Locker Room Layout Showing Common Mistakes with Narrow Aisles, Door Clashes and Benches Blocking Access UK
April 30, 2026
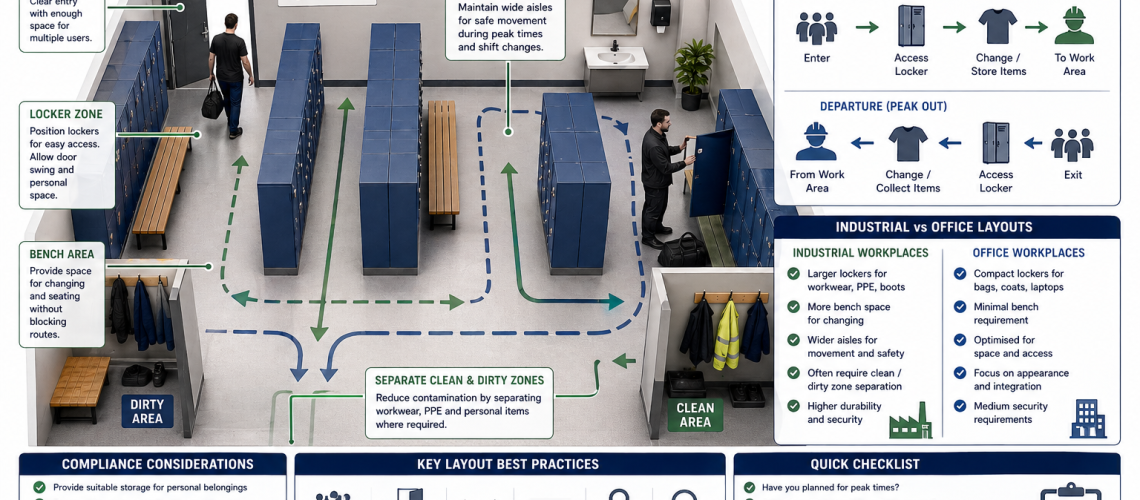
A poor locker room layout can make a space feel cramped, unsafe and difficult to use, even when the room has enough lockers. The most common problems are narrow aisles, locker doors clashing, benches blocking access, poor circulation routes and layouts that only work when the room is empty.
This guide explains the most common locker room layout mistakes in UK workplaces, schools, gyms, leisure centres and changing rooms. It shows why they happen, how they affect daily use, and how to correct them before installation.
For wider planning support, read our locker room layout planning guide. For aisle planning, see the locker aisle width guide. For door opening space, use our locker door clearance guide.
Not sure which wider storage system you need? Start with our types of storage systems guide.
Why locker room layouts go wrong
Locker room layouts usually go wrong because the design focuses on locker quantity instead of usable space. A drawing may show lockers fitting neatly along a wall, but real users need space to stand, open doors, bend, sit, turn, move past others and carry belongings.
That means a locker room is not just a storage area. It is a movement space. Every locker creates activity in front of it. Every bench creates a seated-use zone. All doorways create a pause point. Every aisle becomes a shared route.
The layout must work when the room is busy, not just when it is empty. This is especially important in staff changing rooms, school locker areas, gyms and factories where many users may arrive at the same time.
The three most common locker layout mistakes
Most poor locker room layouts can be traced back to three avoidable mistakes:
- Narrow aisles that do not allow users to pass comfortably
- Door clashes caused by lockers placed too close together or opposite each other
- Benches blocking access because seating has been placed in the main movement route
These mistakes often appear together. A narrow aisle becomes worse when doors open into it. A bench becomes a bigger obstruction when users need to pass behind seated people. Opposing lockers become harder to use when two users open doors at the same time.
Mistake 1: aisles are too narrow
Narrow aisles are one of the biggest causes of poor locker room performance. A narrow aisle may look acceptable on a plan, but it can quickly fail once users start opening doors, standing in front of lockers or carrying bags.
The problem is not just walking width. Locker aisles also need to support stopping, turning, reaching and passing. A user standing in front of a locker temporarily reduces the aisle width. An open door reduces it further. If a bench, bag or shoe is also in the route, movement becomes restricted.
Signs an aisle is too narrow
- Users have to turn sideways to pass each other
- Open locker doors block the route
- People wait at the end of the aisle until others finish
- Bags and footwear regularly end up in the walkway
- Users avoid certain lockers because access is awkward
- Congestion appears during shift change, school breaks or gym peaks
Practical aisle width guidance
Every project should be checked against the actual room, users and building constraints. However, as an early planning guide:
| Locker aisle situation | Practical planning guide | Use case |
|---|---|---|
| Light-use single-sided lockers | 900 mm minimum | Occasional staff storage or low-traffic areas |
| General locker access | 1200 mm preferred | Workplaces, schools and staff rooms |
| Busy locker or changing area | 1500 mm+ | Gyms, leisure centres, factories and shift changes |
| Opposing locker runs | 1500 mm to 1800 mm+ | Two-sided access with doors opening into the aisle |
| Accessible turning or manoeuvring zone | 1500 mm turning circle where needed | Accessible locker areas and inclusive layouts |
The key point is that aisle space must remain usable when lockers are open and people are present. A route that only works when everything is closed is not a practical route.
Mistake 2: locker doors clash
Locker doors need clear opening space. When lockers are placed too close to walls, benches, corners or opposing locker runs, doors can clash with objects or other users.
This can make lockers awkward to use and can damage doors, hinges, handles and nearby finishes over time. It also creates frustration because users cannot access their belongings properly.
Where door clashes usually happen
- Opposing locker runs in a narrow aisle
- Lockers placed too close to room corners
- Lockers installed beside inward-opening doors
- Locker doors opening into bench seating zones
- Low-tier lockers where users need to bend or crouch
- High-use areas where many doors open at the same time
Door clearance is not only about whether the door can physically open. It is also about whether the user can stand in a safe, comfortable position while opening it.
How to prevent locker door clashes
- Allow clear access space in front of locker doors
- Avoid tight opposing locker runs unless the central aisle is wide enough
- Keep locker banks away from entrance door swings
- Avoid placing benches directly in the door opening zone
- Check end lockers near corners, walls and partitions
- Use shallower lockers where room depth is limited
If door swing is ignored, the layout may technically fit but still fail in daily use.
Mistake 3: benches block locker access
Benches are useful in changing rooms, but they are also a common cause of blocked movement. A bench is not just a narrow object on a plan. Once people sit on it, place bags beside it or remove footwear, it becomes a wider active-use zone.
When benches are placed too close to lockers, users may struggle to open doors, stand in front of compartments or move past seated people. This is especially common in small changing rooms and compact staff areas.
Bench placement problems
- Bench directly in front of locker doors
- Bench positioned in the only circulation route
- Bench too close to opposing locker runs
- Bench placed immediately inside the entrance
- Bench length too large for the room
- No allowance for bags, shoes or seated users
Better bench planning
Good bench planning separates seated changing space from main movement routes. In a small room, this may mean using a shorter bench, a wall-fixed bench, a slim bench or a layout where the bench is positioned away from the busiest locker doors.
- Keep benches away from main aisles where possible
- Allow users to sit without blocking locker doors
- Use shorter bench sections instead of one long obstruction
- Leave enough space for users to pass behind seated people
- Plan for bags and shoes as well as the bench itself
A well-placed bench improves the room. A poorly placed bench becomes the main obstruction.
Mistake 4: designing around the empty room
Many locker room mistakes happen because the layout is assessed while empty. Empty rooms are misleading. Lockers are closed, benches are clear and no one is moving through the space.
Real use is different. People arrive together, open doors, stand in front of lockers, talk, change, place items on benches and move between zones. A layout that looks clean when empty can become congested within minutes.
To avoid this mistake, test the layout against the busiest normal use period.
- How many people arrive at once?
- Where do they stop first?
- How many locker doors may be open at the same time?
- Where do bags and shoes go?
- Can people pass if someone is seated?
- Can users leave without crossing incoming users?
Mistake 5: placing lockers too close to entrances
Entrances are natural congestion points. People pause as they enter, look for their locker, wait for others or move from one zone to another. Placing high-use lockers immediately beside an entrance can create a bottleneck.
This is a common problem in school corridors, workplace changing rooms and gym locker rooms. The doorway becomes blocked by users accessing lockers, while others try to enter or leave.
Better entrance planning keeps the first section of the room clear, avoids locker door swing near the doorway and gives users space to move inside before stopping.
Mistake 6: dead-end aisles
Dead-end aisles can work in very low-use areas, but they cause problems in busy locker rooms. Users enter the aisle, access lockers, then turn back through the same route against incoming users.
Dead ends are especially awkward for wheelchair users, users carrying bags, and groups arriving together. If the aisle is narrow, the problem becomes worse.
Where possible, use through-routes or loop layouts. If a dead-end aisle cannot be avoided, keep it wider, limit the number of high-use lockers within it and provide turning space where needed.
Mistake 7: ignoring accessibility
Accessibility should be considered from the start, not added after the locker layout is fixed. An accessible locker is not truly accessible if the aisle is too narrow, the route is blocked, the lock is too high or the user cannot turn safely.
Accessible locker planning should consider clear routes, turning space, locker reach height, bench obstruction and door swing. A practical allowance of 1500 mm turning space may be needed where wheelchair users need to turn or reposition.
For detailed guidance, see our accessible locker spacing guide.
Mistake 8: using the wrong locker depth
Locker depth affects both storage capacity and room usability. Deeper lockers provide more internal space, but they also reduce the aisle width. In a tight room, this can turn a workable layout into a cramped one.
Before choosing deeper lockers, check whether the room can still provide the required clear space in front. If not, a shallower locker may create a better overall layout.
| Locker depth | Benefit | Layout risk |
|---|---|---|
| 300 mm | Saves floor space | Limited storage depth |
| 380 mm | Good compact option | May not suit bulky items |
| 450 mm | Common practical depth | Needs proper aisle allowance |
| 500 mm+ | Better for bulky storage | Can reduce movement space in small rooms |
Mistake 9: choosing the wrong locker configuration
Locker configuration should match the items being stored and the space available. A single-tier locker gives generous storage, but fewer compartments. Multi-tier lockers increase capacity, but each compartment is smaller. Z lockers can save space while still allowing hanging storage.
The wrong configuration can make a room inefficient. For example, using single-tier lockers for small personal items may waste space. Using very small compartments for bulky PPE may frustrate users.
| Need | Better locker choice | Reason |
|---|---|---|
| Coats and uniforms | Single-tier or Z lockers | Hanging space matters |
| Bags and personal items | Two-tier or three-tier lockers | Good balance of size and capacity |
| Phones and wallets | Cube lockers | Maximum small-item density |
| PPE or workwear | Larger ventilated lockers | More space and airflow may be needed |
| School storage | Two-tier or three-tier lockers | Useful capacity without overlarge compartments |
Mistake 10: poor zoning
Good locker rooms separate storage, changing and circulation where possible. Poor zoning forces all activities into the same strip of floor. This creates conflict between people opening lockers, sitting on benches and walking through the space.
In a better layout, users can move through the room without crossing directly through every changing or locker access zone. Benches are placed where they support changing, not where they block the main route.
How to check a locker room layout before installation
Before installing lockers, test the layout with a simple practical review. This helps catch problems that are easy to miss on drawings.
- Mark locker depth on the floor
- Mark bench positions and seated-use zones
- Check door swing for room doors and locker doors
- Walk the main route through the room
- Check whether two people can pass during use
- Test the busiest likely period, not the quietest
- Check accessible routes and turning space
- Allow for bags, shoes and loose items
Quick correction guide
| Problem | Likely cause | Better solution |
|---|---|---|
| Users cannot pass | Aisle too narrow | Increase aisle width or reduce locker depth |
| Doors hit other doors | Opposing lockers too close | Widen aisle or change layout |
| Bench blocks lockers | Bench in access zone | Move bench away from locker doors |
| Entrance becomes crowded | Lockers too close to doorway | Keep entrance zone clear |
| Users reverse out of aisles | Dead-end layout | Create through-route or turning area |
| Accessible lockers hard to use | Poor route or reach position | Reposition accessible lockers on a clear route |
Checklist: avoid these locker room layout mistakes
- Do locker doors open fully without hitting benches, walls or other doors?
- Is the aisle wide enough when users are standing at lockers?
- Can two users pass during normal use?
- Are benches kept out of the main circulation route?
- Is the entrance clear of high-use locker activity?
- Are dead-end aisles avoided or properly managed?
- Does the locker depth suit the room size?
- Does the locker configuration match the stored items?
- Is accessibility built into the layout from the start?
- Has the layout been tested against peak-time use?
Explore storage systems by use case
- Workplace storage systems UK
- Industrial storage systems UK
- School storage systems UK
- Care home storage systems UK
- Storage access control guide UK
- Storage system planning checklist UK
FAQ: Locker Room Layout Mistakes UK Guide
What are the most common locker room layout mistakes?
The most common issues are aisles that are too narrow, locker doors clashing, benches blocking access, lockers placed too close to entrances and layouts that ignore peak usage.
Why are narrow aisles a major problem in locker rooms?
Aisles are not just for walking. Users also stop, open doors and handle belongings. A narrow aisle quickly becomes blocked, especially during busy periods.
How wide should locker room aisles be?
As an early planning guide, allow around 900 mm for low-use areas, 1200 mm for most practical layouts, 1500 mm or more for busy areas, and 1500 mm to 1800 mm or more for opposing locker runs.
What causes locker doors to clash?
Door clashes happen when lockers face each other in a narrow aisle, doors open near walls or entrances, benches sit in front of lockers, or there is not enough clearance for doors to open fully.
How do you prevent locker door clashes?
Allow enough space in front of lockers, avoid tight opposing layouts, keep doors clear of entrances and position benches outside door swing areas.
Why do benches block locker room flow?
Benches create seated-use zones. When placed in the wrong location, they reduce aisle width and prevent users from accessing lockers or moving through the space.
Where should benches be placed in a locker room?
Benches should be away from main walkways, clear of locker doors, positioned in designated changing zones and sized to suit the room.
What is a dead-end locker layout?
A dead-end layout is where users enter an aisle and must turn back to exit. This can cause congestion, especially in busy locker rooms.
Should lockers be placed near entrances?
No. Entrances are natural congestion points. Placing lockers nearby can block access and create crowding during peak use.
What is the key principle for good locker layout design?
Design for movement first and storage second. If users can move freely, access lockers easily and avoid congestion, the layout will work better in daily use.
Summary: design for movement first
The most common locker room layout mistakes are narrow aisles, door clashes and benches blocking access. These problems usually happen when the design tries to fit too many lockers into the room without protecting clear movement space.
A better layout starts with how people use the room. Users need to enter, stop, open lockers, sit, change, turn, pass others and leave without obstruction. Once those movement needs are protected, lockers and benches can be positioned around them.
The best locker room layouts are not simply the ones with the highest locker count. They are the ones that remain safe, comfortable and practical during real daily use.
Discover more from Blog Total Locker Service
Subscribe to get the latest posts sent to your email.