Locker Aisle Width Guide UK: Planning Safe, Practical Locker Room Spacing (2026)
April 29, 2026
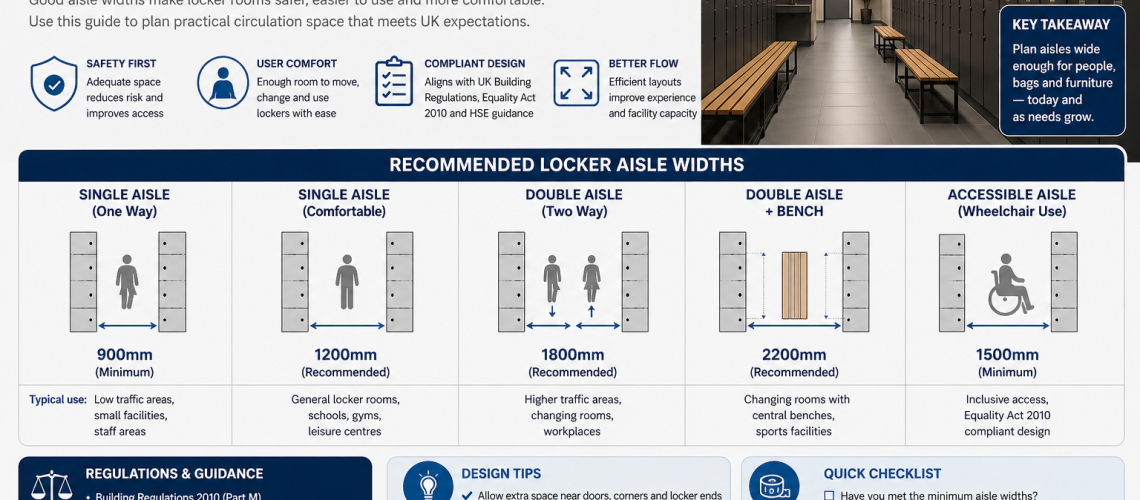
Locker aisle width is the clear usable space between locker runs, benches, walls and other fixed features. Correct spacing gives users room to open locker doors, stand at compartments, handle belongings and move through the area without unnecessary congestion.
When calculating how much space lockers need, the locker cabinet is only one part of the measurement. A practical layout also needs to allow for door swing, people standing at lockers, other users passing behind them, benches, bags, PPE, changing activity and peak-time demand.
This guide brings locker aisle width, row spacing and locker-room working clearances together in one place. It covers single locker rows, opposing locker banks, back-to-back central runs, island layouts, benches, entrances, accessibility and worked space calculations.
Important: the dimensions in this guide are practical early-stage planning starting points, not universal statutory minimums. Final layouts should be checked against the actual building, locker products, user numbers, accessibility requirements, fire and escape arrangements and other project-specific requirements.
For the complete project process, start with our Locker Planning UK guide. For the wider arrangement of lockers, benches and circulation routes, see the Locker Room Design UK guide.
Quick Answer: How Wide Should a Locker Aisle Be?
There is no single aisle width suitable for every locker room. The required space depends on locker depth, door width, whether lockers face each other, bench position, stored items, user numbers, accessibility and how busy the room becomes.
| Locker layout | Indicative early planning starting point | Main consideration |
|---|---|---|
| Single locker run, lower use | Around 900 mm clear space in front | Basic standing and locker access |
| Single locker run, regular use | Around 1200 mm clear space | More comfortable access and passing |
| Busy locker or changing area | Around 1500 mm or more | Several simultaneous users and movement |
| Opposing locker runs | Around 1800 mm or more central working aisle | Doors and users may occupy both sides |
| Lockers with central bench | Often around 2200 mm or more overall working zone | Bench, seated users, doors and circulation |
| Back-to-back central locker bank | Calculate each outer aisle separately | Both faces of the central bank need usable access |
These figures should not be copied into a project without checking the actual locker and room. A lightly used office storage area and a factory changing room during shift change can require very different working space.
Simple Locker Space Calculation
For a single locker run against a wall, an early calculation is:
Total room depth required = locker depth + clear working space
For example, a 450 mm deep locker with 1200 mm of clear working space requires approximately:
450 mm + 1200 mm = 1650 mm total depth
This gives approximately 1.65 m from the wall behind the locker to the next fixed obstruction.
Common Locker Depths and Total Working Space
| Locker depth | + 900 mm access | + 1200 mm access | + 1500 mm access |
|---|---|---|---|
| 300 mm | 1200 mm total | 1500 mm total | 1800 mm total |
| 380 mm | 1280 mm total | 1580 mm total | 1880 mm total |
| 450 mm | 1350 mm total | 1650 mm total | 1950 mm total |
| 500 mm | 1400 mm total | 1700 mm total | 2000 mm total |
Do not choose a shallow locker simply because it reduces the room projection. The locker must still be suitable for the bags, coats, uniforms, PPE, footwear or equipment being stored.
For detailed depth selection, see What Depth Locker Do I Need?
The Five Locker Spacing Zones
A locker room becomes easier to plan when the floor area is divided into separate working zones rather than treated as one empty aisle.
| Spacing zone | What happens there | Main risk |
|---|---|---|
| Locker-front zone | User stands, opens the door and reaches inside | Insufficient working room |
| Circulation zone | Other users move through the room | Stationary users block movement |
| Door-opening zone | Locker doors open into the working area | Doors conflict with walls, benches or people |
| Bench zone | Users sit, stand and change | Bench activity consumes aisle space |
| Entrance and corner zone | Users enter, leave, turn and change direction | Localised bottlenecks |
A room may have a generous overall floor area and still work badly because one local zone is too restricted.
What Is Locker Aisle Width?
Locker aisle width is the usable clear route between locker runs or between lockers and another fixed feature such as a wall, partition, bench or opposite locker bank.
The important measurement is the space remaining during real use, not simply the distance between two closed cabinet faces.
- Open locker doors reduce usable space.
- Users standing at lockers occupy part of the aisle.
- Bags, uniforms, sports kit and PPE create additional working space.
- Lower compartments may require users to bend or crouch.
- Benches occupy more space when people are sitting on them.
- Opposing locker banks may be used at the same time.
- Entrances and corners concentrate movement.
Main Locker Row Layouts
The way locker rows are arranged changes both capacity and the amount of circulation space needed. Four arrangements appear regularly in schools, workplaces, gyms and commercial changing rooms.
| Layout | Typical use | Main benefit | Main planning risk |
|---|---|---|---|
| Single row | Narrow rooms, offices and smaller staff areas | Simple access from one side | Remaining walkway may become too narrow |
| Opposing rows | Changing rooms, schools and workplaces | High wall-based capacity | Both sides compete for the same aisle |
| Back-to-back central bank | Larger changing rooms and high-capacity spaces | Uses central floor area efficiently | Both outer aisles must remain usable |
| Island layout | Large open rooms | Access around several sides | Can create multiple undersized circulation routes |
Single Row Locker Layouts
A single locker run against one wall is normally the simplest arrangement because active locker use occurs on only one side of the aisle.
Single rows can work particularly well in narrower rooms, offices, staff storage areas and other locations where capacity demand is moderate.
- Measure locker depth from the wall.
- Add the door-opening zone.
- Allow standing room for the user.
- Check whether people need to pass behind the user.
- Allow for bags and clothing.
- Check nearby entrances, doors and corners.
- Include benches if they face the locker run.
A wall may be long enough for a locker bank while the room itself is still too narrow for that locker bank to be used comfortably.
Opposing Locker Rows
Opposing rows place lockers on both sides of the same central aisle. This arrangement can provide strong capacity, but both sides may be active simultaneously.
The basic early planning calculation is:
Total room width = locker depth + central working aisle + locker depth
For example, two runs of 450 mm deep lockers with approximately 1800 mm between the cabinet faces require:
450 mm + 1800 mm + 450 mm = 2700 mm total room width
The central space may need to increase where user numbers, bulky belongings, benches or accessibility requirements create additional demand.
Opposing Row Layout Checks
- Measure the complete room width.
- Deduct the depth of both locker banks.
- Check locker doors opening from both sides.
- Allow users to stand on both sides simultaneously.
- Check whether another person still needs to pass.
- Include any bags or PPE being handled.
- Add occupied bench space if seating is introduced.
- Check the room during its busiest realistic period.
Opposing rows should never be assessed from closed locker dimensions alone. Two users directly opposite each other can consume a large proportion of the same aisle.
Back-to-Back Locker Runs
A back-to-back locker arrangement places two locker banks against each other in the centre of a room with their backs touching. One locker face points towards one side of the room and the second faces the opposite direction.
This creates a central storage bank rather than relying entirely on wall-mounted rows. It can be useful in larger changing rooms, workplaces, schools and leisure facilities where wall space is limited but there is enough overall floor width.
The central bank itself does not require a circulation aisle between the two locker backs. Instead, each outward-facing locker run requires its own working aisle.
Back-to-Back Locker Bank Calculation
If both locker runs are 450 mm deep, the physical depth of the central locker bank is approximately:
450 mm + 450 mm = 900 mm central locker bank
If an early layout then provides approximately 1200 mm of clear working space on each side, the overall width across the central arrangement becomes:
1200 mm aisle + 450 mm locker + 450 mm locker + 1200 mm aisle = 3300 mm
This is approximately 3.3 m across the two access aisles and the back-to-back bank. It does not include additional wall-mounted lockers, benches or other features outside that calculation.
If both sides are busy, contain benches or form important circulation routes, 1200 mm on each side may not be enough. Treat the calculation as a way of understanding the geometry rather than a final design requirement.
Back-to-Back Locker Layout Checks
- Confirm the depth of both locker banks.
- Check whether the lockers can be securely linked back-to-back.
- Provide suitable access on both outward-facing sides.
- Check door swing independently on each side.
- Do not assume both aisles can share the same circulation allowance.
- Check bench positions on both sides.
- Allow for cleaning around the ends of the central bank.
- Check visibility and supervision where relevant.
- Keep run ends away from important doorways and turning points.
- Consider how users move around the ends of the central bank.
Back-to-Back Banks and End Circulation
The ends of a central locker bank are easy to overlook. Users moving from one side of the room to the other may naturally travel around these ends, creating localised turning and crossing points.
A central bank that appears to have generous side aisles can therefore still create congestion where the run finishes.
- Do not terminate the locker bank too close to a doorway.
- Allow people to turn around the run end.
- Check whether bags or open doors extend into the end route.
- Avoid placing bench ends directly opposite tight turns.
- Protect accessible routes from unnecessary conflicts.
Island Locker Layouts
An island layout places a locker bank or group of locker banks away from the perimeter walls, allowing circulation around more than one side.
This can produce good capacity in large open rooms, but every side that contains usable locker doors needs appropriate working space.
The danger is creating several narrow aisles simply to fit a central island. One well-sized central bank with practical circulation can work better than a larger island that leaves poor access around every side.
Central Aisle Optimisation
Central aisle optimisation means balancing storage capacity with practical movement. The aim is not to achieve the highest possible number of locker doors. It is to provide useful storage without making the room difficult to operate.
A central aisle may need to handle several actions simultaneously:
- one person opening a locker;
- another user standing at an opposite locker;
- someone changing footwear;
- people carrying bags or PPE;
- other users travelling through the room;
- locker doors projecting into the aisle.
The available width should be assessed under those conditions rather than with an empty room and closed locker doors.
Locker Aisle Width and Door Clearance Are Different
Aisle width relates to movement through the locker area. Door clearance relates to the space required for an individual locker door to open and for the compartment to be used.
A room may have an apparently generous cabinet-to-cabinet measurement but still perform badly when several locker doors open into the same route.
Check this separately using the Locker Door Clearance Guide UK.
How Locker Door Width Changes Aisle Space
Two lockers with the same cabinet width and depth can behave differently if their door configurations are different.
A wide single-tier locker door may project further into the aisle than the smaller door of a multi-tier locker.
- Check actual door width.
- Check hinge position.
- Check opening direction.
- Check nearby walls and corners.
- Check opposing locker doors.
- Check nearby building doors.
- Check benches and other furniture.
Lockers Facing Benches
A bench occupies more working space than the physical seat depth. Once occupied, users’ legs, bags, footwear, clothing and standing movements extend into the surrounding area.
| Bench arrangement | Main spacing issue |
|---|---|
| Bench directly in front of lockers | Can restrict door opening and standing access |
| Island bench between locker rows | Needs working room on both sides plus circulation |
| Bench against opposite wall | Occupied seating reduces usable aisle width |
| Bench beside an entrance | Can create an immediate bottleneck |
| Bench near central locker-bank end | Can restrict turning and cross-room movement |
Do not deduct only the bench frame depth from the room and classify all remaining floor area as a clear walkway.
For complete changing-room planning, see the Locker Room Design UK guide.
Entrances, Corners and Locker Run Ends
Many locker spacing problems occur at transition points rather than in the middle of a straight aisle.
- the first lockers beside an entrance;
- locker run ends;
- the ends of back-to-back central banks;
- tight changes of direction;
- inside corners;
- bench ends;
- building doors opening towards lockers;
- points where several routes meet.
A generous main aisle does not compensate for a badly restricted entrance or turning point. Review the narrowest working section of the complete user route.
Plan Locker Space for Peak Use
Locker areas should be assessed during their busiest realistic operating period rather than when only one or two users are present.
| Environment | Typical peak period | Main spacing pressure |
|---|---|---|
| School | Between lessons | Groups gathering around locker banks |
| Factory or warehouse | Shift changes | Simultaneous users carrying PPE and workwear |
| Gym | Morning, lunchtime and evening | Locker and bench congestion |
| Leisure centre | Classes and pool sessions | High turnover and wet/dry movement |
| Office | Arrival and departure periods | Concentrated access to shared storage |
For detailed peak-use analysis, see our Locker Room Traffic Flow and Congestion Planning Guide.
Stored Items Affect Locker Working Space
The belongings being handled can materially change how much floor area is occupied around the locker.
- School bags may be placed temporarily on the floor.
- Workwear can require users to change clothing beside the locker.
- PPE may be bulky and take longer to handle.
- Sports bags can occupy considerable floor space.
- Boots and footwear may be placed beside benches.
- Lower-tier compartments may require crouching.
- Large coats or uniforms require more movement than small personal items.
Space planning should therefore reflect both the number of users and what those users will actually store.
Accessible Locker Spacing
Accessible locker provision should be part of the initial room design rather than added after every other locker and bench has been positioned.
Approach routes, manoeuvring space, reach, door operation, lock position and nearby seating may all need to be considered together.
Do not assume that one generic aisle width automatically satisfies every accessibility requirement.
Use our Accessible Locker Planning UK guide for the detailed accessibility stage.
Cleaning and Maintenance Space
Very tight locker arrangements can create problems long after installation because access is still needed for cleaning, inspection and repairs.
- Can floors be cleaned around locker runs?
- Can the ends of central banks be reached?
- Can benches be cleaned underneath and around?
- Can locker doors and hinges be repaired?
- Can locks be replaced?
- Can nearby building services remain accessible?
- Can debris be removed from corners and run ends?
A layout that uses every available millimetre can become unnecessarily difficult to maintain.
Worked Example: Small Office Locker Area
A small office is considering 450 mm deep lockers. Users access them throughout the day rather than simultaneously.
An early planning range might be:
450 mm locker + 900 to 1200 mm working space = approximately 1350 to 1650 mm total depth
The final position still needs to account for door width, nearby furniture, user numbers and the building circulation route.
Worked Example: Workplace Shift Change
A factory uses 450 mm deep staff lockers and many workers access them during the same shift-change period.
An early calculation might use:
450 mm locker + 1500 mm working space = approximately 1950 mm total depth
Additional room may be useful where workers handle boots, uniforms, bags or bulky PPE.
Worked Example: Opposing Locker Banks
Two runs of 450 mm deep lockers face each other across a central changing-room aisle.
Using approximately 1800 mm as an initial central working-space allowance gives:
450 mm + 1800 mm + 450 mm = approximately 2700 mm total room width
If a bench is introduced into the same central zone, this calculation must be reconsidered because the bench and seated users consume part of the working space.
Worked Example: Back-to-Back Central Locker Bank
A larger room is being considered for two 450 mm deep locker runs placed back-to-back in the centre.
The central bank itself measures approximately:
450 mm + 450 mm = 900 mm
If approximately 1200 mm of working space is initially allowed on both outward-facing sides:
1200 mm + 450 mm + 450 mm + 1200 mm = approximately 3300 mm
This gives approximately 3.3 m for the two working aisles and the central locker bank.
If wall-mounted lockers are then added opposite either side, those additional locker depths and the effects of simultaneous use must be included separately.
Worked Example: Wall Lockers Plus Central Back-to-Back Bank
Consider a room with 450 mm wall lockers on the left, a 1800 mm aisle, a 900 mm back-to-back central bank, another 1800 mm aisle and 450 mm wall lockers on the right.
An early room-width calculation becomes:
450 + 1800 + 900 + 1800 + 450 = 5400 mm
That is approximately 5.4 m overall. This type of arrangement can provide substantial locker capacity, but the two aisles must still work independently when wall lockers and the central bank are being used at the same time.
How to Reduce Locker Space Requirements
Where room space is restricted, review the locker specification and layout before automatically reducing circulation space.
- Use shallower lockers where the stored items permit.
- Use multi-tier lockers where smaller compartments are appropriate.
- Split locker banks across more than one wall.
- Use a central back-to-back bank where the room width supports it.
- Keep benches away from the tightest locker access areas.
- Consider Z lockers where hanging garment storage is needed.
- Move the busiest locker runs away from entrances.
- Remove unnecessary furniture.
- Review whether all lockers need permanent individual assignment.
- Use several smaller locker zones rather than one overloaded bank where appropriate.
Do not reduce the aisle until the room becomes difficult to use simply to maximise the headline number of locker doors.
Minimum Space Is Not Necessarily Good Space
The minimum amount of floor space that allows a locker door to physically open is not necessarily enough for a practical locker installation.
A layout that only works with one person present, every locker door closed and no bags on the floor is unlikely to represent normal daily operation.
Where space permits, additional working room can improve access, reduce door conflicts, support accessibility and make cleaning and maintenance easier.
How to Plan Locker Row Spacing
- Measure the complete room. Record length, width and usable wall runs.
- Mark fixed features. Include doors, windows, columns, radiators, pipework and services.
- Choose the locker depth. Base it on what users actually need to store.
- Select the row arrangement. Compare single, opposing, back-to-back and island layouts.
- Draw the locker footprint. Use actual product dimensions.
- Add locker door swing. Do not plan only from closed cabinet faces.
- Add user working space. Allow people to stand, reach, bend and handle belongings.
- Protect the circulation route. Check whether people need to pass behind active locker users.
- Add benches. Include seated users, legroom and changing activity.
- Check central-bank ends. Make sure users can turn around back-to-back runs.
- Review entrances and corners. Find the narrowest point in the route.
- Check accessibility. Include approach and manoeuvring requirements from the start.
- Check cleaning and maintenance access.
- Test the layout at peak occupancy.
- Only then finalise locker quantity.
Common Locker Spacing Mistakes
- Measuring only the locker cabinet.
- Planning with every locker door closed.
- Forgetting standing users.
- Using a building corridor as locker working space without checking its required function.
- Ignoring door swing.
- Putting benches too close to lockers.
- Ignoring seated users around benches.
- Using opposing locker rows with insufficient central space.
- Adding a back-to-back central bank without checking both outer aisles.
- Ignoring circulation around the ends of a central locker bank.
- Creating an island layout with narrow routes on every side.
- Placing high-use lockers immediately beside entrances.
- Ignoring corners and run ends.
- Planning for quiet periods instead of peak demand.
- Choosing deeper lockers without checking room projection.
- Ignoring bags, sports kit, uniforms, footwear and PPE.
- Maximising locker quantity at the expense of usability.
Locker Aisle and Row Spacing Checklist
- What depth are the lockers?
- How wide are the locker doors?
- Can all required doors open fully?
- Can a user stand comfortably in front?
- Can another user pass where required?
- Are lockers arranged as single, opposing, back-to-back or island rows?
- Can opposing locker rows operate simultaneously?
- Does each face of a back-to-back bank have adequate access?
- Can users move around the ends of central banks?
- Are benches included?
- Has occupied bench space been considered?
- Are entrances and doorways clear?
- Are corners and turning points usable?
- Is the narrowest part of the route still practical?
- Are users handling bulky belongings?
- Have accessibility requirements been checked?
- Can floors and locker banks be cleaned and maintained?
- Does the arrangement still work at peak use?
Related Locker Planning Guides
- Locker Planning UK: Layout, Space, Compliance and Installation
- Locker Room Design UK
- What Depth Locker Do I Need?
- Locker Door Clearance Guide UK
- Locker Room Traffic Flow and Congestion Planning UK
- Accessible Locker Planning UK
- Commercial Lockers
Locker Aisle Width and Row Spacing FAQs
How wide should a locker aisle be?
There is no single aisle width suitable for every locker installation. The required clearance depends on locker depth, door swing, user numbers, opposing rows, benches, stored belongings and the level of circulation. Around 900 mm may provide basic access in some low-use single-row situations, while regularly used and busy areas often require more.
Is 900 mm enough space in front of lockers?
Around 900 mm can provide a basic early planning allowance in some lightly used single-row situations. It may not be suitable where people need to pass behind locker users, several lockers are accessed simultaneously, bulky belongings are handled or accessibility requirements demand additional space.
How much space do opposing locker rows need?
Opposing rows need sufficient central working space for doors and users on both sides as well as any required passing movement. Around 1800 mm can be a useful early planning starting point in some situations, but the final dimension should reflect actual doors, user numbers, belongings, benches and accessibility requirements.
What is a back-to-back locker layout?
A back-to-back layout places two locker banks with their backs against each other, normally in the centre of the room. The locker doors face outwards in opposite directions, creating a central storage bank with a separate access aisle on each side.
How much room does a back-to-back locker bank need?
Add the depth of both locker banks and then add the required working space on each outward-facing side. For example, two 450 mm deep lockers create a 900 mm central bank. With an initial 1200 mm working allowance on each side, the overall width would be approximately 3300 mm. This is a planning calculation rather than a universal minimum.
Are back-to-back lockers space efficient?
They can be very space efficient in larger rooms because they use central floor area as well as perimeter walls. Their success depends on providing adequate working aisles on both sides and enough room around the ends of the locker bank.
What is an island locker layout?
An island layout positions lockers away from the perimeter walls so users can move around more than one side. It can provide strong capacity in large rooms, but every active locker face and circulation route needs adequate working space.
Is locker aisle width the same as locker door clearance?
No. Locker aisle width is the usable movement and working route through the locker area. Door clearance is the space required for a locker door to open and for a user to access the compartment. Both should be checked separately.
How do benches affect locker aisle width?
A bench consumes more space than its physical frame because seated users, legs, bags, footwear and changing activity extend into the surrounding area. Include the occupied bench zone as well as locker doors and the required circulation route.
Should locker spacing be checked with the doors open?
Yes. A layout that only works when all locker doors are closed does not represent normal operation. Check the space with doors open, people standing at lockers and belongings being handled.
Do busy locker rooms need wider aisles?
Often they do. Schools, factories, gyms and leisure facilities may have many users accessing lockers at the same time. Peak occupancy, bags, clothing, PPE and changing activity should be considered rather than designing only for average use.
Should locker spacing include cleaning and maintenance access?
Yes. The completed layout should allow reasonable access for floor cleaning, locker inspection and routine maintenance around locker banks, benches, central-bank ends, corners and other fixed features.
Plan Locker Rows Around Real Use
The amount of space a locker needs is not simply its cabinet depth. A practical installation includes the locker body, door movement, user working space, circulation and any benches or other equipment sharing the same area.
Single rows are usually simplest. Opposing rows increase capacity but place activity on both sides of one aisle. Back-to-back central banks can make excellent use of larger rooms, provided both outer aisles and the ends of the central run remain practical.
Use indicative dimensions only as an early planning check. Then test the complete layout with open doors, realistic user numbers, bags or equipment and peak-time movement before finalising the locker quantity.
Once the room requirements are established, browse our commercial locker range or contact Total Locker Service on 01284 749211 or sales@totallocker.co.uk.
Discover more from Blog Total Locker Service
Subscribe to get the latest posts sent to your email.