Locker Room Layout Planning Guide UK: Zoning, Measurements and Bottleneck-Free Design
April 29, 2026
Locker room layout planning turns measurements into a practical working space. A good layout balances lockers, benches, circulation routes, door clearance and user movement so the room works safely during normal daily use.
This guide explains how to plan a full locker room layout, divide the room into zones, avoid bottlenecks and connect locker depth, aisle width, bench spacing and door clearance into one design.
Use this page as the secondary hub for locker room planning. For the wider spacing overview, start with the locker room spacing guide. For detailed measurements, read the locker aisle width guide, locker depth and projection guide, locker door clearance guide and locker row spacing guide.
What locker room layout planning means
Locker room layout planning is the process of deciding where lockers, benches, walkways, entrances, exits and support areas should sit inside a room. It is not just about fitting lockers against available walls.
A good layout must work when people are using the space. Doors open, users stand, bags are placed on benches, people pass each other and some areas become busier than others.
The best locker room designs start with user movement, then add storage capacity around that movement.
Locker room layout planning priorities
| Planning priority | What it controls | Why it matters |
|---|---|---|
| Locker position | Storage access and wall use | Determines how people enter and use the room |
| Aisle width | Movement and passing space | Prevents crowding and blocked routes |
| Locker depth | Projection into the room | Affects usable floor space |
| Door clearance | Open-door access | Stops doors clashing with benches, walls and users |
| Bench spacing | Seated and standing use | Supports changing without blocking circulation |
| Zoning | Room organisation | Separates storage, movement and changing activity |
Start with the room measurements
Measure the room before choosing the layout. Wall length alone is not enough. The full room width, door positions, window positions, radiators, columns, pipework and fixed services all affect the final design.
Record every obstruction before placing lockers. A layout that looks strong on a clear rectangle may fail once doors, benches and existing fixtures are included.
- Measure the room length, width and ceiling height.
- Mark all doors and door swings.
- Mark windows, radiators, columns and pipework.
- Identify entrances, exits and washroom routes.
- Measure available wall runs.
- Decide where people will naturally enter, stop, change and leave.
- Check whether benches, changing cubicles or washroom access are required.
Turning measurements into full layouts
Once measurements are recorded, the next step is to turn them into a working layout. This means testing where lockers can sit without damaging circulation.
Start by placing the main movement route. Then add locker banks, benches and secondary routes around it. This prevents the room from becoming storage-heavy but difficult to use.
A practical locker room layout should show three things clearly: where users store items, where they sit or change, and how they move through the space.
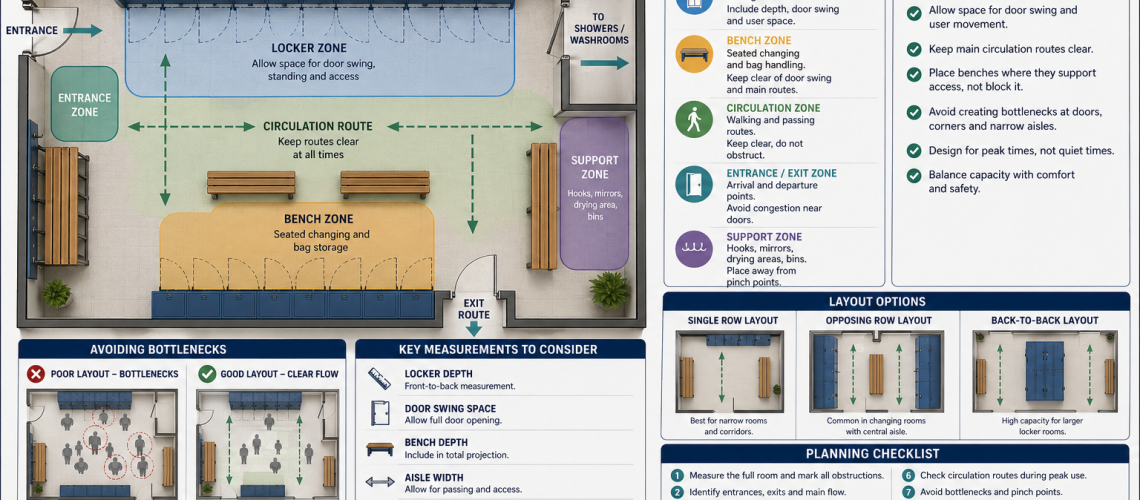
Main locker room zones
Locker rooms work best when each part of the space has a clear purpose. This is called zoning.
| Zone | Purpose | Planning note |
|---|---|---|
| Locker zone | Secure storage and access | Allow depth, door swing and user standing space |
| Bench zone | Sitting, changing and bag handling | Keep clear of door swing and main routes |
| Circulation zone | Walking, passing and queue movement | Do not use as spare storage space |
| Entrance zone | Arrival and first movement point | Avoid immediate congestion near doors |
| Exit route | Safe movement out of the room | Keep clear at all times |
| Support zone | Mirrors, hooks, drying areas or waste bins | Place away from narrow pinch points |
Locker zone planning
The locker zone is where the storage units sit. This may be one wall, two opposing walls or a back-to-back central run.
Plan the locker zone by checking the full working projection, not only the closed locker depth. Include doors, handles, locks, users and any bench space nearby.
Where many people use the room at the same time, split locker banks into shorter runs. Long uninterrupted rows can create crowding if everyone gathers in one narrow strip.
Bench zone planning
The bench zone supports seated use, changing and temporary bag placement. It should help the room work, not block access to lockers.
Benches should be placed where users can sit, stand and reach lockers without forcing others into the main circulation route.
- Use wall benches in narrow rooms.
- Use central benches only where the aisle is wide enough.
- Keep benches clear of door swing where possible.
- Leave space for users to stand up and turn.
- Avoid placing benches immediately inside the entrance.
For detailed bench clearances, read the bench spacing and clearance guide.
Circulation route planning
Circulation routes are the walking paths through the locker room. They connect the entrance, lockers, benches, washrooms and exit points.
These routes should stay clear even when lockers are open and people are changing. A route that only works when the room is empty is not a usable circulation route.
Good circulation planning reduces queues, awkward turning, door clashes and blocked access during peak times.
Single row locker room layouts
A single row layout places lockers against one wall. It is useful in narrow rooms, small staff spaces, corridors and compact changing areas.
This layout keeps the room simple. Users access lockers from one side and the remaining space can be protected as the main movement route.
Single row layouts work best when the room does not need maximum locker density. They are often more practical where safe access is more important than high capacity.
Opposing row layouts
Opposing row layouts place lockers on both sides of a central aisle. They increase capacity and are common in changing rooms, schools, leisure centres and workplaces.
The central aisle must be planned carefully. It needs to support people using lockers on both sides at the same time.
If benches are added between opposing rows, include bench depth before confirming the locker positions.
Back-to-back locker layouts
Back-to-back locker layouts place two locker runs together in the centre of the room. Each side faces outwards, with access aisles on both sides.
This can be an efficient choice for larger locker rooms because it increases capacity without using every wall. It can also help divide the room into zones.
Both access aisles must be checked. A back-to-back run fails if one side works well but the other side becomes too narrow.
Avoiding bottlenecks in locker rooms
A bottleneck is a point where movement slows or stops because too many actions happen in the same place. Locker rooms often develop bottlenecks near entrances, narrow aisles, bench ends, washroom doors and popular locker banks.
To avoid bottlenecks, separate stopping areas from walking routes. Do not place high-use lockers, benches and doorways in one tight zone.
- Keep entrances clear.
- Avoid placing benches directly inside doorways.
- Split long locker runs into usable zones.
- Do not narrow the route near washroom entrances.
- Allow space for users to stand at open lockers.
- Keep the busiest lockers away from pinch points.
Peak-time layout planning
Locker rooms should be planned for busy use, not empty-room appearance. A layout that works for one person may fail during a shift change, school changeover, gym session or sports team arrival.
Think about how many people may use the room at once. Then check whether they can open lockers, sit, stand and pass without blocking each other.
For busy rooms, wider circulation routes and better zoning may be more valuable than adding extra compartments.
Locker room layout by environment
| Environment | Layout priority | Common issue to avoid |
|---|---|---|
| Workplace changing rooms | Shift-change flow and PPE storage | Narrow aisles during busy periods |
| School locker rooms | Fast access and clear circulation | Crowding between lessons |
| Leisure centres | Wet/dry separation and bench access | Benches blocking locker doors |
| Gyms | High turnover and easy navigation | Congestion near entrances |
| Industrial sites | Uniform, PPE and boot storage | Insufficient depth or changing space |
| Offices | Compact storage and tidy access | Overfilling small rooms |
Clearance planning
Clearance planning checks whether each part of the room has enough space to work properly. It should include locker doors, benches, walking routes, entrance doors and user movement.
Locker clearance is especially important where doors open into aisles. If open doors block the route, the layout needs more width, fewer lockers or a different arrangement.
Clearance should also be checked at corners, row ends and around entrance doors because these areas often become pinch points.
Capacity versus usability
A higher locker count is not always a better layout. More compartments can reduce comfort if the room becomes difficult to move through.
Good layout planning balances capacity with usability. The room should provide enough lockers, but users must still be able to access them safely and comfortably.
If the room feels too tight, consider shallower lockers, fewer compartments, staggered locker zones or a different row arrangement.
Common locker room layout mistakes
- Planning from wall length only.
- Ignoring door swing and locker projection.
- Adding benches after the locker positions are fixed.
- Creating a narrow central aisle between opposing rows.
- Placing high-use lockers beside entrances or corners.
- Using deep lockers where shallow lockers would protect circulation.
- Blocking washroom routes, exits or access to services.
- Maximising locker numbers without testing peak-time use.
Step-by-step locker room layout planning process
- Measure the full room and mark all fixed obstructions.
- Identify entrances, exits, washroom routes and main user flow.
- Divide the room into locker, bench and circulation zones.
- Choose suitable locker depth for the items being stored.
- Place locker rows without blocking the main route.
- Add door clearance and user standing space.
- Add benches and check seated access.
- Test the layout during peak use.
- Remove bottlenecks by widening routes or changing row positions.
- Confirm that the final layout balances storage, access and movement.
Locker room layout checklist
- Does the room have a clear entrance and exit route?
- Can users open lockers without blocking the main walkway?
- Are benches positioned away from tight door swings?
- Is there enough space for people to pass at busy times?
- Are high-use areas kept away from bottlenecks?
- Does the layout allow cleaning and maintenance access?
- Are lockers deep enough for the intended items?
- Has the layout been checked as a working room, not an empty plan?
Best practice for locker room layout planning
Plan the room around movement first. Then add locker capacity. This creates a safer and more practical layout than filling walls and trying to make the remaining space work afterwards.
Keep the main circulation route clear, separate benches from bottlenecks and choose locker depths that suit the room. Where space is tight, a smaller or shallower locker arrangement may perform better.
The strongest locker room layouts are easy to understand, easy to move through and easy to use during the busiest part of the day.
Explore storage systems by use case
- Workplace storage systems UK
- Industrial storage systems UK
- School storage systems UK
- Care home storage systems UK
- Storage access control guide UK
- Storage system planning checklist UK
FAQ Section
What is locker room layout planning?
Locker room layout planning is the process of organising lockers, benches and circulation routes so the space works safely and efficiently during real use, not just on paper.
How do you plan a locker room layout?
Start by measuring the room and marking doors, fixtures and routes. Then define circulation paths, position lockers, add benches and check that users can move, open doors and pass comfortably.
What are the main zones in a locker room?
Most locker rooms include:
- Locker zone (storage)
- Bench zone (changing and seating)
- Circulation zone (movement and access)
- Entrance and exit zones
- Support areas such as mirrors, hooks or drying spaces
Why is zoning important in locker room design?
Zoning separates different activities so they do not interfere with each other. This helps prevent congestion, improves flow and makes the space easier to use.
What causes bottlenecks in locker rooms?
Bottlenecks usually occur where too many activities happen in one place, such as near entrances, narrow aisles, bench ends or busy locker areas.
How can bottlenecks be avoided?
Keep main routes clear, avoid placing benches near entrances, allow space for open locker doors and spread high-use lockers across the room instead of clustering them.
How much space should be left for circulation?
Circulation space should allow people to walk, pass and turn comfortably even when lockers are in use. It must work during busy periods, not just when the room is empty.
Should locker rooms be designed for peak use?
Yes. Locker rooms should always be planned for peak times such as shift changes, class changes or busy gym periods to avoid congestion and access issues.
What is the most common locker room layout mistake?
The most common mistake is focusing on locker capacity instead of usability, which leads to cramped layouts, blocked walkways and poor user experience.
How do locker depth and aisle width affect layout?
Deeper lockers reduce available floor space, which can narrow aisles. Both should be planned together to maintain safe movement and access.
Summary
Locker room layout planning brings measurements, zoning and circulation together. It turns locker depth, aisle width, bench spacing and door clearance into a complete room design.
Good layouts separate locker access, bench use and walking routes. They avoid bottlenecks, protect movement space and support daily use without crowding.
For the next planning step, compare this guide with the locker room spacing guide, locker row spacing guide, locker aisle width guide and bench spacing and clearance guide.
Discover more from Blog Total Locker Service
Subscribe to get the latest posts sent to your email.