Locker Row Spacing and Back-to-Back Layouts UK: Single Row, Double Row and Central Aisle Planning
April 29, 2026
Locker row spacing is the planned space between locker runs, walls, benches and walkways. Good row spacing allows users to open doors, stand, pass, sit and move safely without creating congestion.
This guide explains how single row, double row and back-to-back locker layouts work. It also shows how locker depth, aisle width, door swing and bench placement combine in real locker room designs.
Use this page with the locker aisle width guide, locker depth and projection guide and locker door clearance guide.
What locker row spacing means
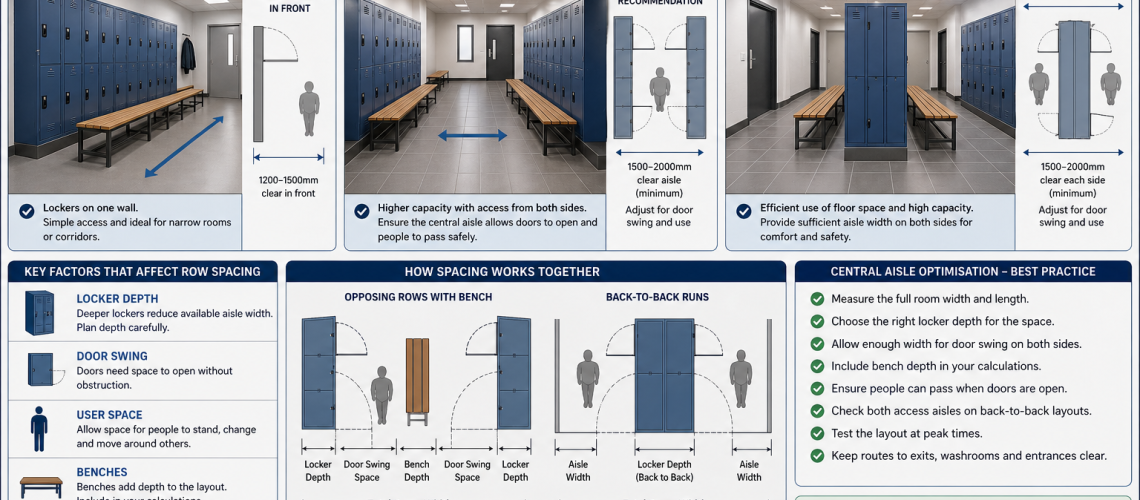
Locker row spacing is the usable distance between one locker run and another feature in the room. That feature may be a wall, bench, opposite locker bank, door, washroom entrance or circulation route.
The measurement should include real use, not just closed locker dimensions. A practical layout must allow for open locker doors, people standing at lockers, people walking past and any seating placed between rows.
Main locker row layouts
| Layout type | Best suited to | Main benefit | Planning concern |
|---|---|---|---|
| Single row | Narrow rooms, corridors, offices and small staff areas | Simple to install and easy to access | Limited capacity per wall |
| Opposing rows | Changing rooms, schools and workplaces with wider rooms | Higher capacity from both sides of an aisle | Needs enough central aisle space |
| Back-to-back rows | Large changing rooms and high-capacity layouts | Uses floor space efficiently | Requires planning for access on both sides |
| Island layout | Large rooms with circulation around all sides | Strong capacity and flexible movement | Can fail if aisles are too tight |
Single row locker layouts
A single row layout places lockers against one wall. It is the safest starting point for narrow rooms, staff areas, school corridors and compact changing spaces.
This layout keeps the room easier to read. Users approach from one side, doors open into one access zone and the remaining floor area can be used for circulation.
Single row layouts work well when capacity demand is moderate. They are also useful where lockers need to sit beside desks, washrooms, entrances or workplace routes.
Single row spacing checks
- Check the locker depth from the wall.
- Add door swing space in front of the lockers.
- Allow standing space for users.
- Keep the main route clear when doors are open.
- Include bench depth if seating is fitted opposite or in front.
A single row can still cause problems if the remaining walkway is too narrow. The wall may accept the locker run, but the room may not work once people start using it.
Opposing locker rows
Opposing rows place lockers on both sides of a central aisle. This is common in changing rooms, schools, leisure facilities and workplaces because it increases capacity without needing a very long wall.
The central aisle is the key measurement. It must support door opening, user access and passing movement from both sides.
If the aisle is too tight, two people using opposite lockers can block each other. Open doors can also reduce movement space and create a poor user experience at busy times.
Opposing row layout checks
- Measure the room width from wall to wall.
- Deduct the depth of both locker banks.
- Deduct any bench depth placed between the rows.
- Check door swing from both sides.
- Confirm that users can pass when doors are open.
Opposing rows should never be planned from closed locker sizes alone. The layout must be tested as a working aisle.
Back-to-back locker runs
Back-to-back locker runs place two locker banks against each other, usually in the centre of the room. Each side faces outwards, creating access aisles on both sides.
This layout is useful when wall space is limited but floor space is available. It can create strong capacity in larger changing rooms, staff facilities and leisure environments.
Back-to-back layouts need careful aisle planning. Both sides of the central run must have enough space for users, doors, benches and circulation.
Benefits of back-to-back locker layouts
- Increases capacity without relying only on wall space.
- Creates clear zones in larger rooms.
- Can separate user groups, teams or departments.
- Works well with benches placed in parallel rows.
- Improves storage density when the room width allows it.
Risks with back-to-back locker layouts
- Aisles can become narrow on both sides.
- Benches may reduce access space too far.
- Doors may block passing routes during peak use.
- The room can feel crowded if capacity is pushed too high.
- Cleaning and maintenance access may be harder if spacing is poor.
Central aisle optimisation
Central aisle optimisation means balancing storage capacity with safe movement. The aim is not simply to fit the highest number of lockers. The aim is to create a layout that works when people are using it.
A central aisle must handle several actions at the same time. One person may be opening a locker. Another may be sitting on a bench. Others may need to walk through the space.
Good central aisle planning gives enough width for these actions without forcing users into awkward movement or contact.
Aisle planning by layout
| Layout | Aisle priority | Best practice |
|---|---|---|
| Single row | Clear route in front of lockers | Keep enough space for open doors and passing users |
| Opposing rows | Shared central aisle | Allow for use from both sides at the same time |
| Back-to-back rows | Two access aisles | Check both sides, not just the main entrance side |
| Rows with benches | Seated and standing space | Include bench depth before finalising locker positions |
How locker depth and aisle width work together
Locker depth and aisle width should be planned together. A deeper locker gives more storage, but it also takes more floor space. This can reduce the aisle and make the room harder to use.
For example, two deep locker rows facing each other may look suitable on a plan. In daily use, open doors and people standing at each locker may make the central aisle feel too tight.
Where the room is narrow, a shallower locker can be a better choice. It may reduce storage depth slightly, but it can improve movement, comfort and access.
Bench positioning between rows
Benches must be included early in the layout. Adding benches after locker positions have been chosen often creates spacing problems.
In opposing row layouts, benches can sit between the locker banks, against walls or in separate changing zones. The best position depends on room width, locker depth and expected use.
- Central benches can work well in wide changing rooms.
- Wall benches may suit narrow rooms with one locker run.
- Island benches need circulation around both sides.
- Benches should not prevent locker doors from opening.
For more detail, read the bench spacing and clearance guide.
When to use single row layouts
Single row layouts are best when the room is narrow, access must stay simple or the locker area forms part of another working space.
- Small staff rooms
- Office storage areas
- School corridors and cloakrooms
- Compact changing rooms
- Rooms with doors or fixtures on the opposite wall
This layout is often the most practical option when movement space matters more than maximum capacity.
When to use opposing rows
Opposing rows work well when the room has enough width for a central aisle. They are suitable when several users need access during the same period.
- Workplace changing rooms
- Leisure centre changing areas
- School locker rooms
- Sports facilities
- Industrial staff welfare areas
This layout gives more capacity than a single row, but only if the central aisle remains comfortable.
When to use back-to-back layouts
Back-to-back layouts suit larger rooms where wall space alone is not enough. They can help divide a room into zones and increase locker numbers without making every wall crowded.
This arrangement is useful for high-capacity changing rooms, staff facilities and sports environments. It also works where different groups need separate locker faces within the same space.
Back-to-back runs should only be used where both access aisles can remain practical. If one side becomes narrow, the layout will fail in daily use.
Locker row spacing mistakes to avoid
- Planning from closed locker dimensions only.
- Forgetting that open doors reduce aisle width.
- Putting benches into an already tight central aisle.
- Using deep lockers on both sides of a narrow room.
- Creating back-to-back runs without enough access on both sides.
- Blocking routes to doors, washrooms or emergency exits.
- Maximising locker quantity at the expense of usability.
Locker row layout planning checklist
- Measure the full room width and length.
- Mark doors, windows, radiators, columns and pipework.
- Choose the proposed locker depth.
- Decide whether the layout is single row, opposing row or back-to-back.
- Add door swing space.
- Add bench depth where seating is included.
- Check central aisle width during real use.
- Test whether users can pass while lockers are open.
- Keep routes to entrances, exits and washrooms clear.
- Reduce locker depth or capacity if the room becomes too tight.
Best practice for locker row spacing
Start with the user journey. Think about how people enter the room, reach their locker, open the door, sit down, change, collect belongings and leave.
Next, test the busiest period. A layout that works for one person may not work for a shift change, class changeover or sports team arrival.
Finally, choose locker depth and row arrangement together. A good layout balances capacity, comfort, access and safe movement.
FAQ Section
What is locker row spacing?
Locker row spacing is the usable distance between locker runs, walls, benches and walkways. It must allow for door opening, user access and safe movement.
What is the difference between single row and double row locker layouts?
A single row layout places lockers against one wall. A double row (opposing layout) places lockers on both sides of a central aisle, increasing capacity but requiring more space.
What is a back-to-back locker layout?
A back-to-back layout places two locker banks joined together in the centre of a room, with access aisles on both sides. Each side faces outward for user access.
Are back-to-back locker layouts efficient?
Yes, they are efficient for larger rooms because they increase storage capacity without relying only on wall space. However, both access aisles must be wide enough to remain usable.
How much space is needed between opposing locker rows?
The central aisle must allow for open doors, users standing at lockers and people passing through. The exact space depends on locker depth, door width and whether benches are included.
Do locker doors affect row spacing?
Yes. Open doors reduce the usable aisle width and can block movement if spacing is too tight. Door swing should always be included in layout planning.
How do benches affect locker row layouts?
Benches increase the space required between rows. They must be included early in the design to avoid reducing aisle width or blocking access to lockers.
When should you use a single row locker layout?
Single row layouts are best for narrow rooms, corridors and smaller spaces where maintaining clear movement is more important than maximising storage capacity.
When should you use opposing locker rows?
Opposing rows are suitable for wider rooms where multiple users need access at the same time, such as changing rooms, schools and workplaces.
What is the biggest mistake in locker row spacing?
The most common mistake is planning from closed locker dimensions only, without allowing for door opening, user movement and bench placement.
Summary
Locker row spacing connects aisle width, locker depth and door clearance into one practical layout decision. Single rows work well in narrow spaces. Opposing rows increase capacity but need a strong central aisle. Back-to-back layouts suit larger rooms where both sides can be accessed comfortably.
The best locker layout is not always the one with the most compartments. It is the layout that users can access safely, comfortably and efficiently during normal daily use.
For related planning guidance, read the locker aisle width guide, locker depth and projection guide and locker door clearance guide.
Discover more from Blog Total Locker Service
Subscribe to get the latest posts sent to your email.