Locker Specification Planning UK: What to Include Before Procurement
May 11, 2026
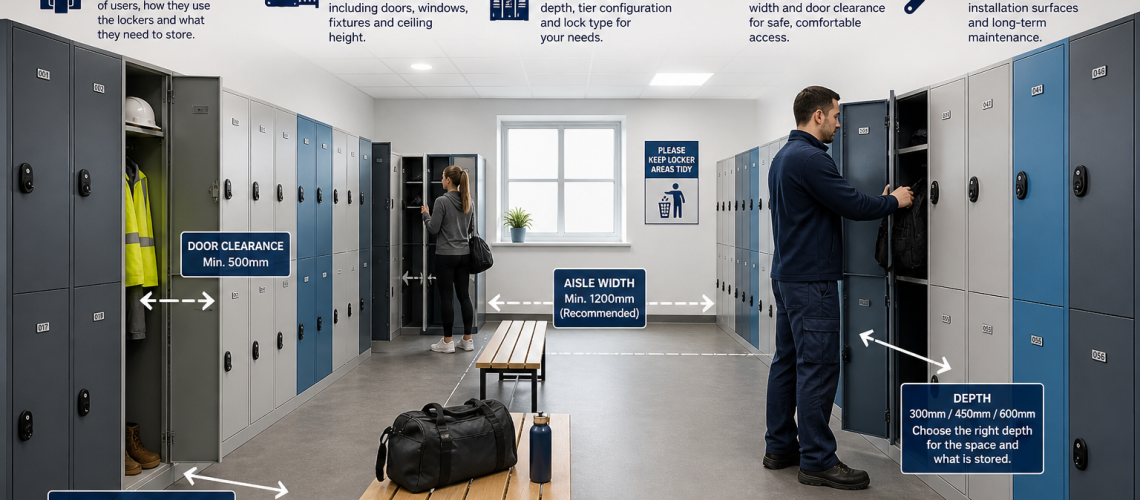
Locker specification planning is the process of turning a storage requirement into a clear technical brief that a supplier, contractor or procurement team can price and deliver consistently.
A good locker specification defines exactly what is required before products are ordered. It should state the user group, stored items, required compartment configuration, usable dimensions, material, finish, base and top treatment, ventilation, locking system, numbering, accessibility requirements, installation constraints, maintenance expectations and handover information.
A completed locker specification can be used to request suitable product options and quotations from Total Locker Service.
This guide focuses specifically on what should be written into a locker specification. It owns the procurement brief, not the detailed room-layout method, capacity calculation, access-governance process or installation logistics.
For room dimensions, circulation, benches, aisle spacing and physical layout, use our Locker Planning UK guide. For calculating the number of compartments required, use How Many Lockers Do You Need?. For access-technology selection, use Locker Access Control Systems UK. For delivery routes, fixing and site preparation, use Locker Installation Planning UK.
What This Page Owns, and What It Hands Off
| Question | Owner |
|---|---|
| What requirements should suppliers price and provide? | This guide |
| How should lockers, aisles, benches and user space fit the room? | Locker Planning UK |
| How many usable compartments are required? | Locker Capacity Planning |
| Which access technology should be selected? | Locker Access Control Systems UK |
| Who may reset, override or administer privileged access? | Locker Access Permissions & Governance UK |
| How are lockers assigned, shared or reallocated? | Locker Management Systems UK |
| How are detailed accessibility requirements planned? | Locker Accessibility and DDA Planning UK |
| How are delivery, fixing and site logistics planned? | Locker Installation Planning UK |
| How are faults, parts and routine servicing handled after handover? | Locker Parts & Servicing Guide |
What Is a Locker Specification?
A locker specification is a written description of the locker system that a project requires. It converts a general statement such as “we need staff lockers” into measurable requirements that can be checked against supplier quotations and final products.
A specification might define:
- who will use the lockers;
- what users need to store;
- the required number of usable compartments;
- locker height, width and depth;
- usable compartment dimensions;
- number of tiers or doors per column;
- material and construction;
- door and carcase finish;
- stands, plinths or sloping tops;
- ventilation requirements;
- lock type and operating mode;
- numbering and identification;
- accessible locker provision;
- maintenance and replacement requirements;
- installation conditions;
- handover items such as keys, codes or spare parts.
The aim is not to make the specification unnecessarily complicated. The aim is to remove ambiguity before the order is placed.
Quick Answer: What Should a Locker Specification Include?
| Specification area | What to define |
|---|---|
| User requirement | Who will use the lockers and what they need to store |
| Quantity | Number of usable compartments required |
| Dimensions | Overall locker and usable compartment dimensions |
| Configuration | Single-door, two-tier, multi-tier or specialist layout |
| Material | Steel, laminate, plastic or other suitable construction |
| Finish | Carcase colour, door colour and finish |
| Base and top | Floor standing, stand, plinth, seat stand, flat or sloping top |
| Ventilation | Standard vents, perforation or enhanced airflow requirement |
| Locking | Key, hasp, combination, coin, RFID, electronic or smart access |
| Identification | Numbers, labels, engraved tags or asset references |
| Accessibility | Required accessible positions and operating requirements |
| Maintenance | Replaceable parts, lock access and long-term service requirements |
| Installation | Relevant site constraints that affect the product or fixing method |
| Handover | Keys, credentials, codes, records and spare parts |
1. Define the User Requirement
The first part of a locker specification should describe the user group and storage requirement. This establishes the basis for every later product decision.
A school pupil, office employee, warehouse operative, hospital worker and leisure-centre member may all require lockers, but the physical contents and operating conditions are different.
The specification should state:
- the user group;
- the items normally stored;
- whether the storage is assigned or shared;
- whether clothing hangs or folds;
- whether bags, footwear or PPE must fit inside;
- whether wet or damp items are expected;
- whether larger personal items need separate storage.
Do not begin with a locker model and try to make the user requirement fit it. Define the storage requirement first, then select the product.
2. Specify the Required Quantity
The specification should state the number of usable locker compartments required. The detailed calculation should already have been completed before procurement.
The number may be based on permanently assigned users, shared use, shifts, temporary users or a combination of these. The specification itself should record the agreed quantity and any required spare provision.
For example:
Provide 120 usable staff compartments, including 10 spare compartments for future allocation.
The detailed question of simultaneous users, shift overlap, hybrid attendance and spare capacity belongs in How Many Lockers Do You Need? Capacity Planning Guide.
3. Locker Dimensions and Usable Compartment Size
Locker dimensions should be specified in terms of both the overall cabinet and the usable compartment. External dimensions alone do not confirm whether the intended belongings will fit.
The specification should define, where relevant:
- overall height;
- overall width;
- overall depth;
- number of tiers;
- usable compartment height;
- usable compartment width;
- usable compartment depth;
- clear opening dimensions where critical.
For example, a 450 mm deep workplace locker may suit coats and bags, while a compact personal-effects locker may only need to accommodate phones, wallets and keys.
Use the Locker Sizes UK guide for detailed size selection. If front-to-back projection is the main question, use the Locker Depth Guide UK.
4. Specify the Locker Configuration
The specification should state the required door or compartment configuration rather than simply asking for “lockers”.
Typical configurations include:
- single-door full-height lockers;
- two-tier lockers;
- three-tier lockers;
- four-tier lockers;
- six-tier or high-density personal storage;
- clean and dirty lockers;
- PPE lockers;
- garment lockers;
- mesh lockers;
- heated lockers;
- charging lockers;
- specialist small-compartment lockers.
The selected configuration should reflect the stored items and operating requirement, not simply the maximum number of doors that can fit into the available wall width.
5. Specify the Locker Material
Material should be chosen according to the environment, expected wear, cleaning method and appearance requirement.
| Material | Typical application | Specification issue |
|---|---|---|
| Steel | Schools, offices, warehouses and general workplaces | Good general-purpose option for dry environments |
| Laminate | Education, leisure and higher-finish changing areas | Specify door and substrate type where relevant |
| Plastic | Wet, humid or corrosive environments | Useful where moisture resistance is important |
| Heavy-duty construction | Industrial and high-wear locations | Useful where impact and rough use are expected |
| Wire mesh | Warehouses, PPE and ventilated storage | Provides visibility and high airflow |
Do not describe an environment merely as “indoor”. A dry office, swimming-pool changing area and industrial washdown zone are all indoor environments but may require very different products.
See Locker Materials Explained for detailed material selection.
6. Specify Colours and Finishes
Colour and finish should be written into the specification rather than left as an informal decision after the product has been selected.
State, where required:
- carcase colour;
- door colour;
- single-colour or mixed-colour doors;
- powder-coated finish;
- laminate finish;
- department or year-group colour coding;
- requirement to match existing lockers;
- contrast requirements for numbering.
This becomes particularly important on phased projects where new banks may need to sit alongside older installations.
For detailed matching and colour guidance, use Locker Colours and Finishes UK.
7. Stands, Plinths and Top Treatment
The base and top arrangement should form part of the specification because it affects installed height, cleaning, appearance and compatibility with the locker range.
Options may include:
- floor-standing lockers;
- open stands;
- stands with adjustable feet;
- closed plinths;
- seat stands;
- flat tops;
- sloping tops.
A specification should state the required arrangement rather than assuming it is included as standard.
Use Locker Stands, Plinths and Sloping Tops for the detailed choice.
8. Ventilation Requirement
Ventilation should be specified according to the items being stored and the environment in which the lockers will operate.
Standard door vents may be sufficient for routine personal storage. Clothing, footwear, PPE or damp workwear may justify greater airflow, perforation or a specialist ventilated system. Where active drying is required, specify that separately rather than assuming passive ventilation will provide it.
The specification should therefore state whether ventilation is simply required as part of the normal product design or whether enhanced airflow is a functional requirement.
For detailed guidance, see Locker Ventilation and Airflow.
9. Specify the Lock and Access Requirement
The locker lock should be written into the specification because it affects user experience, administration, maintenance and long-term cost.
| Lock type | Typical specification use |
|---|---|
| Key lock | Assigned lockers and straightforward permanent use |
| Hasp lock | User-supplied or site-issued padlocks |
| Combination lock | Sites wanting to reduce physical key issue |
| Coin lock | Leisure, public changing and temporary use |
| RFID or card access | Sites using managed credentials |
| Electronic or smart access | Managed shared-use or integrated locker systems |
The specification should record the chosen operating method but does not need to duplicate the complete technology-selection process.
Use the Locker Locking Systems guide for the broader locking-system landscape and Locker Access Control Systems UK for access-technology selection. Authority to use master, reset or override functions belongs in Locker Access Permissions & Governance UK.
10. Locker Numbering and Identification
A locker specification should state how individual compartments will be identified. Leaving numbering until after installation often results in inconsistent labels or duplicate numbering.
The project may require:
- sequential locker numbers;
- department-specific ranges;
- floor or room prefixes;
- engraved labels;
- adhesive number plates;
- asset numbers;
- barcode or QR identification;
- matching key or lock schedules where appropriate.
Define the visible numbering format before manufacture or installation where factory numbering is required. Where the project also uses stable asset IDs, QR codes or long-term physical records, align those requirements with the Locker Asset Register.
11. Accessibility Requirements
The specification should identify any accessible locker requirements rather than assuming every locker position can serve every user equally.
Relevant specification points may include:
- lower or more accessible compartment positions;
- appropriate reach heights;
- lock operating method;
- door force and handle usability;
- clear identification;
- provision for users with mobility or dexterity limitations.
The detailed room-space and approach requirements belong in the accessibility and layout process rather than this specification guide.
Use Locker Accessibility and DDA Planning UK for detailed inclusive-layout guidance.
12. Cleaning and Hygiene Requirements
Cleaning requirements should influence the locker specification, particularly in schools, healthcare, food production, changing facilities and industrial workplaces.
Specify any requirement for:
- easy-clean surfaces;
- closed plinths;
- open stands for floor access;
- sloping tops;
- moisture-resistant construction;
- reduced dirt traps;
- materials compatible with the site’s cleaning regime.
The specification should describe the required outcome. The exact cleaning schedule remains an operational matter.
13. Maintenance and Replacement Parts
A commercial locker installation should remain serviceable after the initial project is complete. This makes maintenance support and replacement parts legitimate specification issues.
Consider stating requirements for:
- replaceable locks;
- replacement keys;
- replacement doors where available;
- hinges and fixing components;
- master or override access where appropriate;
- spare locks or keys supplied at handover;
- availability of replacement parts after installation.
Standardising lock formats and locker ranges across an estate can make future maintenance simpler, particularly where multiple departments or buildings are involved. The specification may require serviceability and parts availability, but post-handover diagnosis and corrective work belong in Locker Parts & Servicing.
14. Future Extension and Standardisation
The specification should consider whether additional locker banks may be added later. This is particularly important for growing workplaces, schools and multi-phase developments.
Useful requirements may include:
- consistent locker width and depth;
- standard door colours;
- common lock types;
- matching numbering systems;
- compatible stands or plinths;
- product ranges with replacement parts support;
- scope for later extension using matching units.
This is a specification issue because later compatibility can depend on decisions made at the original purchase stage.
15. Installation Information to Include in the Specification
The specification should record only installation conditions that materially affect the product supplied, assembly method, fixing or restraint requirement. It should not duplicate delivery-route surveys, unloading arrangements, trade sequencing or the full site-installation process.
Relevant information may include:
- whether lockers are to be freestanding, nested or fixed;
- whether wall fixing is required;
- whether stands or plinths are supplied;
- whether the floor is level or has known constraints;
- whether fixing to walls is permitted;
- whether lockers arrive assembled or require on-site assembly;
- whether special access restrictions affect the cabinet dimensions.
Detailed delivery access, unloading, stairs, lifts, working hours, phased installation and site logistics belong in Locker Installation Planning UK.
16. Handover Requirements
Handover requirements are often omitted from locker specifications even though they can affect whether the facilities team can operate the system effectively from day one.
State what should be provided at completion, such as:
- user keys;
- specified master or technical override keys;
- combination-reset tools;
- PIN or credential information;
- spare locks;
- spare keys;
- locker numbering records;
- lock schedules;
- manufacturer instructions;
- maintenance information;
- warranty documentation where applicable.
Where electronic or managed locker systems are used, the handover may also need administrator credentials, user-management instructions and system documentation. The specification can state what must be handed over; authority to hold or use privileged credentials belongs in Access Permissions & Governance.
Example Locker Specification Schedule
A simple schedule can make quotations easier to compare because every supplier is working from the same requirement.
| Field | Project requirement |
|---|---|
| Location | Building, floor, room or department |
| User group | Staff, pupils, visitors, members or other users |
| Stored items | Clothing, bags, PPE, books, equipment or personal effects |
| Quantity | Required usable compartments plus agreed spare provision |
| Operating model | Assigned, shared, hot, temporary, booked or mixed as already defined by the project |
| Configuration | Single-door, two-tier, multi-tier or specialist |
| Dimensions | Required overall and usable compartment dimensions |
| Material | Required locker construction |
| Finish | Carcase and door colour or finish |
| Base | Floor standing, stand, plinth or seat stand |
| Top | Flat or sloping |
| Ventilation | Standard or enhanced requirement |
| Lock | Lock type and operating mode |
| Numbering | Required numbering or identification format |
| Accessibility | Required accessible positions or operating requirements |
| Maintenance | Required spares and replacement-part provision |
| Installation | Relevant fixing or product constraints |
| Handover | Keys, credentials, instructions and records |
Common Locker Specification Mistakes
- Starting with a product instead of a requirement: define what users need to store first.
- Specifying only external dimensions: usable internal space matters just as much.
- Leaving the number of tiers undefined: different configurations can have very different usability.
- Ignoring the environment: material should reflect moisture, wear and cleaning conditions.
- Leaving colour and finish until later: this can create mismatched installations.
- Not specifying stands, plinths or sloping tops: these are often project-critical components.
- Choosing the lock too late: access technology affects user operation, technical management and long-term administration.
- Failing to specify numbering: inconsistent identification creates avoidable administration.
- Ignoring maintenance requirements: replacement parts and access should be considered before purchase.
- Not planning for future matching: unnecessary variation makes later expansion harder.
- Using the specification to solve room-layout problems: layout should already have been resolved during planning.
Locker Specification vs Locker Planning
These two processes are related but should not be treated as the same task.
| Locker Planning UK | Locker Specification Planning UK |
|---|---|
| How many lockers fit? | What dimensions should be specified? |
| Where should they go? | What product configuration is required? |
| How wide should aisles be? | What material and finish are required? |
| Where should benches go? | What stand, plinth or top treatment is required? |
| Will doors clash? | What lock system should be supplied? |
| How will users move through the room? | What numbering and identification are required? |
| Will the installation physically work? | What should the supplier price and provide? |
Locker Planning UK answers whether the installation will work in the available space. Locker Specification Planning UK defines exactly what product and options should be supplied.
That distinction should remain clear throughout the procurement process.
Related Locker Specification Guides
- Locker Planning UK: Layout, Space and Room Planning
- How Many Lockers Do You Need?
- Locker Sizes UK
- Locker Depth Guide UK
- Locker Materials Explained
- Locker Colours and Finishes UK
- Locker Stands, Plinths and Sloping Tops
- Locker Ventilation and Airflow
- Locker Locking Systems
- Locker Access Control Systems UK
- Locker Access Permissions & Governance UK
- Locker Accessibility and DDA Planning UK
- Locker Installation Planning UK
- Locker Parts & Servicing Guide
Conclusion: Turn the Requirement into a Measurable Specification
Locker specification planning should convert an agreed storage and room-planning requirement into a measurable procurement brief. The specification should define the locker dimensions, configuration, material, finish, base and top treatment, ventilation, access technology, numbering, accessibility requirements, serviceability expectations and relevant installation constraints.
It should not duplicate the full room-planning process. Capacity calculations, aisle widths, door clearances, bench positions and user circulation should be resolved in the relevant planning guides before the final specification is issued.
Once the specification is complete, compare the requirement with our commercial locker ranges and confirm current manufacturer dimensions, colours, lock options and accessories before ordering.
FAQ: Locker Specification Planning UK
What is locker specification planning?
Locker specification planning is the process of defining exactly what locker product, configuration, material, finish, locking method, identification and supporting options should be supplied before procurement.
What should a locker specification include?
A locker specification should include user requirements, quantity, overall and usable dimensions, configuration, material, finish, base and top treatment, ventilation, lock type, numbering, accessibility, maintenance requirements, relevant installation constraints and handover requirements.
What is the difference between locker planning and locker specification?
Locker planning determines whether the installation will work in the available room, including capacity, layout, aisles and circulation. Locker specification defines exactly what locker product and options the supplier should provide.
Should usable compartment size be included in the specification?
Yes. External cabinet dimensions do not confirm whether users can store the intended items, so usable compartment dimensions should be defined where storage capacity is critical.
Should locker locks be specified before ordering?
Yes. Access technology affects user operation, lost-access handling, technical reset or override capability, maintenance and long-term administration, so it should be agreed before ordering.
Should locker numbering be included in the specification?
Yes. Numbering, labelling or asset identification should be defined before manufacture or installation where a consistent identification system is required.
Should installation details be included in a locker specification?
Include installation conditions only where they affect the product or fixing method. Detailed delivery routes, unloading, access and site logistics should be handled separately through installation planning.
Does locker specification planning include the full room layout?
No. Locker specification planning records the agreed requirements that suppliers should price and provide. Detailed room layout, aisle spacing, benches, circulation and door clearances should be resolved through Locker Planning before the final procurement specification is issued.
Discover more from Blog Total Locker Service
Subscribe to get the latest posts sent to your email.