Locker Room Traffic Flow and Congestion Planning UK: Aisle Design, Peak Usage and Layout Strategy (2026 Guide)
April 29, 2026
Locker room traffic flow is the way people move through a locker area during normal and peak use. Good planning reduces bottlenecks, door clashes, queueing, blocked aisles and collision points. It is especially important in schools, workplaces, gyms, factories and leisure changing rooms where many users may arrive, change or leave at the same time.
This guide explains how to plan locker room movement, compare one-way and two-way aisles, model peak usage and avoid the common congestion points that make locker areas difficult to use.
For basic space planning, start with our minimum space for lockers guide. For aisle dimensions, read the locker aisle width guide. For changing room layout, see our locker room layout planning guide.
Why traffic flow matters in locker rooms
A locker room is not a static storage area. It is a movement space. Users enter, stop, open doors, turn, sit, change, collect belongings, talk, queue and leave. If the layout does not account for this movement, even a room with enough lockers can feel cramped.
Good traffic flow helps users move through the space without blocking each other. It also improves safety, comfort, supervision, cleaning access and day-to-day management.
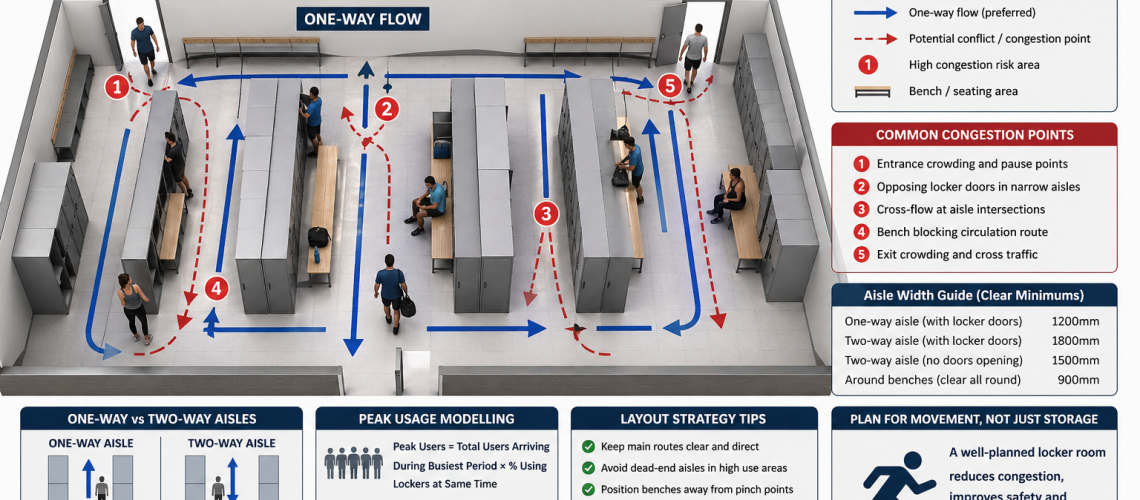
The main locker room traffic zones
Most congestion happens because several activities overlap in the same small area. Breaking the room into zones makes the layout easier to assess.
| Zone | What happens there | Congestion risk |
|---|---|---|
| Entrance zone | Users arrive, pause, look for lockers or wait for others | Queues and blocked doorways |
| Locker access zone | Users open doors, stand, bend and handle belongings | Door clashes and blocked aisles |
| Bench zone | Users sit, change, remove footwear or place bags | Reduced walkway width |
| Circulation zone | Users move through the room | Two-way conflict and pinch points |
| Exit zone | Users leave, gather, wait or rejoin groups | Cross-flow and crowding |
The best layouts keep these zones clear where possible. Problems start when locker access, bench use and main circulation all compete for the same strip of floor.
One-way vs two-way locker aisles
Locker room aisles can work as one-way routes, two-way routes or mixed-use spaces. The right choice depends on room shape, user numbers, peak periods and whether lockers are used for changing or simple storage.
One-way aisles
One-way aisles guide users through the room in a set direction. They can reduce face-to-face movement and are useful where space is tight or peak flow is predictable.
- Useful for schools, gyms and shift-change environments
- Reduces users turning against the main flow
- Works best with separate entry and exit points
- Can fail if users ignore the route or need to backtrack
Two-way aisles
Two-way aisles allow users to move in both directions. They are more flexible but need more space, especially when locker doors open into the aisle.
- Better for lower-density locker rooms
- Allows users to reach lockers by the shortest route
- Needs wider clear space to avoid shoulder clashes
- Can become congested during peak use
| Aisle type | Best suited to | Main risk |
|---|---|---|
| One-way aisle | High-flow areas with clear entry and exit routes | Users may need to walk further |
| Two-way aisle | Flexible rooms with enough width | Passing conflict during busy times |
| Dead-end aisle | Small low-use locker areas only | Backtracking and crowding at the end |
| Loop route | Larger changing rooms and schools | Needs careful zoning and signage |
Peak usage modelling for locker rooms
Locker rooms should be planned around peak use, not average use. A space that works well at quiet times may fail when a class, sports group or staff shift arrives together.
Peak usage modelling means estimating how many people will use the locker area at the same time, how long they will stay, and where they are likely to stop.
Simple peak-use calculation
Use this basic planning method:
Peak users = total users arriving during the busiest period × percentage using lockers at the same time
Example: if 60 staff arrive during a shift change and around 50% use lockers at the same time, plan for 30 active users in the locker area.
60 × 50% = 30 peak active users
Peak-use examples by setting
| Setting | Typical peak pattern | Planning priority |
|---|---|---|
| School locker area | Short bursts between lessons | Avoid corridor blocking and doorway crowding |
| Factory changing room | Shift start and shift end | Design for simultaneous use |
| Gym changing room | Evening and weekend peaks | Balance lockers, benches and wet-area movement |
| Office locker room | Morning arrival and end of day | Keep access simple and uncluttered |
| Leisure centre | Class changeovers and pool sessions | Separate wet and dry movement where possible |
How long users occupy locker space
Congestion is not only about how many lockers are fitted. It is also about how long each person occupies space in front of a locker.
| Activity | Typical space impact | Congestion risk |
|---|---|---|
| Collecting a bag | Short standing pause | Low to medium |
| Changing clothes | Longer stop with bending and turning | High |
| Removing workwear or PPE | Bulky movement and extra handling | High |
| Using a bench | Seated user occupies nearby floor space | High |
| Waiting for others | Static users gather near entrances or lockers | Medium to high |
Where users change clothes, handle workwear or use benches, allow more space than you would for simple bag storage.
Avoiding collision points
Collision points are places where people, locker doors, benches and routes conflict. They are the areas most likely to cause frustration, blocked movement or minor accidents.
Common collision points include:
- Locker doors opening into narrow aisles
- Users standing directly behind seated bench users
- Entrances opening into locker access zones
- Opposing locker doors opening at the same time
- Dead-end aisles where users need to turn around
- Wet users crossing dry changing routes
- Bags, shoes or PPE left in circulation areas
Door swing and traffic flow
Locker doors create temporary obstructions. A door that opens into a busy aisle can reduce the usable width just when another user is trying to pass.
In high-use rooms, avoid placing lockers where door swing conflicts with entrances, corners, benches or main routes. Where possible, leave extra clearance in front of lower-tier lockers because users may need to bend, crouch or place bags on the floor.
For detailed door planning, see our locker door clearance guide.
Bench position and congestion
Benches are one of the biggest causes of congestion in locker rooms. A bench can be useful, but it also creates a seated-use zone that reduces free movement around lockers.
Avoid placing benches where they block the natural route through the room. If benches sit between opposing locker runs, make sure there is enough space for seated users, open locker doors and passing movement.
For more detail, read our bench spacing and clearance guide.
Entrance and exit planning
Entrances and exits often become congestion points because users pause there. They may wait for friends, check belongings, remove coats, look for lockers or queue to enter.
Where possible, avoid placing the busiest lockers immediately beside the entrance. Also avoid layouts where users must turn sharply as soon as they enter.
- Keep doorways clear of locker door swing
- Avoid benches directly inside entrances
- Leave space for users to pause without blocking others
- Use clear routes from entrance to lockers and from lockers to exits
Dead-end aisles and backtracking
Dead-end aisles can work in very small or low-use areas, but they are risky in busy locker rooms. Users have to enter, stop, turn around and move back against incoming traffic.
This can create congestion at the end of the aisle and near the entrance. Where possible, use loop routes or through-routes so users do not need to reverse through the same flow of people.
Wet and dry traffic flow
Wet changing areas need extra care because users may move between showers, pools, lockers, benches and drying areas. Slippery wet floors increase slip risk, and users often carry towels, bags and footwear.
Try to separate wet movement from dry movement where possible. Keep dry storage away from heavy wet traffic, and avoid forcing users to cross the same route repeatedly.
For a dedicated comparison, read our changing room layout guide for wet and dry areas.
How to improve traffic flow in existing locker rooms
If a locker room already feels congested, the solution may not require a full redesign. Small layout changes can often improve movement.
- Move benches away from narrow access points
- Relocate the busiest lockers away from entrances
- Remove unused furniture from circulation routes
- Split locker allocation across different areas
- Use signage to guide one-way movement
- Stagger access times during shift or class changes
- Replace unsuitable lockers with a better configuration
Traffic flow checklist
Use this checklist before finalising a locker room layout.
- Can users enter without blocking the doorway?
- Can locker doors open without obstructing main routes?
- Can two users pass during busy periods?
- Are benches clear of the main circulation route?
- Are wet and dry routes separated where possible?
- Are dead-end aisles avoided in high-use areas?
- Can users leave without crossing incoming traffic?
- Has the layout been tested against peak use?
Explore storage systems by use case
- Workplace storage systems UK
- Industrial storage systems UK
- School storage systems UK
- Care home storage systems UK
- Storage access control guide UK
- Storage system planning checklist UK
Summary: expert locker room planning starts with movement
Good locker room planning is not only about locker size, quantity or aisle width. It is about how people move through the space when the room is actually in use.
One-way aisles can reduce conflict in busy areas. Two-way aisles offer flexibility but need more space. Peak usage modelling helps identify how many users may be active at once, while collision-point checks show where the layout may fail.
The strongest locker room layouts separate stopping zones from movement routes, avoid blocked entrances, give locker doors enough clearance and plan for the busiest moments of the day.
FAQ: Locker Room Traffic Flow and Congestion Planning UK
What is locker room traffic flow?
Locker room traffic flow refers to how people move through a locker area, including entering, accessing lockers, using benches and exiting. Good flow reduces congestion, improves safety and makes the space easier to use during busy periods.
What is the best aisle layout for locker rooms?
There is no single best layout. One-way aisles work well in busy environments with predictable movement, while two-way aisles suit flexible layouts but need more space to avoid congestion.
How wide should locker room aisles be?
As a general guide, allow around 1200 mm for one-way aisles, 1500 mm to 1800 mm for two-way aisles and 1800 mm or more where opposing lockers open into the same aisle.
What causes congestion in locker rooms?
Common causes include locker doors opening into narrow aisles, benches blocking movement routes, entrances placed too close to lockers, too many users arriving at once and dead-end aisles forcing users to turn back.
How do you calculate peak locker room usage?
Use this simple estimate: Peak users = total users during busiest period × percentage using lockers at the same time. For example, 60 staff × 50% = 30 active users.
What are collision points in locker rooms?
Collision points are areas where movement conflicts occur, such as opposing locker doors, users standing behind seated bench users, cross-traffic at aisle intersections and crowded entrances or exits.
Are benches a major cause of congestion?
Yes. Benches create seated-use zones that reduce free movement. If placed poorly, they can block locker access and narrow walkways.
Should locker rooms use one-way systems?
One-way systems can improve flow in high-traffic areas, especially where users arrive in groups. They work best with clear entry and exit points.
How can I improve traffic flow in an existing locker room?
You can often improve flow by moving benches away from narrow areas, clearing obstacles from walkways, spreading lockers across multiple walls, using signage and staggering access times during busy periods.
Why is traffic flow more important than locker quantity?
A locker room can have enough lockers but still fail if people cannot move easily. Good traffic flow ensures users can access lockers, pass each other and leave the space without congestion.
Discover more from Blog Total Locker Service
Subscribe to get the latest posts sent to your email.