Minimum Space for Lockers UK: What You Actually Need
April 29, 2026
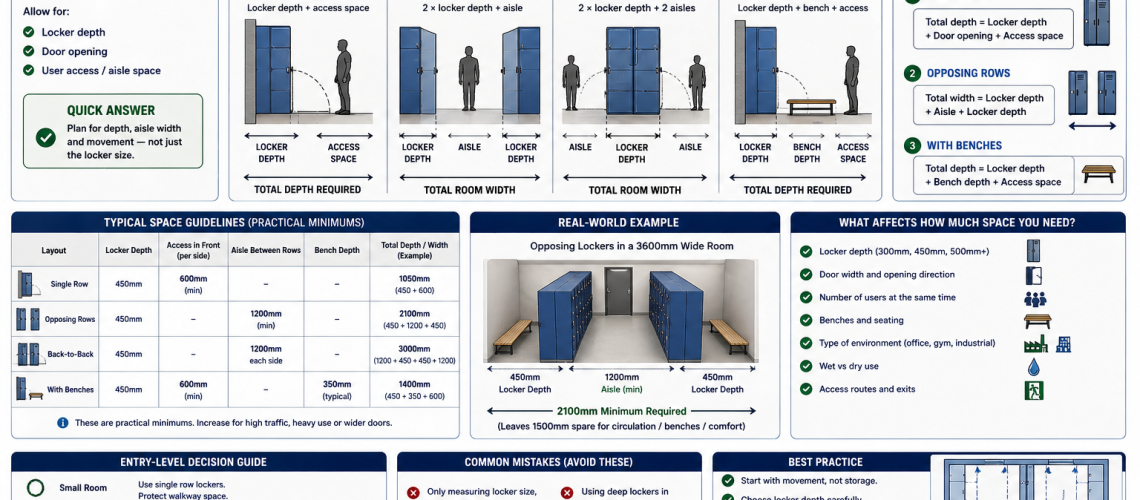
The minimum space for lockers depends on locker depth, door swing, user movement and whether people need to change, queue or pass behind each other. As a simple starting point, allow the locker depth plus at least 900 mm of clear standing space in front. For busier changing rooms, workplaces or school locker areas, plan for 1200 mm to 1500 mm or more in front of the lockers.
This guide gives a quick, practical way to estimate how much space you need for lockers before you choose a layout. It is designed for early planning, not detailed architectural design.
For a wider room-planning overview, see our locker room spacing guide. For aisle planning, read the locker aisle width guide. For door movement, see the locker door clearance guide.
How much space do I need for lockers?
As a quick rule, you need the locker depth, space for the door to open, and enough clear floor area for users to stand, turn and access their belongings safely.
For a basic single-sided locker run, many layouts need around 1200 mm to 1800 mm total depth from the wall behind the lockers to the opposite obstruction. This usually includes the locker depth plus standing and access space.
| Use type | Typical planning allowance in front of lockers | Best for |
|---|---|---|
| Minimum access | 900 mm | Low-use areas, occasional access, small staff areas |
| Comfortable access | 1200 mm | Most workplace and school locker areas |
| Busy changing area | 1500 mm+ | Gyms, pools, factories, shift changes |
| Two-sided locker aisle | 1800 mm+ | Opposing lockers, higher traffic, shared changing rooms |
These figures are planning allowances. Final spacing should consider your building, user numbers, accessibility needs, fire routes and how the lockers are used during peak times.
Quick calculation for locker space
Use this simple formula for early planning:
Total space needed = locker depth + clear access space
For example, if the locker is 450 mm deep and you allow 1200 mm of clear space in front, the total depth needed is:
450 mm + 1200 mm = 1650 mm
That means you need around 1.65 m from the wall behind the locker to the opposite wall, bench, partition or obstruction.
Common locker depths and space needed
Locker depth has a direct effect on room planning. Deeper lockers give more storage, but they also reduce the clear space available in front.
| Locker depth | With 900 mm access | With 1200 mm access | With 1500 mm access |
|---|---|---|---|
| 300 mm | 1200 mm total | 1500 mm total | 1800 mm total |
| 380 mm | 1280 mm total | 1580 mm total | 1880 mm total |
| 450 mm | 1350 mm total | 1650 mm total | 1950 mm total |
| 500 mm | 1400 mm total | 1700 mm total | 2000 mm total |
For most commercial locker areas, the practical answer is often between 1.5 m and 2 m of total room depth for a single-sided locker run.
Minimum space for a single row of lockers
A single row of lockers placed against a wall is usually the easiest layout to plan. It needs less space than opposing lockers and creates a clear access zone in front.
For light use, a 900 mm clear zone may work. However, 1200 mm is usually more comfortable because users can open doors, stand in front of lockers and move past each other more easily.
- Small staff room: locker depth plus 900 mm to 1200 mm
- School corridor locker area: locker depth plus 1200 mm or more
- Changing room: locker depth plus 1500 mm or more
Minimum space for lockers facing each other
Opposing locker runs need more space because users may open doors on both sides at the same time. People also need to pass through the middle while others are using the lockers.
For two locker runs facing each other, use this early planning formula:
Total width = locker depth + aisle space + locker depth
Example with 450 mm deep lockers on both sides and a 1500 mm aisle:
450 mm + 1500 mm + 450 mm = 2400 mm
This gives a total space requirement of around 2.4 m. In busy changing rooms, more may be needed.
Minimum space when benches are included
Benches change the calculation. A bench is not just furniture; it creates a seated-use zone. People need space to sit, stand, bend, open lockers and move around others.
If benches sit in front of lockers, avoid treating the gap as ordinary walkway space. Seated users can block access, especially during peak times.
| Layout | Planning issue | Practical guidance |
|---|---|---|
| Bench directly in front of lockers | Can block doors and access | Allow generous clearance around the bench |
| Island bench between locker runs | Users sit on both sides | Plan for seated space and circulation |
| Bench on opposite wall | Can reduce walkway width | Check door swing and passing space |
For more detail, read our bench spacing and clearance guide.
What affects the minimum space needed?
The right amount of space depends on more than locker size. A small locker area may still need generous clearance if many people use it at the same time.
User numbers
A locker area used by five staff members does not need the same clearance as a changing room used by a full shift, sports class or gym group. Peak-time use matters more than total locker count.
Door swing
Locker doors need room to open without hitting benches, walls, other users or nearby doors. Wider doors and lower-tier lockers often need more practical clearance.
Locker configuration
Single-tier lockers are taller and give larger compartments. Multi-tier lockers fit more users into the same wall length, but they can increase activity in one area.
Wet or dry use
Wet changing rooms often need more generous space because users may carry towels, bags, footwear and wet clothing. Slip risk, drainage and cleaning access also matter.
Circulation routes
Locker access space should not clash with main walkways, entrances, exits, toilets, showers or doorways. A narrow route may work on paper but fail during busy periods.
Entry-level decision guide
Use this quick guide if you are at the early planning stage.
| Question | Practical answer |
|---|---|
| Is the locker area low use? | Start with 900 mm clear space in front |
| Will people use lockers at the same time? | Plan for at least 1200 mm clear space |
| Is it a changing room? | Use 1500 mm or more where possible |
| Are lockers facing each other? | Allow a wider central aisle |
| Are benches included? | Add seated-use clearance, not just walkway space |
| Is the area used during shift change? | Design for peak flow, not quiet periods |
Common mistakes when estimating locker space
- Only measuring the locker footprint
- Forgetting door swing
- Placing benches too close to locker doors
- Using corridor space as locker access space
- Ignoring peak-time congestion
- Choosing deeper lockers without checking room depth
- Placing lockers too close to entrances or corners
The biggest mistake is treating lockers as static storage. In real use, lockers create movement, queues, open doors, standing space and changing activity.
Worked examples
Small office locker area
A small office wants personal storage lockers for staff bags and coats. The lockers are 450 mm deep and used throughout the day rather than all at once.
Suggested space: 450 mm locker depth + 900 mm to 1200 mm clear space = 1350 mm to 1650 mm total depth.
Workplace shift-change lockers
A factory needs lockers for staff arriving and leaving at similar times. Users may carry workwear, bags and PPE.
Suggested space: 450 mm locker depth + 1500 mm clear space = around 1950 mm total depth.
School locker corridor
A school wants lockers near a circulation route. Pupils may gather around lockers between lessons.
Suggested space: avoid relying on the main corridor as access space. Use generous clearance and avoid pinch points near doors and corners.
How to reduce space problems
If your room is tight, the answer is not always to force in fewer lockers. Sometimes a better configuration can make the space work more effectively.
- Use shallower lockers where storage needs allow
- Choose multi-tier lockers to reduce wall length
- Avoid placing benches directly in front of locker doors
- Split lockers across more than one wall
- Keep entrances and main routes clear
- Use Z lockers where hanging space is needed in a compact footprint
- Plan layouts around peak use, not the empty room
Minimum space is not always the right space
Minimum space can help with early decisions, but it should not be the only target. A locker area that only just fits may become awkward, crowded or unsafe once people start using it.
The best layout gives users enough room to open doors, access belongings, pass others and move through the space without blocking key routes.
For most projects, it is better to plan a slightly more generous locker area than to maximise locker numbers at the cost of comfort and flow.
Explore storage systems by use case
- Workplace storage systems UK
- Industrial storage systems UK
- School storage systems UK
- Care home storage systems UK
- Storage access control guide UK
- Storage system planning checklist UK
Summary: what you actually need
For a quick estimate, start with the locker depth and add 900 mm to 1500 mm of clear access space in front. Use 900 mm only for light-use areas. Choose 1200 mm for more comfortable everyday access. Plan for 1500 mm or more in busy changing rooms, workplaces, schools or peak-use environments.
If lockers face each other, include the depth of both locker runs and a wider central aisle. If benches are included, allow extra seated-use clearance rather than treating the bench area as ordinary walkway space.
Good locker planning is not just about fitting units into a room. It is about creating a space that works when people are actually using it.
Discover more from Blog Total Locker Service
Subscribe to get the latest posts sent to your email.