Locker Planning Standards UK: Layout, Spacing, Access and Installation Guide
May 12, 2026
Locker planning standards help organisations choose the right locker sizes, layouts, aisle widths, door clearances, bench spacing, access routes and installation positions for safe, practical and efficient locker areas.
This guide explains the main planning principles for UK workplaces, schools, gyms, leisure centres, healthcare sites, factories and changing rooms. It is designed to help facilities teams plan locker spaces before ordering, installing or replacing lockers.
Quick answer: what are locker planning standards?
Locker planning standards are the practical layout rules used to make locker areas usable, accessible and safe. They cover locker depth, door swing, aisle width, bench clearance, wheelchair access, circulation routes, fixing methods, wet and dry zones, supervision, maintenance access and user flow.
What locker planning should include
| Planning area | What to check | Why it matters |
|---|---|---|
| Locker size | Width, height, depth and compartment count | Controls storage capacity and footprint |
| Door clearance | How far doors open into aisles | Prevents clashes and blocked routes |
| Aisle width | Space in front of lockers and between rows | Supports safe movement and daily use |
| Bench spacing | Clearance around seating and changing areas | Improves changing room usability |
| Access routes | Entrances, exits, corridors and circulation paths | Reduces bottlenecks |
| Accessibility | Reach heights, turning space and inclusive access | Supports wider user needs |
| Installation | Floor fixing, wall fixing, levelling and stability | Keeps lockers secure and reliable |
Why locker planning standards matter
Lockers need space to work properly. A layout that looks acceptable on a drawing can fail in daily use if doors clash, aisles are too narrow, benches block movement or too many users arrive at the same time.
- Improves user movement around locker areas.
- Reduces door clashes and blocked aisles.
- Supports changing room and staff welfare planning.
- Helps schools reduce corridor congestion.
- Improves accessibility and reach.
- Makes cleaning, maintenance and inspection easier.
- Helps buyers choose the right locker depth and layout.
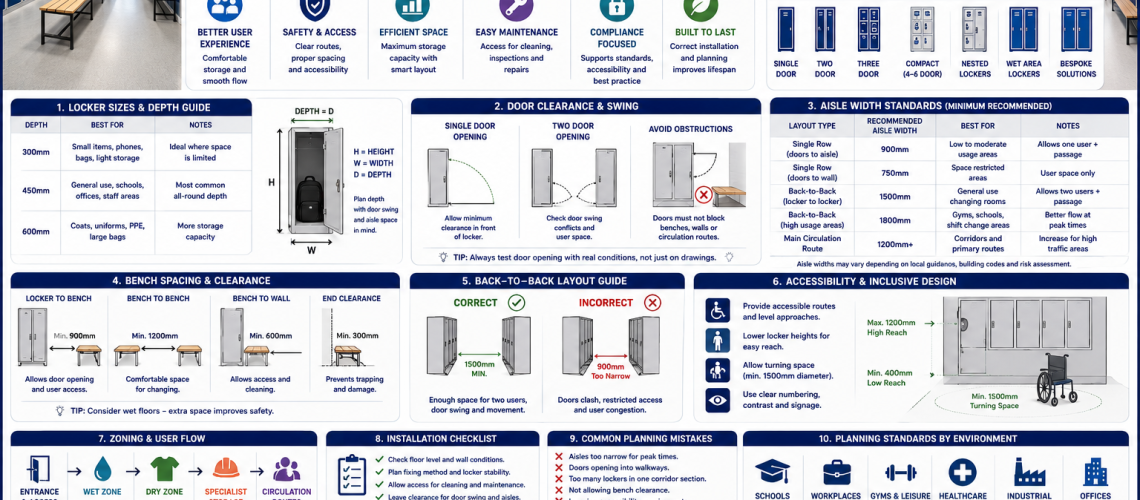
1. Locker size and depth planning
Locker depth affects storage capacity and how much space the locker bank takes from the room. Common locker depths include 300 mm, 450 mm and 600 mm. The best depth depends on what users need to store and how much circulation space is available.
| Locker depth | Best for | Planning note |
|---|---|---|
| 300 mm | Small items, bags, phones and light storage | Useful where space is tight |
| 450 mm | General workplace, school and staff storage | Good balance of storage and footprint |
| 600 mm | Coats, uniforms, PPE, bags and larger items | Needs more circulation space |
For a deeper sizing guide, use the locker depth and projection guide UK.
2. Locker door clearance
Locker doors need enough space to open without blocking other users, benches, walls or circulation routes. Door clearance is especially important in narrow corridors, schools, staff changing rooms and back-to-back locker layouts.
- Check the open-door projection before finalising layout.
- Avoid placing doors where they open directly into narrow routes.
- Allow extra space in high-traffic locker areas.
- Check whether adjacent doors can clash.
- Consider shorter compartment doors where space is restricted.
- Use wider aisles where several users open lockers at the same time.
For detailed checks, see the locker door clearance guide UK.
3. Locker aisle width planning
Aisle width controls how easily users can stand, open doors, remove belongings and pass other people. Narrow aisles can cause congestion, especially in schools, gyms and workplaces at shift changeover times.
- Allow enough standing room in front of each locker bank.
- Increase aisle space in high-use areas.
- Allow extra clearance where benches are placed opposite lockers.
- Avoid long dead-end locker aisles where possible.
- Check peak demand, not only quiet-time use.
- Keep main circulation routes separate from locker-use zones where practical.
For spacing detail, use the locker aisle width guide UK.
4. Bench spacing and changing room clearance
Benches improve changing room usability, but they also need clearance. Poor bench placement can block locker doors, reduce aisle width and make changing rooms difficult to clean or supervise.
- Keep enough space between lockers and benches.
- Allow users to sit, stand and open locker doors.
- Avoid placing benches where they block entrance routes.
- Leave cleaning access around fixed benches.
- Plan separate wet and dry zones where needed.
- Check changing flow during peak periods.
For more detail, use the locker bench spacing and clearance guide UK.
5. Locker row spacing and back-to-back layouts
Back-to-back locker layouts can increase capacity, but they need careful planning. The combined locker depth, door swing and user standing space can quickly reduce usable aisle width.
- Check total projection from both locker rows.
- Allow space for two users to open lockers at the same time.
- Keep main routes clear of open doors.
- Use island layouts only where room width allows it.
- Check whether end panels or sloping tops are needed.
- Plan fixing and stability before installation.
6. Accessibility and inclusive locker planning
Locker planning should consider a range of users, including wheelchair users, ambulant disabled users, shorter users and people with limited reach or grip strength. Access should be practical, not just technically possible.
- Provide lockers at usable reach heights.
- Keep access routes clear and level where possible.
- Allow enough manoeuvring space in front of accessible lockers.
- Choose locks that are easy to operate.
- Use clear numbering and visual contrast.
- Avoid placing accessible lockers in blocked or awkward corners.
For inclusive planning, see the locker accessibility and DDA planning UK guide.
7. Locker zoning and user flow
Zoning helps separate different users, functions and movement patterns. It is especially useful in schools, gyms, healthcare sites and industrial changing rooms.
- Separate wet and dry areas in changing rooms.
- Keep PPE lockers near workplace entry points where practical.
- Place school lockers near year group routes.
- Avoid sending users against main movement flow.
- Keep visitor lockers separate from staff lockers where needed.
- Use visible zones for supervision and management.
For zoning guidance, use the locker room zoning guide UK.
8. School locker planning standards
School lockers need extra attention because lockers can affect corridor flow, supervision and break-time movement. Good planning avoids placing too many lockers in narrow or unsupervised areas.
- Plan lockers by year group or form where possible.
- Keep locker banks away from narrow corridor pinch points.
- Avoid blocking classroom entrances.
- Allow enough space for bags and open doors.
- Plan for peak times before school, break, lunch and end of day.
- Use clear numbering and allocation records.
For education sites, use the school locker systems UK guide, school locker corridor planning UK and break-time flow management in schools UK.
9. Workplace and industrial locker planning standards
Workplace lockers should support staff welfare, shift patterns, PPE storage and daily routines. Industrial locker areas may need more durable lockers, wider circulation and better separation between clean and dirty zones.
- Place staff lockers near changing or welfare areas.
- Allow space for coats, uniforms, bags and PPE.
- Separate clean and dirty storage where needed.
- Plan around shift changeover demand.
- Use durable locks and fittings in heavy-use areas.
- Leave maintenance access around locker banks.
For workplace planning, see the workplace locker layout guide UK.
10. Installation and fixing standards
Locker installation should be planned before delivery. Stability, levelling, wall fixing, floor condition, skirting, pipework and cleaning access can all affect the finished layout.
- Check floor level before installation.
- Allow for wall skirting and service routes.
- Use suitable fixing where stability requires it.
- Keep locker banks aligned and numbered clearly.
- Plan end panels, sloping tops or stands where needed.
- Leave enough access for cleaning and maintenance.
- Check door swing after installation, not just on drawings.
Locker planning checklist
- Have you checked locker depth and total projection?
- Do locker doors open without blocking routes?
- Is aisle width suitable for peak use?
- Are benches placed with enough clearance?
- Are accessible lockers practical to reach and use?
- Are wet and dry zones separated where needed?
- Are locker banks visible enough for supervision?
- Is there enough space for cleaning and maintenance?
- Are lockers fixed or stabilised where required?
- Does the layout still work when several lockers are open?
Best locker planning approach by environment
| Environment | Main planning risk | Best focus |
|---|---|---|
| Schools | Corridor congestion and supervision | Year group zoning, clear routes and peak-time flow |
| Workplaces | Staff changeover and welfare use | Accessible staff routes and practical locker depth |
| Gyms and leisure centres | High turnover and changing room pressure | Bench clearance, wet-area zoning and shared-use access |
| Healthcare | Clean changing, staff access and controlled areas | Clean/dirty zoning and reliable access control |
| Factories and warehouses | PPE, tools and shift patterns | Durable lockers, wider aisles and supervisor access |
| Offices | Hybrid working and flexible use | Hot lockers, smart access and occupancy planning |
Common locker planning mistakes
- Choosing locker depth without checking room width.
- Ignoring door swing and open-door projection.
- Placing lockers too close to benches.
- Creating narrow dead-end aisles.
- Putting too many school lockers in one corridor section.
- Forgetting peak-time movement.
- Leaving no space for wheelchair users or inclusive access.
- Installing lockers before checking floor level and wall conditions.
- Using the same locker layout for every environment.
- Buying more lockers before checking occupancy and utilisation.
Related locker planning guides
Use these guides to plan a complete locker layout:
- Locker Planning UK
- Locker Depth and Projection Guide UK
- Locker Door Clearance Guide UK
- Locker Aisle Width Guide UK
- Locker Bench Spacing and Clearance Guide UK
- Locker Room Zoning Guide UK
- Locker Accessibility and DDA Planning UK
- School Locker Systems UK
- Workplace Locker Layout Guide UK
- Locker Management Systems UK
- Lockers
Final advice
Good locker planning standards protect the usefulness of the whole locker system. The best layouts consider the locker size, door clearance, aisle width, bench spacing, accessibility, user flow, installation method and long-term maintenance needs before lockers are ordered.
For most UK sites, the safest approach is to plan from real use. Check what users store, how many people arrive at peak times, how doors open, where benches sit and how the locker area connects to the rest of the building. A well-planned locker area is easier to use, easier to manage and more reliable over time.
Discover more from Blog Total Locker Service
Subscribe to get the latest posts sent to your email.