Locker Accessibility & DDA Planning UK: Layout, Reach Heights and Inclusive Design Guide (2026)
May 11, 2026
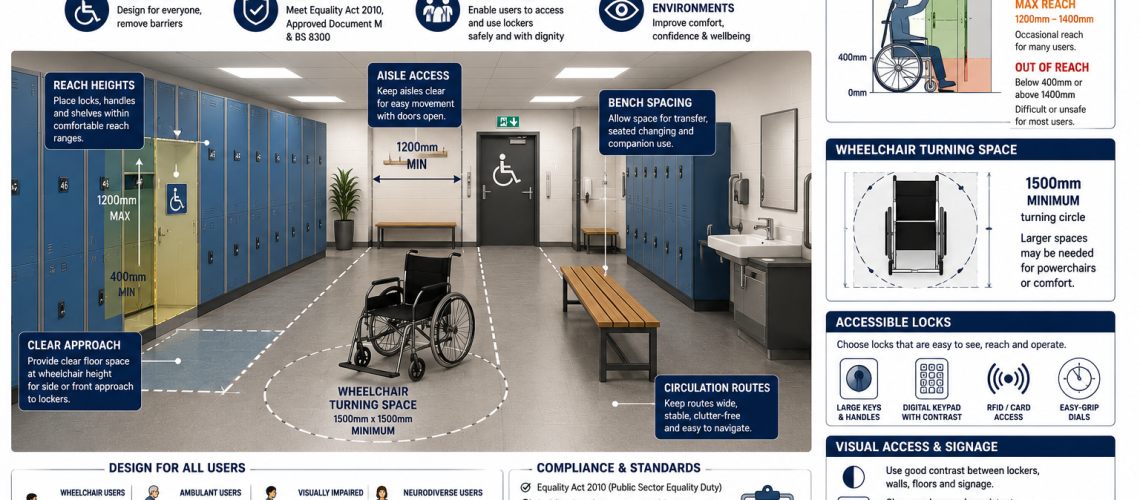
Accessible locker planning means designing locker areas so disabled users, wheelchair users, ambulant disabled users, visually impaired users and people with limited reach, strength or dexterity can approach, open and use storage as independently and safely as reasonably possible.
Good accessibility is not achieved simply by installing one locker labelled “accessible”. The route to the locker, available manoeuvring space, locker position, compartment height, lock type, door swing, benches, signage, lighting and the way the room works at busy times all affect whether the storage is genuinely usable.
This guide explains accessible locker planning in the UK, including wheelchair access, Part M considerations, locker reach height, aisle space, turning areas, bench positioning, lock accessibility, visual contrast, ambulant disabled users and inclusive locker-room design.
Quick answer: accessible locker areas need a clear approach route, practical manoeuvring space, reachable storage and controls, appropriate door clearance and a layout that remains usable when lockers, benches and surrounding facilities are actually in use.
This article belongs within the Locker Planning & Estate Management topic and owns the specific question of accessible locker use: approach routes, manoeuvring space, reachable compartments and controls, door clearance, benches, visual identification and lock usability. For general room layout, use the Locker Room Design UK guide. For NHS staff lockers and healthcare changing-room workflow, use the NHS & Healthcare Changing Room Planning guide.
What This Accessible Locker Guide Owns
This guide is deliberately narrow. It explains how accessibility affects the physical use of lockers and the space immediately around them. It does not try to replace the wider locker-planning, sector-selection or locking-system guides.
- Overall locker quantities, room dimensions and installation: Locker Planning UK
- General locker-room layout and benches: Locker Room Design UK
- NHS staff lockers and healthcare changing rooms: NHS & Healthcare Changing Room Planning UK
- School locker selection: School Lockers UK
- Workplace locker selection: Workplace Lockers UK
- General lock choice: Locker Locking Systems: Keys, Codes and Smart Access
DDA, Equality Act and Part M: What Do They Mean for Lockers?
“DDA compliant lockers” and “DDA lockers” are still commonly used search terms, but they can be misleading if treated as a precise technical specification.
In Great Britain, the Disability Discrimination Act framework was largely replaced by the Equality Act 2010. The Act protects disabled people from discrimination and includes duties relating to reasonable adjustments. For service providers and those exercising public functions, accessibility should be considered in advance rather than only after a disabled user encounters a barrier.
For workplaces, employers also have duties to make reasonable adjustments where disabled workers would otherwise be placed at a substantial disadvantage.
Approved Document M provides guidance on access to and use of buildings under the Building Regulations in England. It is important accessibility guidance, but it does not provide one universal measurement that makes an individual locker “Part M compliant”. Locker accessibility has to be considered as part of the wider building, route and facility design.
Projects in Scotland, Wales and Northern Ireland should be checked against the relevant national building standards and equality requirements because the regulatory framework is not identical throughout the UK.
Authoritative guidance is available from GOV.UK: Approved Document M and the Equality Act 2010 Code of Practice for services, public functions and associations.
There Is No Single “DDA Locker Height”
A common mistake is looking for one prescribed locker height or one lock height that automatically makes a locker accessible. In practice, accessibility depends on a combination of reach, approach, controls, door operation and surrounding space.
A locker compartment may be physically within reach but still difficult to use if:
- the wheelchair approach is blocked by a bench;
- the lock requires excessive grip or twisting;
- the compartment is too low to access comfortably;
- the door opens across the accessible route;
- a user cannot get close enough to the locker front;
- the aisle does not allow repositioning;
- the compartment requires a heavy bag to be lifted above a practical height;
- signage or numbering is difficult to see or understand.
The better approach is to assess the complete user interaction rather than specify accessibility from one dimension.
What Is Accessible Locker Planning?
Accessible locker planning is the process of arranging lockers, routes, doors, benches and controls so people with a wide range of physical and sensory requirements can use the storage facility without unnecessary barriers.
It applies to facilities including:
- workplaces and staff changing rooms;
- schools, colleges and universities;
- gyms and leisure centres;
- swimming pools and wet changing facilities;
- healthcare and NHS staff areas;
- industrial welfare facilities;
- offices and hybrid-working storage areas;
- public-sector buildings;
- community and public facilities.
The objective is not simply to reserve a small number of lockers for wheelchair users. Inclusive planning should consider wheelchair users, people who walk with aids, people who have limited balance or stamina, users with reduced hand function, people with limited reach, visual impairment and temporary injuries.
Accessible Locker Planning Priorities
| Planning issue | Why it matters | What to check |
|---|---|---|
| Approach route | The locker cannot be accessible if the user cannot reach it | Doors, thresholds, benches, bins and narrow points |
| Manoeuvring space | Users may need to turn or reposition before opening the locker | Clear floor area when the room is occupied |
| Locker height | Very high and very low compartments can be difficult to reach | Compartment, handle and lock position |
| Door swing | Open doors temporarily reduce usable space | Route width with doors open |
| Bench position | Benches and seated users occupy significant floor area | Passing, turning and transfer space |
| Lock operation | Small or stiff mechanisms may create dexterity barriers | Grip, force, visibility and control position |
| Visual access | Users need to identify lockers and controls | Contrast, numbering, lighting and glare |
| Peak occupancy | Accessible space can disappear when a room becomes busy | Realistic simultaneous use |
Start With the Accessible Route
The first question should not be “where can we fit an accessible locker?” It should be “how does the user reach the locker?”
Trace the route from the building or room entrance to the storage position. Look for barriers including narrow doorways, changes in level, protruding furniture, benches, radiators, bins, cleaning equipment and doors that swing across the route.
- Keep the route clear and predictable.
- Avoid locating accessible lockers behind furniture.
- Avoid narrow dead-end locker aisles where practical.
- Check whether users can approach from the front or side as required.
- Consider the effect of surrounding users during busy periods.
- Keep temporary equipment out of designated accessible space.
- Consider the route between lockers and accessible changing, shower or welfare facilities.
An accessible locker placed at the end of an inaccessible route does not solve the accessibility problem.
Wheelchair Manoeuvring and Turning Space
Wheelchair users may need space to approach a locker, align with it, open the door, retrieve belongings, close the door and change direction afterwards.
Around 1500 mm is often used as an early-stage planning reference for wheelchair turning space, but it should not be treated as a universal locker-specific statutory measurement. The final arrangement should be checked against the applicable project guidance, building design, wheelchair type and access requirements.
Powered wheelchairs, scooters and users with extended foot supports may require more space than a simple diagram suggests.
Most importantly, the manoeuvring area has to remain genuinely clear. A circle drawn on a plan is meaningless if it later contains:
- a bench;
- open locker doors;
- bins;
- loose footwear;
- bags;
- radiator projections;
- cleaning equipment;
- another door swing.
Accessible Space in Front of Lockers
Allow enough clear working space for the user to approach and operate the locker rather than measuring only the nominal aisle between two closed cabinet faces.
For early planning, a generous clear area in front of designated accessible lockers is generally preferable to squeezing them into a standard narrow row. Where turning or substantial repositioning is required, the layout may need considerably more space than an ordinary low-use locker aisle.
For general locker spacing principles, see our Locker Aisle Width Guide UK.
Do Not Confuse Aisle Width With Usable Accessibility
A quoted aisle width does not automatically tell you whether a locker area is accessible. The useful dimension is the clear space that remains during real operation.
Consider:
- locker door projection;
- users standing at neighbouring lockers;
- opposing locker doors;
- benches and seated users;
- bags and footwear;
- wheelchair turning and repositioning;
- people travelling through the same aisle;
- peak-time occupancy.
A nominally wide aisle can become unusable when open locker doors occupy both sides. Conversely, a well-planned wider zone beside accessible lockers can allow users to operate them without conflicting with the main flow of traffic.
Accessible Locker Position
Accessible lockers should be deliberately located rather than added to whatever space remains after the main locker quantity has been calculated.
Good positions generally have:
- a clear route from the entrance;
- adequate manoeuvring space;
- minimal conflict with doorways;
- space to open the locker door without trapping the user;
- good lighting and visibility;
- proximity to accessible changing or welfare facilities where relevant;
- less peak-time congestion than the busiest locker banks.
Avoid placing the only accessible lockers at the end of a narrow dead-end aisle. This can force wheelchair users to reverse out of the complete locker row if there is insufficient turning space.
Locker Reach Height
Locker usability depends on more than the height of the compartment. The user must be able to reach the handle or door edge, operate the lock and place belongings inside without excessive stretching or lifting.
Mid-level storage is often more practical for inclusive use than the highest or lowest compartments in a tall multi-tier locker.
When selecting accessible compartments, consider:
- lock position;
- handle position;
- door opening force;
- usable internal storage height;
- how deeply belongings need to be reached;
- whether a bag must be lifted;
- front and side approach;
- use from both seated and standing positions.
Do not automatically allocate a top-tier compartment as accessible storage simply because it is nearest an open aisle.
Lower Lockers Can Also Cause Problems
Accessibility is not solved by putting everything as low as possible. Very low compartments can be difficult for wheelchair users, ambulant disabled users, people with balance difficulties and people who cannot bend comfortably.
The most inclusive arrangement may therefore involve a range of storage positions rather than one extreme height.
Locker Door Swing and Accessibility
Locker doors create temporary obstructions. Their effect is particularly important where manoeuvring space is already limited.
- Check the full door-opening arc.
- Avoid doors projecting across the only accessible route.
- Allow space for the user to move while opening the door.
- Check doors on neighbouring lockers.
- Check opposing locker banks where doors can open from both sides.
- Avoid trapping the user between the open door and a bench or wall.
Test the drawing with several locker doors shown open. This often exposes conflicts that are invisible on a plan showing only closed cabinets.
Benches and Accessible Locker Areas
Benches are useful in changing rooms but are also one of the most common causes of lost circulation space. The physical bench is only part of its footprint. Seated users, legs, bags, clothing and footwear extend into the surrounding area.
Do not rely on the gap between a locker and a bench as both the main accessible route and the principal changing area unless the layout has genuinely been designed to support both functions.
- Keep benches away from wheelchair turning areas.
- Do not block accessible locker approaches.
- Allow space for seated users without closing the route.
- Consider transfer requirements where relevant.
- Keep bags and footwear away from circulation routes.
- Check the layout while locker doors are open.
For the wider interaction between lockers, benches and circulation, use the Locker Room Design UK guide.
Accessibility for Ambulant Disabled Users
Not every disabled user uses a wheelchair. People may use walking sticks, crutches or frames, have reduced stamina, experience pain while bending, have balance difficulties or need somewhere to rest.
Good locker planning should therefore consider:
- short, straightforward routes;
- appropriate seating;
- avoiding very low storage where possible;
- easy-to-operate doors and locks;
- stable floor surfaces;
- space for walking aids;
- minimising unnecessary changes of direction;
- avoiding long dead-end locker rows.
Accessible Locker Locks
The locking mechanism can make an otherwise well-positioned locker difficult to use. Consider strength, grip, fine motor control, tremor, vision and cognitive load when specifying locks.
| Lock type | Potential accessibility issue | Planning consideration |
|---|---|---|
| Key lock | Small keys may be difficult to grip or manipulate | Consider key-head size, operating force and management support |
| Mechanical combination lock | Small numbers and rotating controls may be difficult for some users | Check visibility, grip and operating resistance |
| Digital keypad lock | Small buttons or poorly positioned displays can create barriers | Check control height, contrast, feedback and instructions |
| RFID lock | Credential presentation may reduce manual input but reader position matters | Provide an obvious, reachable reader position |
| Coin lock | Coin handling may be difficult for users with limited dexterity | Assess whether the operating method suits the user group |
| Padlock fitting | The user must provide and operate a separate padlock | Consider whether this places an unnecessary dexterity burden on users |
No single lock type is automatically accessible for every user. Choose the system around the people expected to use it and consider alternative access arrangements where appropriate.
This section only considers locks from an accessibility perspective. For the wider comparison of keyed, combination, coin-operated, electronic, RFID and smart-access systems, use the Locker Locking Systems guide. If you already know the required lock type, browse the locker lock range.
Visual Accessibility, Contrast and Locker Identification
People with visual impairments may experience difficulty identifying individual lockers, locks, handles and routes where there is poor contrast, excessive glare or confusing numbering.
Consider:
- clear locker numbering;
- strong legibility;
- useful contrast between controls and their surroundings;
- good, even lighting;
- avoiding glare on highly reflective surfaces;
- logical locker sequences;
- consistent signage;
- keeping hazards and projecting objects out of circulation routes.
Very large locker installations can also benefit from clear zoning so users do not have to search across long, visually similar rows.
Our Locker Room Zoning Guide UK explains how locker areas can be separated into understandable storage, changing, circulation, wet, dry and accessible zones.
Accessible Locker Planning During Busy Periods
Accessibility should be tested under realistic conditions rather than on an empty floor plan.
At peak times:
- several locker doors may be open simultaneously;
- users may stand in front of neighbouring compartments;
- benches may be fully occupied;
- bags and shoes may be temporarily placed on the floor;
- people may queue near entrances;
- wheelchair turning areas may attract through traffic.
If the accessible route only works when the room is empty, the design needs further consideration.
For high-use changing areas, also see our Locker Room Traffic Flow and Congestion Planning Guide.
Avoid Accessible Lockers at Major Pinch Points
An entrance may appear convenient for accessible lockers because it offers a short travel distance. However, entrances are often some of the busiest parts of locker rooms.
Users may stop immediately after entering, wait for others, remove clothing, search for locker numbers or queue at the doorway. An accessible locker placed directly in this activity can become harder to use.
Look for a position that combines a short, accessible route with sufficient working space and lower conflict.
Dead-End Locker Aisles
Dead-end aisles deserve particular attention because a wheelchair user may have to reverse the complete distance if there is nowhere to turn at the end.
Where possible:
- avoid locating designated accessible lockers deep inside narrow dead ends;
- provide suitable manoeuvring space;
- use through routes where the overall design allows;
- keep aisle ends clear of bins and stored equipment.
Accessible Changing Rooms and Wet Areas
Gyms, leisure centres and swimming pools add further considerations because users may be moving between dry lockers, benches, showers and wet areas.
Accessible routes should remain clear despite:
- wet flooring;
- towels and swim bags;
- occupied benches;
- shower traffic;
- changing cubicles;
- pool access routes.
Locker placement should connect logically with accessible changing and shower provision rather than require users to cross the most congested part of the room repeatedly.
For mixed wet and dry facilities, see our Changing Room Layout Guide UK.
Accessible Workplace Lockers
Workplace locker planning needs to consider the Equality Act alongside the practical requirements of uniforms, PPE, bags, footwear and shift changes.
A standard locker arrangement may need to be adjusted for an individual worker. Reasonable adjustments can involve the physical environment, equipment or the way a workplace system operates, depending on the circumstances.
Useful questions include:
- Can the worker reach and operate their assigned locker?
- Can a more suitable compartment be allocated?
- Is additional storage space required for disability-related equipment?
- Is the normal route to the locker accessible?
- Does shift-change congestion create a barrier?
- Would a different lock type be easier to operate?
For wider workplace storage planning, see the Workplace Lockers UK guide.
Accessible School Locker Planning
School locker areas can become extremely busy between lessons, so accessibility should be considered alongside pupil movement and supervision.
- Avoid allocating accessible lockers solely by year-group convenience.
- Provide a practical route during lesson changeovers.
- Consider pupils with temporary injuries as well as long-term disabilities.
- Avoid very high or low compartments where they create unnecessary difficulty.
- Consider the usability of locks for pupils with limited dexterity.
- Keep accessible positions away from the most severe corridor pinch points.
This section only addresses accessibility. For the wider education buying and specification process, use the School Lockers UK guide. Operational allocation, access control and student-management questions can then move to the separate School Locker Systems guide.
Accessible NHS and Healthcare Staff Lockers
Healthcare staff changing areas need the same core accessibility checks as other locker facilities, but the layout may also have to work around uniforms, benches, shift-change peaks, staff-only access and routes between changing and clinical or non-clinical areas.
- Provide a clear approach to suitable locker positions.
- Check reachable lock, handle and compartment positions from the intended approach.
- Protect manoeuvring space from benches, bags and high-use circulation routes.
- Test the arrangement during realistic shift overlap rather than only when the room is empty.
- Consider accessible changing, seating and welfare facilities as part of the same route.
- Keep staff-locker accessibility separate from medicine, clinical-supply and specialist storage requirements.
For the complete healthcare staff-changing workflow, use the NHS & Healthcare Changing Room Planning UK guide. If the question is wider healthcare storage selection rather than staff lockers, use Healthcare Storage Systems UK.
Inclusive Design Is Wider Than Wheelchair Access
Wheelchair access is an important part of accessible design, but it is not the complete subject.
Locker systems may be used by people with:
- limited grip;
- reduced upper-body strength;
- restricted reach;
- arthritis;
- tremor;
- visual impairment;
- balance difficulties;
- limited stamina;
- temporary injuries;
- different cognitive or sensory needs.
A system that offers different usable compartment positions, simple routes, understandable numbering and more than one practical access method may serve a wider range of users than a design focused on one assumed disability.
Should Accessible Lockers Be Grouped Together?
There is no universal requirement to create one isolated bank of accessible lockers. In some installations grouping a number of suitable lockers beside a generous manoeuvring area works well. In others, distributing accessible storage across several zones provides better access for different users.
The key principle is that accessible provision should not be:
- hidden;
- isolated without reason;
- placed behind obstacles;
- restricted to the least desirable part of the room;
- located where access disappears at busy times.
Locker Layout Examples and Accessibility Risks
| Locker arrangement | Potential accessibility problem | Better planning approach |
|---|---|---|
| Single locker row with narrow aisle | An open door can obstruct the only route | Provide additional working space around accessible positions |
| Opposing locker rows | Doors and users occupy both sides simultaneously | Increase overall aisle provision and protect accessible space |
| Dead-end aisle | Wheelchair user may need to reverse out | Provide turning space or position accessible lockers elsewhere |
| Central bench between lockers | Seated users reduce the circulation width | Separate accessible manoeuvring space from bench activity |
| Lockers beside entrance | Arrival traffic creates a pinch point | Move accessible lockers to a nearby lower-conflict position |
| Very high multi-tier lockers | Locks and compartments may be beyond practical reach | Provide suitable mid-level storage options |
| Lowest tier only | Requires substantial bending and low reach | Offer a range of practical compartment heights |
Example: Workplace Changing Room
Consider a workplace changing room with lockers along both walls and a bench through the centre.
On the drawing, a designated accessible locker sits halfway along one wall. In reality, a wheelchair user reaching it during shift change encounters seated staff, bags around the bench, neighbouring locker doors and people travelling in both directions.
The locker itself may be at a suitable height, but the complete arrangement performs badly.
A better solution may be to position accessible lockers beside a wider circulation zone, retain clear manoeuvring space, move the bench activity away from the approach and choose a reachable lock and compartment.
This demonstrates why accessibility is a layout property, not merely a locker specification.
Example: Leisure Centre Changing Room
A leisure facility may have adequate circulation when dry and empty, yet perform very differently during a busy swimming session.
Wet users return carrying towels and bags, benches become occupied and shower traffic crosses the locker area. If accessible lockers are positioned directly on this route, the designated manoeuvring space can disappear.
Separating the main wet movement route from the accessible locker approach can make the facility substantially easier to use without necessarily increasing the total number of square metres.
Common Accessible Locker Planning Mistakes
- Assuming one accessible locker makes the whole area accessible.
- Searching for a single “DDA locker height” and ignoring the surrounding layout.
- Placing accessible lockers at the end of narrow dead-end rows.
- Using only top-tier or bottom-tier compartments.
- Failing to provide adequate manoeuvring space.
- Allowing benches to occupy accessible routes.
- Ignoring the effect of open locker doors.
- Choosing locks that are difficult to grip, see or operate.
- Forgetting ambulant disabled users.
- Ignoring visual contrast and locker identification.
- Placing bins or loose furniture inside planned clear space.
- Designing around an empty room instead of peak occupancy.
- Adding accessibility only after the final locker quantity has been fixed.
- Treating generic Part M references as a substitute for project-specific design checks.
Accessible Locker Planning Checklist
- Is there an accessible route to the locker area?
- Can users approach the designated lockers without passing through a severe pinch point?
- Is there sufficient clear manoeuvring space?
- Can a wheelchair user turn or reposition where necessary?
- Does the space remain clear when locker doors are open?
- Are accessible lockers at practical heights?
- Can locks and handles be reached from the intended position?
- Can users operate the selected lock with reasonable ease?
- Are benches outside the essential circulation and manoeuvring space?
- Have ambulant disabled users been considered?
- Are numbering and signage easy to identify?
- Is there appropriate visual contrast?
- Are wet-area routes predictable and usable?
- Does the design remain accessible during peak use?
- Have individual workplace adjustment requirements been considered where relevant?
- Has the final arrangement been checked against the applicable project accessibility requirements?
Step-by-Step Accessible Locker Layout Process
- Identify the user groups. Consider both known requirements and the wider range of people who may use the facility.
- Measure the complete room. Include doors, columns, benches, radiators, showers and other fixed features.
- Mark the accessible route. Follow the journey from entrance to locker and onward to any changing or welfare facilities.
- Choose accessible locker positions. Avoid dead ends, severe pinch points and areas blocked by benches.
- Allow manoeuvring space. Check turning and repositioning rather than relying solely on a nominal aisle width.
- Select practical compartment heights. Consider both seated and standing reach.
- Choose the lock system. Check dexterity, grip, visibility and operating height.
- Add door swing. Draw locker doors open and check that the route still functions.
- Add benches and people. Test the real occupied condition rather than the empty room.
- Check visual access. Review contrast, lighting, numbering and signage.
- Test peak use. Consider shift change, school lesson changes, gym peaks or leisure sessions.
- Review applicable standards and duties. Confirm the final layout against the project-specific accessibility and Building Regulations requirements.
Part M Is a Baseline, Not the Whole Design
Approved Document M is an important part of accessibility planning for relevant building work in England, but successful inclusive locker design should not become a box-ticking exercise.
Two layouts can contain the same nominal dimensions and perform very differently because of locker door swing, benches, user numbers, lock position or congestion.
For larger public buildings, healthcare environments, education projects, major workplace schemes or complex refurbishments, project teams should involve the relevant architect, designer, building control professional or access specialist where appropriate.
Equality Act and Reasonable Adjustments
Accessibility does not stop once the locker room has been installed. An organisation may need to respond to the requirements of individual disabled users.
For service providers and public functions, the Equality Act reasonable-adjustment duty is anticipatory, meaning organisations should consider likely barriers in advance. Employers also have duties concerning reasonable adjustments for disabled workers.
A practical locker-related adjustment might involve assigning a different-height locker, providing a more suitable lock, keeping a particular approach clear or changing the normal allocation process where reasonable in the circumstances.
For current legal guidance, refer to GOV.UK Equality Act 2010 guidance. Project-specific legal or compliance questions should be checked with the appropriate competent professional.
Related Locker Planning Guides
- Locker Planning UK: Layout, Space, Compliance and Installation — parent planning guide.
- Locker Room Design UK — general room layout, lockers and benches.
- Locker Aisle Width Guide UK — general aisle and working-space planning.
- Locker Room Traffic Flow and Congestion Planning — peak-use movement and pinch points.
- NHS & Healthcare Changing Room Planning UK — healthcare staff lockers, changing, uniforms and shift flow.
- Workplace Lockers UK — workplace-specific selection and staff storage.
- School Lockers UK — education-specific locker selection.
- Locker Locking Systems — general lock selection beyond accessibility.
Accessible Locker Planning FAQs
What does DDA mean for lockers?
DDA is still commonly used as a term for disabled access, but in Great Britain the Disability Discrimination Act framework was largely replaced by the Equality Act 2010. There is no single technical specification called a “DDA locker”. Accessibility depends on the locker, its controls, surrounding space and the route used to reach it.
What makes a locker accessible?
An accessible locker should have a usable approach route, suitable manoeuvring space, a practical compartment and control position, an operable lock and enough clearance for the door to open without preventing the user from accessing or leaving the locker.
Is there a standard DDA locker height?
There is no single universal “DDA locker height”. Accessible locker design should consider compartment position, lock and handle height, approach, reach, door operation and the needs of the intended users. Project-specific accessibility requirements should be checked before finalising dimensions.
What does Part M say about lockers?
Approved Document M provides guidance for access to and use of buildings in England. It does not prescribe one universal locker size or locker height. Locker installations should be considered within the wider accessible route and facility design.
How much wheelchair turning space should be provided near lockers?
Around 1500 mm is often used as an early planning reference for wheelchair turning space, but it should not be treated as a universal locker-specific requirement. The final space should be checked against the relevant building guidance, project requirements and expected wheelchair users.
How wide should an accessible locker aisle be?
There is no single aisle width that suits every accessible locker installation. The required space depends on the approach, whether users need to turn or pass, locker door swing, benches, opposing rows and the applicable project accessibility requirements.
Should accessible lockers be at the bottom of a locker bank?
Not automatically. Very low compartments can be difficult for some wheelchair users and ambulant disabled users because they require low reach or bending. Mid-level storage can often be more practical, depending on the user and locker design.
Are combination locker locks accessible?
They can be suitable for some users, but small dials, low-contrast numbers and rotating controls may be difficult for people with limited dexterity or vision. Lock selection should consider the actual user group rather than assuming one mechanism works for everyone.
Are RFID locker locks better for accessibility?
RFID can reduce the need to manipulate keys or combination dials, which may help some users. Reader position, credential handling, visual feedback and the wider operating process still need to be accessible.
Should accessible lockers be grouped together?
They can be grouped where this provides good access and manoeuvring space, but there is no reason to isolate accessible storage in a poor location. Larger facilities may benefit from suitable accessible lockers in more than one area.
Do accessible changing rooms need benches?
Appropriate seating may be important in accessible changing facilities, but the exact provision depends on the facility and project requirements. Bench position should not obstruct wheelchair movement, locker access, transfer areas or principal circulation routes.
Is meeting Part M enough for an accessible locker room?
Part M is important Building Regulations guidance for relevant work in England, but inclusive locker design should also consider the Equality Act where applicable, real user requirements, peak occupancy, door operation, locks, benches, signage and the way the facility will actually be managed.
Summary
Accessible locker planning is about the complete user experience. A suitable locker needs an accessible route, enough space to approach and manoeuvre, a practical compartment position, an operable lock and a door that can open without blocking the user or the surrounding circulation route.
Do not rely on a single “DDA locker height” or aisle dimension. Consider wheelchair users, ambulant disabled users, reach, dexterity, vision, benches, locker doors and realistic peak occupancy together.
For projects in England, Approved Document M provides important access guidance, while the Equality Act 2010 creates wider duties relating to disability discrimination and reasonable adjustments in Great Britain. The final installation should always be checked against the requirements applying to the particular building, organisation and user group.
Use this article to define the accessibility requirements first, then return to the Locker Planning UK guide for the complete project. When the specification is clear, compare commercial lockers and locker locks suitable for the intended users and environment.
Discover more from Blog Total Locker Service
Subscribe to get the latest posts sent to your email.