Locker Lock Replacement Guide UK: How to Replace Locker Locks
May 7, 2026
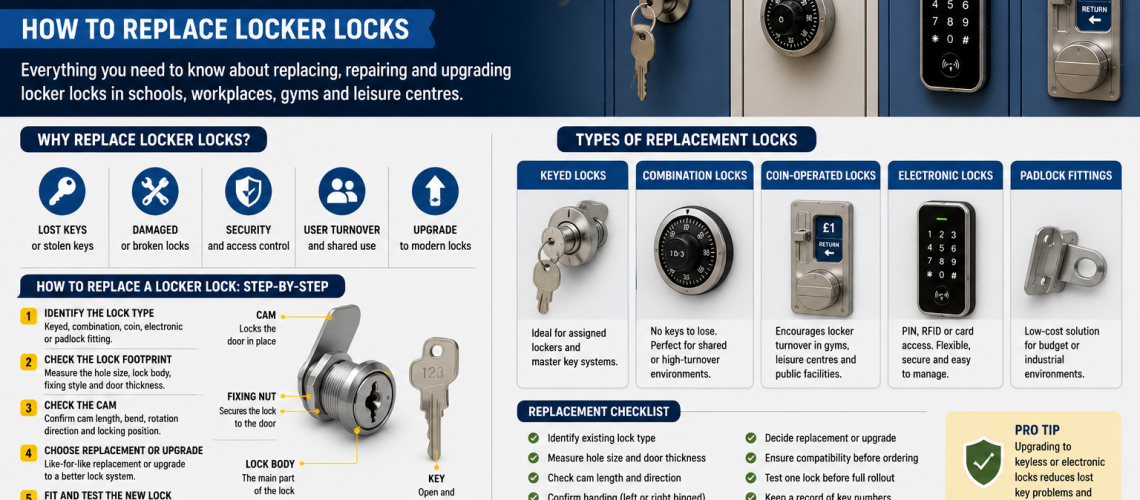
Locker lock replacement means removing a failed, damaged or worn lock and fitting a compatible equivalent without changing the wider access method. The practical job is to preserve the existing door preparation, fit the replacement correctly, refit the cam or latch in the right position and test the mechanism before the locker is returned to use.
This guide owns the physical replacement procedure. It does not decide whether the locker should be retained, which new technology should be selected or how to adapt the locker for a different lock type.
If you do not know what lock is fitted, start with Locker Lock Identification Guide UK. If the proposed replacement is not already known to fit, use Locker Lock Compatibility Guide UK.
Identification = what is fitted. Compatibility = will another one fit. Replacement = physically swap it. Retrofit = modify the locker for a different lock. Upgrade = change the access method.
Quick Answer: How Do You Replace a Locker Lock?
With the locker door open, photograph the existing lock and cam, record the locked and unlocked positions, remove the rear cam and retaining hardware, withdraw the old lock, fit the compatible replacement in the same orientation, refit the correct cam or latch and test the mechanism several times with the door open before closing the locker.
- Open the locker door.
- Photograph the lock from the front and rear.
- Record the cam or latch position.
- Remove the cam or latch fixing.
- Remove the lock-retaining hardware.
- Withdraw the old lock.
- Compare the old and replacement parts.
- Fit the replacement in the correct orientation.
- Refit the correct cam or latch.
- Test repeatedly with the door open.
- Close the door gently and check engagement.
What This Page Owns, and What It Hands Off
- Removing and fitting a compatible replacement lock: this page
- Identifying the existing lock: Locker Lock Identification Guide UK
- Proving dimensional and physical compatibility: Locker Lock Compatibility Guide UK
- Changing the locker to a physically different lock: Retrofit Locker Locks UK
- Changing the access method: Locker Lock Upgrade Guide UK
- Deciding whether replacement is the correct lifecycle intervention: Locker Lifecycle Management Systems UK
- Physical lock ownership cost: Locker Lock Cost UK
Before You Start: Confirm the Replacement Is Already Compatible
This guide assumes the replacement lock has already been identified as a compatible equivalent. Before installation, the important physical points should already be known.
- Door cut-out
- Door thickness
- Fixing method
- Lock body dimensions
- Front footprint
- Cam or latch fixing
- Cam length and offset
- Rotation direction
- Door handing where relevant
- Management or master-key requirement where relevant
If those details are uncertain, stop and use the Compatibility Guide rather than modifying the locker during what should be a straightforward replacement.
Photograph the Existing Lock Before Removing Anything
Photographs provide a simple reference for cam orientation, washer order and lock position.
- Front lock face
- Rear lock body
- Cam or latch
- Locked cam position
- Unlocked cam position
- Retaining nut, clip or bracket
- Washers and spacers
- Anti-rotation plate
- Visible model or manufacturer markings
Keep Small Fixings in Order
Locker locks can use small washers, spacers, clips, screws and anti-rotation parts that are easy to lose or refit in the wrong order.
Use a tray or container and keep removed parts grouped with the locker until the replacement has been commissioned.
Tools Commonly Used for a Nut-Fixed Cam Lock
The exact tools depend on the lock design, but a straightforward keyed cam lock may require:
- Correct screwdriver for the cam fixing
- Suitable spanner or socket
- Small pliers where clips are used
- Ruler or vernier calliper for a final comparison
- Protective gloves where sharp metal edges are present
- Small tray for fixings
- The verified replacement lock and correct cam
Use tools that fit the actual fixing. Damaging a screw head, clip or retaining nut can turn a simple replacement into a larger repair.
Step 1: Open the Locker Door
Routine replacement should be carried out with the locker door open. This gives access to the rear mechanism and reduces the risk of trapping the door shut before the new lock has been tested.
If the locker is closed and no authorised key or override is available, follow the site’s authorised access procedure before starting work.
Step 2: Record the Locked and Unlocked Positions
Before removing the cam or latch, record exactly how it moves.
- Which direction the key or mechanism turns
- Where the cam points when unlocked
- Where the cam points when locked
- Whether the cam is straight or offset
- Which direction an offset faces
- How far the cam engages behind the frame
A replacement lock can fit the door correctly and still fail to secure it if the cam is refitted in the wrong orientation.
Step 3: Remove the Cam or Latch
The rear cam may be secured using a screw, nut, clip or manufacturer-specific fixing.
- Support the cam while removing the fixing.
- Keep washers and spacers in order.
- Note which face of an offset cam points towards the frame.
- Do not discard the original cam until the replacement has been tested.
Step 4: Remove the Lock Retaining Hardware
Many cam locks use a threaded nut behind the locker door. Others use a spring clip, retaining plate or bracket.
Support the lock body from the front while loosening the rear fixing so the lock does not rotate against the door.
Nut-Fixed Locker Locks
For a nut-fixed lock, loosen the retaining nut while holding the front of the lock steady.
- Do not allow the lock body to spin in the door.
- Keep the nut and any washer for reference.
- Check whether an anti-rotation plate is fitted.
- Note the order of the rear components.
Clip-Fixed Locker Locks
Some locks are retained by a spring clip or similar component rather than a threaded nut.
- Identify how the clip is released before applying force.
- Support the lock body as the clip is removed.
- Retain the original clip until the new lock is confirmed.
- Check the replacement uses the same retaining principle.
Step 5: Withdraw the Old Lock
Once the rear cam and retaining hardware have been removed, withdraw the old lock through the door preparation.
Inspect the exposed opening before fitting the replacement.
- Distortion
- Oversized hole
- Sharp burrs
- Cracked laminate or plastic
- Corrosion
- Evidence that the old lock has rotated in the door
- Loose reinforcement components
If substantial modification or reinforcement is required, the job may no longer be a straightforward replacement. Use Retrofit Locker Locks UK for physical adaptation work.
Step 6: Compare the Old and Replacement Locks Side by Side
Even where compatibility has already been checked, a final comparison before fitting can catch simple picking or packing errors.
- Lock body
- Barrel or fixing length
- Fixing method
- Front face / footprint
- Cam fixing
- Cam length
- Cam offset
- Operating rotation
- Keying or management requirement where relevant
If an important dimension or feature differs unexpectedly, resolve it before installation.
Step 7: Fit the Replacement Lock Body
Insert the replacement through the existing opening in the correct orientation.
- Fit the specified washer or anti-rotation plate.
- Fit the retaining nut, clip or bracket.
- Hold the front face square while tightening.
- Secure the lock firmly without distorting the door.
- Check that the lock body cannot rotate in the opening.
Do Not Overtighten the Replacement Lock
Overtightening can distort a thin steel door, damage a laminate surface or place unnecessary stress on the lock body and retaining hardware.
The lock should be secure and resistant to rotation, but the door should remain flat and undamaged.
Step 8: Refit the Correct Cam
Fit the verified cam in the same required locked and unlocked orientation as the original arrangement.
- Correct cam length
- Correct offset direction
- Correct rotation
- Secure cam fixing
- Full clearance through the operating movement
Do not assume the cam supplied in the replacement-lock box automatically matches the locker. Use the cam that has been confirmed for the actual door and frame.
Step 9: Test the Lock Repeatedly With the Door Open
Do not close the locker until the new lock has been operated successfully several times with the door open.
- Operate the lock several times.
- Check smooth key, code or credential operation.
- Check the locked cam position.
- Check the unlocked cam position.
- Confirm the lock body remains secure.
- Confirm the cam does not catch shelves or internal components.
- Test the master or management override where applicable.
Step 10: Close the Door Gently and Check Engagement
Once the lock operates correctly with the door open, close the locker gently and confirm that the cam or latch engages with the frame.
- The door should close without abnormal force.
- The lock should operate without forcing the key or mechanism.
- The cam should engage fully.
- The door should not lift, twist or move excessively when locked.
- The lock should release cleanly when reopened.
If the door needs force to lock, reopen it and check alignment, cam length, cam offset and engagement rather than forcing the mechanism.
Replacing a Damaged Lock Barrel
Where the complete keyed lock barrel is worn, seized or physically damaged, replace it with the confirmed equivalent and preserve the original cam orientation.
- Confirm the keying requirement.
- Confirm any master-key requirement.
- Remove the old barrel with the door open.
- Fit the compatible replacement.
- Refit the correct cam.
- Test ordinary and management keys before closing the door.
Replacing a Bent or Broken Cam
If the lock body itself remains serviceable and only the cam is bent, broken or loose, the cam may be the only component that needs replacement.
- Match length.
- Match offset.
- Match fixing method.
- Match locked orientation.
- Check frame engagement after fitting.
Replacing a Padlock Fitting or Hasp Like for Like
A damaged hasp or padlock fitting can often be replaced without changing the user’s access method.
- Match the existing door preparation.
- Match the fixing-hole positions.
- Check shackle clearance.
- Check door and frame alignment.
- Make sure the new fitting covers the existing opening correctly.
- Test with the intended padlock size.
Replacing a Mechanical Combination Lock Like for Like
Where a damaged combination lock is being replaced with the same or a confirmed equivalent model, preserve the same physical fit and operating mode.
- Match door preparation.
- Match fixing positions.
- Match cam or latch.
- Confirm private-use or public-use mode remains as intended.
- Confirm the reset / management procedure.
- Test the override before returning the locker to service.
If the site is moving from combination to another access technology, use Locker Lock Upgrade Guide UK instead.
Replacing an Electronic Lock Like for Like
Electronic replacement can involve additional service checks even when the replacement is the same model or approved equivalent.
- Correct fixing
- Correct cam or latch
- Battery type
- Battery polarity and compartment closure
- Management or override credential
- Required operating mode
- Programming or reset where required
Changing to a different electronic system, credential type or operating architecture is an upgrade rather than a routine replacement.
Replacing an RFID Lock Like for Like
For an RFID lock being replaced with the same system, confirm both the physical replacement and the expected credential behaviour before the locker is returned to use.
- Physical fit
- Cam or latch
- Power or battery requirement
- Management credential
- User credential operation
- Assigned or public-use mode where applicable
For RFID technology selection or a move to a different RFID system, use RFID Locker Locks UK and the Upgrade Guide.
Replacing a Coin Lock Like for Like
Coin-lock replacement should preserve the existing intended operation unless a wider access-method change has already been approved.
- Manufacturer and model
- Handing
- Coin-retain or coin-return operation
- Coin denomination where applicable
- Latch arrangement
- Door preparation
- Service or management key
Moving from coin operation to hasp, combination, PIN or RFID is a conversion or upgrade and belongs in the Retrofit and Upgrade guides.
Check the Door and Frame Before Final Commissioning
A replacement lock will not correct a door that is badly misaligned or structurally damaged.
- Does the door sit squarely in the frame?
- Are the hinges secure?
- Is the lock opening undamaged?
- Does the frame provide a sound locking point?
- Does the cam engage without forcing the door?
- Are there signs of forced entry or distortion?
If the wider locker condition is in question, return the intervention decision to Locker Lifecycle Management Systems UK.
Common Replacement Problems
| Problem after fitting | Check first |
|---|---|
| Lock body rotates in the door | Retaining hardware, anti-rotation feature and door opening condition |
| Door needs force to lock | Cam length, offset, hinge alignment and frame engagement |
| Cam does not reach the frame | Cam length and orientation |
| Cam strikes the frame | Cam length, offset or locked position |
| Master key no longer works | Replacement keying / master-key group |
| Combination lock cannot be reset | Model, operating mode and reset procedure |
| Electronic lock works open but not closed | Cam / latch alignment and door pressure |
| New lock leaves old opening exposed | Wrong footprint or need for retrofit / adaptor plate |
When Replacement Stops Being Replacement
A job has moved beyond straightforward replacement when it requires a materially different cut-out, new conversion plate, new access technology, new user credential model or a wider decision about whether the locker should remain in service.
- Different physical preparation: use Retrofit Locker Locks UK.
- Different access method: use Locker Lock Upgrade Guide UK.
- Unsure whether the locker should remain in service: use Lifecycle Management.
- Unsure whether the candidate lock fits: use the Compatibility Guide.
Test One Replacement Before Ordering a Large Quantity
Where many lockers use the same lock, fit one verified replacement to a representative locker before committing to the full quantity.
- Confirm physical fit.
- Confirm retaining hardware.
- Confirm cam or latch engagement.
- Confirm door closure.
- Confirm ordinary user operation.
- Confirm management or master access.
- Confirm the finished lock can be serviced.
If several locker ranges or ages exist on the same site, test each distinct arrangement rather than assuming one result applies everywhere.
Record the Replacement
For larger locker estates, recording replacement details can make future maintenance and parts ordering easier.
- Locker number or ID
- Location
- Lock model
- Key series or management group where relevant
- Cam reference
- Replacement date
- Reason for replacement
- Any unusual fitting detail
The replacement guide only records what changed. Ongoing estate records belong in the wider asset-management structure.
Locker Lock Replacement Checklist
- Is the replacement already confirmed as compatible?
- Has the existing lock been photographed?
- Has the locked cam position been recorded?
- Has the unlocked cam position been recorded?
- Are washers, spacers and clips being kept in order?
- Is the locker door open before work starts?
- Is the cam removed carefully?
- Is the lock-retaining hardware removed without damaging the door?
- Has the exposed door opening been inspected?
- Have old and new lock bodies been compared?
- Is the replacement fitted in the correct orientation?
- Is the fixing secure without distorting the door?
- Is the correct cam fitted?
- Has the lock been tested several times with the door open?
- Has management / master access been tested?
- Has the door been closed gently and checked for correct engagement?
- Has the finished replacement been recorded where appropriate?
Common Locker Lock Replacement Mistakes
- Closing the locker before the new lock has been tested open.
- Failing to photograph the original cam orientation.
- Losing washers, spacers or clips.
- Allowing the old or new lock body to spin in the door.
- Fitting the correct lock with the wrong cam orientation.
- Overtightening the retaining nut and distorting the door.
- Forcing the door when the cam does not engage correctly.
- Assuming the cam supplied with the new lock is automatically correct.
- Changing to a different access technology during what should be a like-for-like replacement.
- Modifying the locker door instead of handing the job to the Retrofit process.
- Using replacement work to decide whether the locker should remain in service.
Where Locker Lock Replacement Questions Go Next
| Question | Next guide |
|---|---|
| What lock is currently fitted? | Locker Lock Identification Guide UK |
| Will the proposed replacement fit? | Locker Lock Compatibility Guide UK |
| Does the locker need modifying for a different lock? | Retrofit Locker Locks UK |
| Is the access method changing? | Locker Lock Upgrade Guide UK |
| Should the locker be repaired, refurbished or replaced instead? | Locker Lifecycle Management Systems UK |
| What does the physical lock cost to own? | Locker Lock Cost UK |
| How does RFID lock technology work? | RFID Locker Locks UK |
Locker Lock Replacement FAQs
How do I replace a keyed locker cam lock?
With the locker door open, record the original lock and cam position, remove the cam and retaining hardware, withdraw the old lock, fit the verified compatible replacement, refit the correct cam and test the lock several times before closing the door.
Should a new locker lock be tested with the door open?
Yes. Test the new lock repeatedly with the door open first. Check the fixing, locked and unlocked cam positions, user operation and management access before closing the locker.
Can only the cam be replaced?
Sometimes. If the lock body remains serviceable and the cam is the only damaged component, a correctly matched replacement cam may be sufficient.
Why should I photograph the lock before removing it?
Photographs preserve the original cam orientation, fixing arrangement, washer order and visible markings, making correct reassembly easier.
What should I do if the new lock does not fit the existing opening?
Do not modify the door as part of a routine replacement without reassessing the job. If cutting, drilling or an adaptor plate is required, use the retrofit process.
Can a keyed lock be replaced with a combination or RFID lock?
Often, but changing the access technology is an upgrade rather than a straightforward like-for-like replacement. Use the Upgrade and Retrofit guides for that project.
Should one replacement lock be tested before ordering a full batch?
Yes. A representative test confirms the fixing, cam or latch engagement, door closure and user and management operation before the same replacement is ordered in quantity.
Summary
Locker lock replacement should stay focused on physically removing a failed or worn lock and fitting a verified compatible equivalent.
Keep identification with the Identification Guide, dimensional fit with Compatibility, physical adaptation with Retrofit, access-method change with the Upgrade Guide and the repair/refurbish/replace decision with Lifecycle Management.
The most important installation rule is simple: record the original lock, preserve the cam orientation, fit the replacement carefully and test it repeatedly with the door open before closing the locker.
Discover more from Blog Total Locker Service
Subscribe to get the latest posts sent to your email.