Locker Installation Planning UK: Site Access, Fixing, Layout and Project Coordination
May 13, 2026
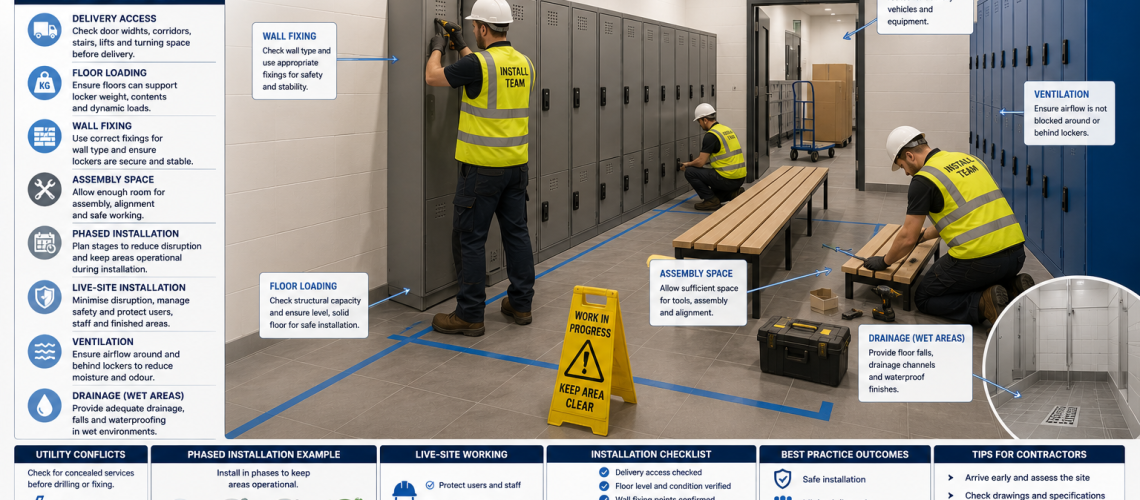
Locker installation planning should begin before the lockers arrive on site. A successful installation depends not only on choosing the correct lockers, but also on delivery access, room measurements, floor condition, wall construction, fixing requirements, locker alignment, door clearance, ventilation, drainage and coordination with other contractors.
Schools, workplaces, factories, warehouses, leisure centres, healthcare sites and commercial changing rooms can all present different installation challenges. Narrow corridors, stairs, lifts, tiled walls, uneven floors, live-site working and restricted delivery periods can all affect how lockers should be delivered, positioned and installed.
Total Locker Service can advise on locker products, delivery requirements and installation support for suitable UK projects.
This locker installation guide explains how to plan the installation stage of a UK locker project, from site readiness and delivery through positioning, linking, levelling, appropriate restraint or fixing, commissioning and final handover. It does not replace the earlier specification or room-layout process.
Quick answer: measure the complete room and delivery route before ordering, confirm the finished locker layout, check the floor and wall construction, identify hidden services, establish how locker banks will be stabilised, leave enough working space for users and doors, coordinate other trades and test every locker and lock before handover.
If the locker size, quantity or room arrangement has not yet been decided, start with our Locker Planning UK guide. For available products, browse our commercial locker range.
What This Page Owns, and What It Hands Off
Locker Installation Planning owns the practical route from an approved locker project to a completed, usable installation. The room layout, product specification and replacement decision should already be substantially defined before this stage begins.
| Question | Owner |
|---|---|
| How do the lockers reach the installation area and get installed? | This guide |
| What locker size, quantity, material and configuration should be procured? | Locker Specification Planning UK |
| How should locker banks, aisles and benches fit the room? | Locker Planning UK |
| How much aisle and working space is required? | Locker Aisle Width Guide UK |
| How much door-opening clearance is required? | Locker Door Clearance Guide UK |
| How are accessibility requirements planned? | Locker Accessibility and DDA Planning UK |
| Which access technology should be specified? | Locker Access Control Systems UK |
| How is an approved replacement programme phased and delivered? | Locker Replacement Planning UK |
| How are faults, parts and routine servicing handled after handover? | Locker Parts & Servicing Guide |
Quick Locker Installation Planning Checklist
- Confirm the locker quantity, dimensions and configuration.
- Confirm the final room layout before delivery.
- Measure the complete delivery route.
- Check external and internal doorways.
- Check corridors, stairs, turns and lifts.
- Confirm unloading arrangements.
- Provide suitable temporary storage where required.
- Check that the installation floor is sound and suitably level.
- Confirm finished floor level before setting out locker runs.
- Check the wall or structure behind the lockers.
- Confirm the manufacturer’s linking, restraint or fixing requirements.
- Check for concealed pipes, cables and other services before drilling.
- Allow sufficient locker-door clearance.
- Allow users to stand and move in front of lockers.
- Include benches in the original room layout.
- Check accessibility and circulation routes.
- Check ventilation and drainage where relevant.
- Allow future cleaning and maintenance access.
- Coordinate flooring, electrical, plumbing, decoration and other trades.
- Plan phased installation where the site remains operational.
- Confirm locker numbers, keys, combinations or electronic credentials.
- Inspect and test the completed installation before handover.
Why Locker Installation Planning Matters
Locker installation is sometimes treated as the final stage of a project after the locker specification has already been decided. In practice, installation conditions can affect the correct product, configuration and layout before an order is placed.
Poor installation planning can result in:
- lockers that cannot physically reach the room;
- insufficient space to manoeuvre or assemble units;
- locker runs that do not fit the available wall;
- doors that clash with walls, benches or other lockers;
- blocked circulation or escape routes;
- unstable or incorrectly supported locker banks;
- doors and locks becoming misaligned;
- damage to floors, walls or finishes;
- fixings being unsuitable for the wall construction;
- conflicts with concealed pipes or electrical services;
- poor ventilation or drainage;
- inaccessible areas for cleaning and repairs;
- conflicts with other trades;
- and avoidable project delays.
1. Confirm the Locker Layout Before Installation
Confirm the final locker positions before delivery. Do not calculate locker capacity from wall length alone.
The completed installation needs to account for:
- locker width and depth;
- door swing;
- users standing at lockers;
- people passing behind them;
- opposing locker banks;
- benches and changing areas;
- columns and structural projections;
- skirting and wall projections;
- radiators and heaters;
- windows;
- electrical equipment;
- pipework and service ducts;
- entrances and exits;
- accessibility;
- cleaning access;
- and future maintenance.
For the complete room-layout process, use Locker Planning UK. Installation should confirm the approved layout on site rather than redesigning it during fitting.
2. Measure the Complete Delivery Route
A locker that fits the finished room still has to reach that room. Measure the complete delivery route before ordering, especially where lockers are supplied assembled.
- vehicle unloading position;
- external gates;
- external doors;
- reception areas;
- corridors;
- internal doorways;
- tight corners;
- stairs and landings;
- ramps;
- lifts;
- and the final approach into the installation area.
Do not compare locker width with doorway width alone. Tall lockers may need considerably more clearance while being tilted, rotated or moved around a corner.
3. Check Lift Dimensions and Capacity
For upper-floor installations, confirm lift access before the lockers are ordered.
- lift-door opening width;
- lift-door opening height;
- internal lift width;
- internal lift depth;
- internal lift height;
- maximum permitted load;
- and the route between the lift and locker room.
If assembled lockers cannot be transported through the building, a product that can be assembled or configured on site may need to be considered instead.
4. Plan Delivery, Unloading and Temporary Storage
Establish where the delivery vehicle can stop and who is responsible for unloading before the delivery date.
Total Locker Service deliveries are normally kerbside to Mainland UK during standard weekday delivery hours unless alternative arrangements have been agreed. The customer should plan suitable unloading and movement from the delivery point. Restricted access, specific dates or times, FORS requirements or other special delivery conditions may affect the delivery arrangement and cost.
- Can the delivery vehicle reach the site?
- Is a loading bay available?
- Are parking or access restrictions in place?
- Is the unloading surface suitable?
- Who will unload the goods?
- How will lockers be moved into the building?
- Is dry temporary storage available?
- Can packaging be removed without obstructing users?
- Will temporary storage interfere with other contractors?
5. Check the Installation Floor
Locker banks need a sound and suitably level base. Floor irregularities can affect the alignment of a long locker run and may cause doors or locking mechanisms to operate poorly.
Check:
- floor level;
- floor condition;
- finished floor height;
- raised-access flooring;
- changes in level;
- drainage falls;
- underfloor heating;
- floor coverings;
- and whether the finished floor will be complete before installation.
6. Locker Floor Levelling
Floor levelling is particularly important when several individual locker units are installed as one continuous bank. Small variations can accumulate along the run and affect door gaps, appearance and lock operation.
The appropriate levelling method depends on the locker system. Some products may use stands, plinths, adjustable components or other manufacturer-approved arrangements.
- Check floor level before positioning the complete bank.
- Establish the correct finished height.
- Level units as required by the locker system.
- Check adjoining locker bodies align.
- Check doors remain square.
- Operate the locks before final handover.
Do not assume an obviously uneven floor can simply be ignored and corrected by forcing the locker bodies into alignment.
7. Consider Floor Loading
Large locker banks, heavy-duty storage and lockers containing tools, equipment or PPE can create significant loads when fully occupied.
Floor loading deserves particular attention on:
- upper floors;
- raised-access floors;
- older buildings;
- mezzanines;
- and areas containing dense groups of storage equipment.
Where floor capacity or supporting construction is uncertain, obtain appropriate competent building or structural advice before installation rather than assuming the floor is suitable.
8. Installing Locker Rows and Banks
Commercial lockers are commonly installed in rows or banks. Individual locker units may need to be linked together, restrained, fixed or otherwise stabilised in accordance with the locker manufacturer’s installation requirements.
Before forming a locker bank:
- confirm the correct locker sequence;
- check locker numbers where units arrive pre-numbered;
- check the floor level;
- position the first unit correctly;
- keep locker fronts aligned;
- follow the approved method for linking adjacent units;
- check doors before final restraint or fixing;
- maintain the planned aisle and door clearances;
- and recheck stability after the complete bank is assembled.
Long locker rows magnify small setting-out errors. Check alignment progressively rather than waiting until every unit has been positioned.
9. Locker Stability, Restraint and Fixing
Lockers need to remain stable in normal use. The correct method of achieving this depends on the locker design, height, depth, base system, bank arrangement and installation environment.
Follow the locker manufacturer’s installation instructions and project requirements rather than assuming every locker should be fixed to a wall in the same way.
Factors include:
- locker height;
- locker depth;
- single units versus linked banks;
- wall construction;
- floor construction;
- stands or plinths;
- back-to-back arrangements;
- and expected use.
10. Wall Fixing Lockers
Where the locker system or project requires wall restraint, the fixing method must suit both the locker and the structure behind it.
The phrase “wall fixing lockers” can sound straightforward, but wall construction varies considerably between buildings.
| Wall type | Installation consideration |
|---|---|
| Solid masonry | Check wall condition and specify a suitable fixing system and fixing depth |
| Stud partition | Suitable structural support or reinforcement may be required |
| Plasterboard lining | Do not assume the board itself provides adequate structural support |
| Tiled wall | Consider tile damage, substrate and the appropriate drilling method |
| Wet-area wall | Maintain the required moisture protection and sealing |
| Wall containing services | Establish service positions before drilling or fixing |
The correct fixing or restraint method should be determined from the actual construction, project requirements and locker manufacturer’s instructions. If the wall or supporting structure is uncertain, obtain competent advice before drilling or fixing.
11. Check for Hidden Services Before Drilling
Before drilling walls or floors, establish whether concealed services may be present.
- electrical cables;
- data cabling;
- water pipes;
- heating pipes;
- drainage;
- gas services;
- underfloor heating;
- and other building services.
This is especially important during refurbishment, where historical drawings may be incomplete or services may have been altered since the building was constructed.
12. Allow Enough Space in Front of Lockers
Installing lockers safely and correctly also means leaving enough room for them to be used properly once the installation team has left.
The required working space depends on:
- locker depth;
- door width;
- door swing;
- opposing locker runs;
- benches;
- number of simultaneous users;
- stored belongings;
- room shape;
- and accessibility requirements.
For detailed calculations, use our Locker Aisle Width Guide UK.
13. Check Locker Door Clearance
A locker can fit against a wall but still be unusable if its doors cannot open correctly.
- Check doors beside walls.
- Check doors at inside corners.
- Check adjacent locker doors.
- Check opposing locker banks.
- Check nearby building doors.
- Check bench positions.
- Allow the user to stand in front of the compartment.
- Check lower lockers where users may need to bend or crouch.
See our Locker Door Clearance Guide UK for the detailed planning stage.
14. Do Not Block Entrances, Exits or Important Routes
Locker banks should not be positioned solely to maximise the number of available doors. The finished layout also needs to preserve the routes required by the building and its users.
- Keep entrances usable.
- Protect required exit and escape arrangements.
- Avoid severe pinch points at locker-run ends.
- Keep important doors operational.
- Do not allow open locker doors to dominate a principal route.
- Check the layout during peak occupancy.
15. Plan Changing Room Benches Before Installing Lockers
Changing-room benches should be part of the original layout. Adding them after lockers have already been fixed can reduce door clearance and turn an acceptable aisle into a congested changing area.
Bench position affects:
- locker-door opening;
- standing space;
- walking routes;
- changing space;
- wheelchair access;
- cleaning;
- and the number of people who can use the room at one time.
Browse our changing-room bench seating or read How to Choose Changing Room Benches UK.
16. Accessibility During Installation Planning
Accessible locker provision should already have been defined during planning. Installation must preserve those agreed positions, reach zones, approach routes and manoeuvring spaces when the locker banks are permanently positioned.
- Maintain the planned accessible approach route.
- Protect required manoeuvring space.
- Check that benches do not intrude into the area.
- Confirm suitable locker and lock positions.
- Check door swing.
- Avoid placing accessible lockers behind temporary or permanent obstructions.
For detailed planning, see our Locker Accessibility and DDA Planning UK guide.
17. Ventilation Around Locker Banks
Locker installation should not unnecessarily obstruct existing ventilation or extraction systems.
This is particularly important where lockers contain:
- wet clothing;
- sportswear;
- workwear;
- PPE;
- boots;
- or other damp equipment.
Check air grilles, vents and extraction routes before fixing the final locker positions. Installation owns keeping the planned airflow path unobstructed; the ventilation requirement itself belongs in Locker Ventilation & Airflow.
18. Locker Installation in Wet Areas
Swimming pools, gyms, wet changing rooms, showers and wash-down environments require additional installation checks.
- Check floor falls.
- Keep drainage channels accessible.
- Avoid creating areas where water can become trapped.
- Use locker materials appropriate to the environment.
- Use lock systems suited to the moisture conditions.
- Allow practical cleaning access.
- Check ventilation.
- Protect appropriate wall and floor waterproofing during installation.
For the wider room design, see our Changing Room Layout Guide: Wet vs Dry Areas UK.
19. Charging Locker Installation
Charging lockers for laptops, tablets, phones, cordless tools or other rechargeable equipment require additional planning beyond a standard unpowered locker installation.
- Confirm the electrical requirements of the product.
- Establish where power will be supplied.
- Coordinate electrical work before the locker position becomes difficult to access.
- Keep cables and connections protected from normal users.
- Allow appropriate access for inspection and maintenance.
- Follow the locker manufacturer’s electrical installation requirements.
See our Charging Lockers UK guide before finalising a powered-storage project.
20. Allow Future Cleaning Access
The locker installation needs to remain practical after the installers leave. Consider routine cleaning while setting out the room.
- Can floors be cleaned around stands or plinths?
- Can the area around locker-run ends be reached?
- Can locker tops be cleaned where required?
- Can wet areas drain and dry?
- Can benches be cleaned underneath?
- Can debris be removed from corners?
21. Allow Future Locker Maintenance
Locks, hinges, doors and other components may need adjustment, repair or replacement during the life of the installation.
- Can doors be removed if required?
- Can hinges be reached?
- Can locks and cams be replaced?
- Can adjoining units be inspected?
- Can nearby building services still be maintained?
- Can technicians reach electronic lock components where fitted?
For fault diagnosis, replacement parts and routine corrective work after handover, use Locker Parts & Servicing Guide. Installation Planning only needs to ensure those components remain practically accessible.
22. Coordinate Locker Installation With Other Trades
Locker installation frequently forms one part of a larger refurbishment or fit-out project.
Coordinate the programme with:
- flooring contractors;
- decorators;
- electricians;
- plumbers;
- HVAC contractors;
- joiners;
- bench installers;
- access-control contractors;
- cleaning teams;
- and principal contractors.
Installing lockers too early can expose finished units to dust, paint, impact damage and other building work. Installing them too late can delay handover.
23. Installing Lockers on Live Sites
Schools, hospitals, factories, offices and leisure centres may remain operational during locker installation.
Plan:
- safe separation of the work area;
- temporary user routes;
- noise and dust management;
- working-hour restrictions;
- storage of tools and packaging;
- temporary locker provision where required;
- delivery movement through occupied areas;
- and phased handover.
24. Phased Locker Installation
Large projects do not always need to be installed in one operation. Phased work can reduce disruption and allow existing storage to remain in service while replacement areas are completed.
- one changing room at a time;
- one floor at a time;
- one department at a time;
- one school block at a time;
- one locker bank at a time;
- or one shift area at a time.
25. Replacing Existing Locker Banks
Replacement projects require additional installation planning because the existing lockers may still contain belongings or remain in daily use until the new installation begins. The wider project scope, phasing and temporary provision belong in Locker Replacement Planning UK; this section focuses on the installation-stage interface.
- Confirm when the old lockers will be emptied.
- Arrange temporary storage if required.
- Check whether old fixings or wall damage need repair.
- Confirm whether flooring continues beneath the existing lockers.
- Allow time for cleaning after removal.
- Check whether services have been concealed behind the old installation.
- Coordinate removal with the arrival of the new lockers.
- Retain allocation and numbering records where users move into replacement lockers.
26. School Locker Installation
Schools often benefit from scheduling locker installation during holidays, inset days or other lower-occupancy periods.
- Check corridor widths.
- Protect required circulation and escape routes.
- Consider pupil movement between lessons.
- Confirm stability and fixing requirements.
- Coordinate locker numbering.
- Plan key allocation before pupils return.
- Protect new lockers from subsequent building work.
- Coordinate installation with flooring and decoration programmes.
27. Workplace Locker Installation
Workplace installation should account for shift patterns, welfare facilities, changing rooms and whether the storage area can be taken completely out of service.
- Plan around shift changes.
- Keep alternative storage available where necessary.
- Coordinate with workplace refurbishment work.
- Confirm staff locker allocation.
- Confirm numbering.
- Check keys, combinations or electronic credentials before handover.
- Allow suitable space for PPE and workwear where required.
28. Factory and Warehouse Locker Installation
Industrial sites can add contractor induction requirements, loading-bay controls, restricted working areas and concentrated shift patterns.
- Confirm site induction requirements.
- Plan delivery-vehicle access.
- Coordinate work with shift changes.
- Allow suitable storage for PPE and workwear.
- Check floor condition.
- Check the environment is suitable for the locker specification.
- Allow future maintenance access.
29. Gym and Leisure Centre Locker Installation
Gym and leisure installations need to consider high user turnover, benches, wet areas and the operation of coin, combination, RFID or electronic locks.
- Check drainage and floor falls.
- Confirm locker material suitability.
- Allow wet-area cleaning access.
- Plan benches before locker positions are fixed.
- Confirm management and override access.
- Check electronic lock commissioning where applicable.
- Protect completed lockers from unfinished wet trades.
30. Healthcare Locker Installation
Healthcare installations may require phased working, controlled contractor access and careful coordination around staff-changing operations.
- Plan around staff shifts.
- Maintain required access routes.
- Coordinate with estates or facilities teams.
- Allow appropriate cleaning access.
- Confirm staff locker allocation.
- Plan installation around operational areas.
- Check electronic access or charging requirements before commissioning.
31. Locker Numbering Before Handover
Agree the locker numbering system before users are allocated storage.
Clear numbering improves:
- user allocation;
- replacement-key ordering;
- fault reporting;
- maintenance records;
- asset management;
- master-key records;
- and future locker audits.
Total Locker Service can manufacture engraved laminate locker numbers and identification products for existing and new locker installations. Stable asset identifiers and physical record fields belong in the Locker Asset Register, while user allocation belongs in Locker Management Systems.
32. Test Locker Locks Before Handover
Every installed locker should be checked before normal use begins.
- Operate keyed locks.
- Check that the correct keys are available.
- Test master keys where specified.
- Check combination-lock operation and reset procedures.
- Test electronic or RFID credentials.
- Confirm the specified technical management or override function operates as intended.
- Check cams and latches engage correctly.
- Confirm doors close without excessive force.
- Check numbering corresponds with allocation records.
33. Final Locker Installation Inspection
- Are locker runs straight and correctly aligned?
- Are all units stable?
- Have units been linked, restrained or fixed as required?
- Do all doors open freely?
- Do all locks operate correctly?
- Are locker doors clear of benches?
- Are circulation routes usable?
- Are accessible approaches clear?
- Are locker numbers correct?
- Are all specified accessories present?
- Has packaging been removed?
- Is the floor clean and accessible?
- Are ventilation and drainage points unobstructed?
- Have keys and management credentials been handed over?
- Have relevant operating instructions been provided?
Installing Lockers Safely and Correctly
Safe locker installation is not achieved through one fixing or one installation rule. It comes from matching the installation method to the locker system and building.
The essential principles are:
- follow the locker manufacturer’s instructions;
- use the correct linking or stabilisation method;
- use fixings suitable for the supporting structure where fixing is required;
- check for hidden services before drilling;
- install locker banks level and stable;
- protect required building routes;
- allow doors to operate safely;
- keep the installation area controlled while work is taking place;
- and inspect the completed system before users are given access.
Where there is uncertainty about the building structure, electrical systems, concealed services or another specialist aspect of the work, the appropriate competent person should assess that part of the installation.
Common Locker Installation Mistakes
- Ordering before checking the complete delivery route.
- Measuring only wall length instead of the complete room.
- Failing to check lift dimensions.
- Ignoring finished floor level.
- Installing a long locker bank on an unsuitable uneven floor.
- Assuming every locker requires the same wall-fixing method.
- Assuming plasterboard alone is a suitable structural fixing point.
- Drilling without checking for concealed services.
- Ignoring locker door swing.
- Forgetting user standing space.
- Adding benches after lockers have been positioned.
- Blocking ventilation grilles.
- Restricting drainage in wet areas.
- Failing to allow cleaning access.
- Failing to allow future lock or hinge replacement.
- Installing lockers before dirty building work is complete.
- Failing to coordinate electricians on charging or electronic-lock projects.
- Failing to plan around live-site users.
- Leaving numbering and key allocation until after handover.
- Failing to test every lock and door before commissioning.
Locker Installation Project Sequence
- Confirm the approved project information. Use the agreed quantity, product specification and room layout from Specification Planning and Locker Planning.
- Verify the installation area. Recheck walls, doors, floors, services, benches and obstructions against the approved information.
- Survey the delivery route. Check unloading, corridors, stairs, lifts and turns.
- Confirm the installation method. Review manufacturer requirements for linking, levelling, restraint and fixing.
- Coordinate other trades. Establish when flooring, decoration, electrical and plumbing work will be complete.
- Arrange delivery and unloading. Confirm access and temporary storage.
- Set out the locker positions. Recheck measurements before fixing anything permanently.
- Position and level the locker units. Maintain correct alignment through the complete run.
- Link and stabilise the bank. Use the appropriate installation method.
- Install benches and accessories. Preserve door and aisle clearances.
- Configure numbering and locks. Prepare keys, codes or credentials.
- Inspect the installation. Check stability, alignment, doors, locks and routes.
- Handover. Provide keys, override information and relevant operating instructions.
Related Locker Installation and Planning Guides
- Locker Specification Planning UK – define the written project requirement before ordering.
- Locker Planning UK – room layout, locker banks, aisles and benches.
- How Many Lockers Do You Need? – quantity and capacity planning.
- Locker Aisle Width Guide UK – working and circulation space.
- Locker Door Clearance Guide UK – door-opening space and obstructions.
- Locker Accessibility and DDA Planning UK – inclusive reach and approach planning.
- Changing Room Layout Guide UK – wet and dry changing-room planning.
- Charging Lockers UK – powered-storage requirements.
- Changing Room Benches UK – bench selection and placement.
- Locker Ventilation & Airflow – passive airflow principles.
- Locker Replacement Planning UK – approved replacement programme delivery.
- Locker Parts & Servicing Guide – post-handover faults, parts and servicing.
- Commercial Lockers
- Changing Room Bench Seating
Locker Installation FAQs
What should be checked before installing lockers?
Check the approved locker specification and room layout, complete delivery route, installation-area dimensions, floor condition, wall construction, manufacturer fixing or restraint requirements, hidden services, locker door clearance, aisles, benches, ventilation, drainage, accessibility and coordination with other trades.
Do lockers need to be fixed to a wall?
Not every locker installation uses the same method. Lockers may require linking, restraint, structural fixing or another method of stabilisation depending on the locker design, manufacturer instructions, bank configuration and building construction. Follow the requirements for the particular locker system and site.
Can lockers be fixed to plasterboard walls?
The wall construction needs to be assessed before structural fixings are used. Plasterboard lining itself should not automatically be assumed to provide suitable structural support. The appropriate fixing arrangement depends on the partition construction, available structural support and locker requirements.
How are locker rows installed?
Locker units are positioned and levelled to form the planned row or bank, then linked, restrained or fixed in accordance with the particular locker system. Alignment, stability, door operation and aisle clearance should be checked throughout the installation.
Why must lockers be level?
A suitably level installation helps keep locker bodies and doors correctly aligned. Significant floor irregularities can cause uneven door gaps, poor appearance and problems with door or lock operation across a long locker bank.
Can lockers be installed on an uneven floor?
The completed locker bank needs to be level and stable. Where the building floor is uneven, the appropriate solution depends on the locker system, floor condition and installation method. The floor should be assessed before the final locker run is installed.
How much space should be left in front of lockers?
Enough space is needed for locker doors to open, for users to stand at the compartments and for any required circulation behind them. The correct allowance depends on locker depth, door width, opposing rows, benches, user numbers, stored items and accessibility requirements.
Should locker benches be installed before or after lockers?
The installation sequence depends on the project, but the bench positions should be included in the room plan before the lockers are permanently positioned. This ensures sufficient locker-door clearance, changing space and circulation remain available.
What should be checked before drilling to fix lockers?
Confirm the supporting construction, appropriate fixing method and the possible location of concealed electrical cables, water pipes, heating pipes, drainage, gas services, data cabling or underfloor systems before drilling.
Can locker installation be phased?
Yes. Schools, workplaces, hospitals, factories and leisure facilities can often install lockers one room, area, floor or bank at a time so that other storage areas remain available during the work.
What should be checked when installing lockers in wet areas?
Check locker and lock suitability, floor falls, drainage, moisture exposure, ventilation, cleaning access and the wall and floor construction. Avoid creating inaccessible areas where water can collect.
What is different about installing charging lockers?
Charging lockers require the electrical provision to be planned alongside the physical locker installation. Power location, cabling, access for maintenance and the manufacturer’s electrical requirements should be confirmed before the locker position is finalised.
What should be tested after lockers are installed?
Check stability, alignment, door opening, lock operation, keys or credentials, numbering, accessories, aisle clearance and bench clearance. The completed area should also be clear of packaging and ready for normal cleaning and use.
What is the difference between locker planning and locker installation planning?
Locker Planning defines how locker banks, aisles, benches and user space fit the room. Locker Installation Planning starts from that approved layout and deals with site readiness, delivery, positioning, levelling, linking, restraint or fixing, commissioning and handover.
Plan the Installation Before the Lockers Arrive
The easiest locker installation problems to solve are the ones identified before delivery. Verify the approved room layout on site, measure the complete delivery route, establish how the locker banks will be supported and stabilised, check the floor and wall construction and coordinate the programme with other trades before the installation date.
Installing lockers correctly also improves the finished storage system. Straight and stable locker banks, free-moving doors, usable circulation, appropriate ventilation and future maintenance access all contribute to lockers that are easier to use and manage throughout their working life.
Total Locker Service supplies commercial lockers, locker locks, replacement keys, parts and changing-room bench seating for schools, workplaces, industrial sites, healthcare facilities, gyms and leisure centres throughout the UK.
For locker project assistance, call 01284 749211 or email sales@totallocker.co.uk.
Discover more from Blog Total Locker Service
Subscribe to get the latest posts sent to your email.