Locker Layout Planning UK: How to Arrange Lockers, Benches and Access Routes
April 10, 2026
Locker layout planning is the stage where a changing room starts to take practical shape. Once the overall room size is known, the next job is to decide how the lockers, benches and main access routes should be arranged inside that space. A good layout helps the room feel organised, usable and easy to manage from day one.
For the full topic overview, start with our locker room design guide.
Locker layout planning means deciding where lockers, benches, entrances, exits and access routes should sit within a room before detailed spacing, capacity or product choices are made.
This guide focuses on how to arrange a locker room step by step. It does not cover overall room size, locker quantities or detailed spacing rules. For room dimensions, read locker room sizes and space planning explained. For locker numbers, see how many lockers do you need. For clearance and access, read locker spacing guidelines.
What locker layout planning means
Layout planning is the process of deciding where the main elements of the room should go. At this stage, the aim is not to calculate exact locker numbers or set detailed spacing dimensions. The goal is to arrange the room logically so the main locker runs, bench areas and access routes sit in sensible positions.
In simple terms, this page answers one question: how should the room be arranged?
Step 1: Confirm the room boundary and fixed features
Start with the shape of the room itself. Identify the outer walls and any fixed features that cannot be moved, such as doors, windows, columns, service points or built-in structures. These elements define the usable planning area and affect where locker runs can realistically be placed.
This stage is about understanding the physical boundary of the room before arranging any fittings inside it. If you still need to review the overall room footprint, see locker room sizes and space planning explained.
Step 2: Identify entry and exit points
Next, mark the main entry and exit points. These are important because they shape the natural direction of movement through the room. Locker runs should be arranged so access starts clearly from the entrance rather than forcing users into awkward turns or unclear routes.
If the room connects to showers, toilets, work areas or wet zones, treat those links as part of the layout plan. They help define how the room should be organised from one side to the other.
Step 3: Position the main locker runs
Once the room boundary and access points are clear, place the main locker runs. In many rooms, this starts with the longest or most practical wall. In larger rooms, it may include more than one run or a combination of perimeter and central layouts.
The main point is to give the room a clear structure. Locker runs should feel deliberate and organised rather than scattered. This stage is about deciding where the primary storage zones belong.
If you are still deciding which layout type suits the room best, see locker room layouts: small, medium and large.
Step 4: Add secondary locker areas if needed
After the main runs are placed, decide whether the room needs any secondary locker areas. These might sit on shorter walls, opposite main runs or in another defined section of the room. The purpose is not to fill every available surface, but to support the room’s overall arrangement in a controlled way.
Secondary runs should support the main structure of the room rather than compete with it. If the room starts to feel fragmented, the arrangement is probably becoming too complicated.
Step 5: Position benches and support features
Once the locker zones are established, position benches and any related changing features. Benches should sit in places that support the locker arrangement rather than interrupt it. At layout stage, you are deciding where benches belong in the room, not yet setting exact clearance rules around them.
If benches are part of the project, it helps to consider them early enough that they become part of the arrangement instead of an afterthought. For bench-specific advice, read our guide to choosing changing room benches.
Step 6: Review how the room connects together
With lockers and benches placed in principle, review the room as a connected whole. The aim is to check that the arrangement makes sense from entrance to exit and that the key zones feel logically related. This is where you confirm that the layout works as a layout before moving on to more detailed checks.
This is not the stage for detailed spacing measurements. Those belong in our locker spacing guidelines. Here, the job is simply to make sure the room arrangement is coherent.
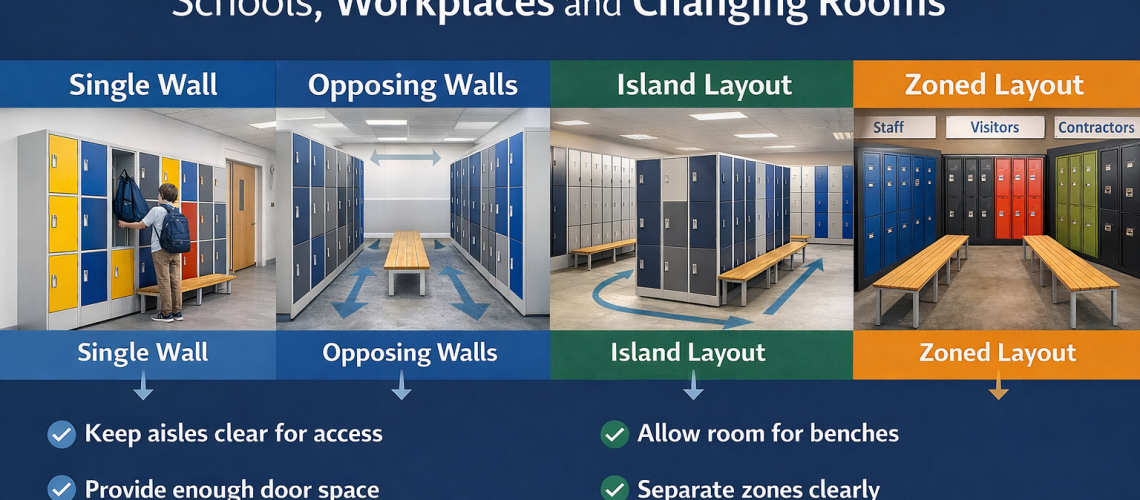
Common layout patterns
Most locker rooms will follow one of a few broad arrangement patterns:
- Single-wall layouts
- Perimeter layouts
- Facing locker runs
- Central or island-based arrangements
- Zoned layouts for larger rooms
| Layout pattern | Best for | Main benefit |
|---|---|---|
| Single-wall layout | Small rooms and narrow spaces | Simple access and easy installation |
| Perimeter layout | Medium rooms and changing areas | Uses wall space efficiently |
| Facing locker runs | Rooms with enough central clearance | Creates strong storage capacity |
| Island layout | Larger rooms | Creates clear zones and higher capacity |
| Zoned layout | Large or multi-use spaces | Separates users, functions or departments |
The right choice depends on the room shape and intended use. For examples of which pattern suits which room size, see locker room layouts: small, medium and large.
Before arranging the room in detail, review locker room sizes and space planning explained and locker spacing guidelines.
Common layout planning mistakes
- Placing lockers before identifying entry and exit points
- Treating benches as an afterthought
- Adding too many locker runs too early
- Using a layout pattern that does not suit the room shape
- Moving into detailed spacing or capacity decisions before the arrangement is settled
Most layout problems begin when the room is arranged without a clear sequence. Starting with the room boundary, then access points, then locker runs, then benches usually leads to a much cleaner result.
To compare arrangement types, see locker room layouts: small, medium and large. You can also browse our lockers or return to the locker room design guide.
How to check a layout plan before moving to detail
Before moving into spacing, quantity or product-level choices, ask these questions:
- Are the entry and exit points clear?
- Do the main locker runs give the room a clear structure?
- Are any secondary runs actually helping the layout?
- Are benches placed in the right general position?
- Does the room feel organised rather than fragmented?
If the answer to any of these is no, the arrangement may need revising before detailed planning continues.
Locker layout planning summary
Locker layout planning is about establishing the structure of the room. Once the room boundary, entry points, locker runs and bench positions are arranged properly, the next stages become much easier. A clear layout gives the room shape, order and purpose before moving into sizing, spacing and quantity decisions.
For the wider topic, read our locker room design guide. For room scale, see locker room sizes and space planning explained. For detailed clearance, read locker spacing guidelines. You can also browse our range of lockers.
If you already know the room layout and need suitable products, browse our locker range or contact us for help matching locker type, size and lock option to your space.
For wider workplace storage planning, read our storage systems guide.
Next steps
- Locker Room Design UK: Layout, Lockers, Benches and Planning Guide
- Locker Room Sizes and Space Planning Explained
- Locker Spacing Guidelines: How Much Space Do You Need?
- View lockers
Locker Layout Planning FAQs
What is locker layout planning?
Locker layout planning is the process of deciding where lockers, benches, entrances, exits and access routes should be positioned within a room. It focuses on the overall arrangement before detailed decisions about spacing, capacity or locker types are made.
Where should lockers be placed in a changing room?
Lockers are usually placed along the longest or most practical walls first to create a clear structure. In larger rooms, lockers may also be arranged in facing runs or central layouts. Placement should follow the natural flow from the entrance and avoid blocking main access routes.
Should benches be planned before or after lockers?
Locker positions are usually planned first to establish the main structure of the room. Benches should then be positioned to support that layout. However, benches should still be considered early enough that they are integrated into the layout rather than added as an afterthought.
What is the best locker room layout?
There is no single best layout. The right arrangement depends on the room size, shape and how it will be used. Common layouts include single-wall, perimeter, facing runs and central or island layouts. The best option is the one that creates a clear, logical flow through the space.
What should be checked before finalising a locker layout?
Before moving to detailed planning, check that entry and exit points are clear, locker runs create a strong structure, benches are positioned logically and the overall layout feels organised rather than fragmented. If any of these are unclear, the layout should be reviewed before adding detailed measurements.
Discover more from Blog Total Locker Service
Subscribe to get the latest posts sent to your email.