Locker Spacing Guidelines: How Much Space Do You Need?
April 18, 2026
Key point: Correct locker spacing allows someone to use a locker without blocking nearby access. Poor spacing reduces comfort, restricts movement and makes the room harder to use.
For full planning guidance, start with our locker room design guide.
This guide focuses on spacing between lockers, benches and access routes. It does not cover overall room size, locker quantities or full layout planning. For the wider process, read our locker room design guide. If you are planning quantities, see how many lockers do you need. If you need overall room dimensions, read locker room sizes and space planning explained.
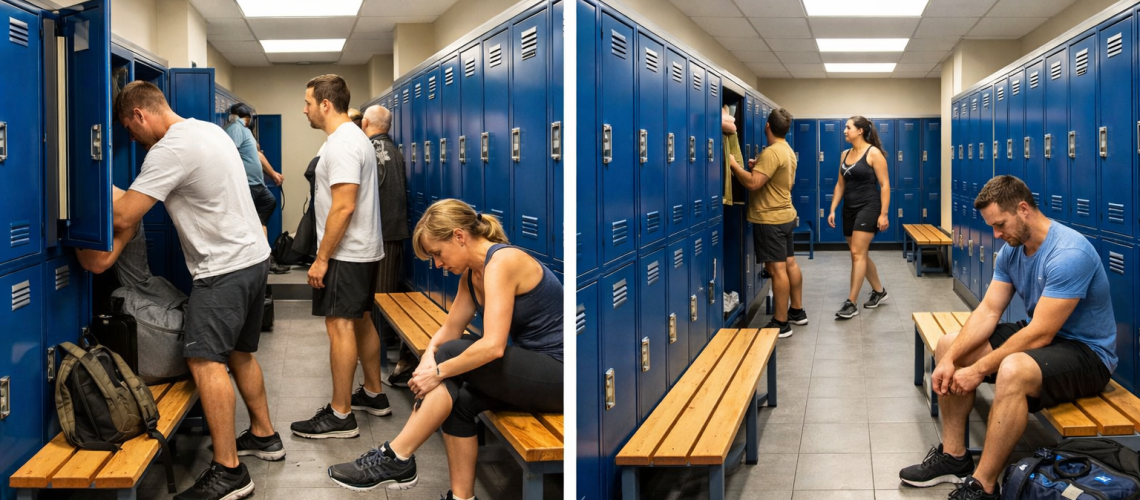
What locker spacing covers
Locker spacing is the practical clearance needed around lockers so they can be used properly. That includes the space in front of lockers, aisle width, door opening clearance, space around benches and access near walls, corners and entrances.
The purpose of locker spacing is simple. Users need enough room to open a locker, stand in front of it and move away again without unnecessary obstruction.
Why locker spacing matters
Good spacing improves access, reduces obstruction and helps the room function more smoothly. If clearances are too tight, locker doors become awkward to use, walkways feel restricted and bench positions can interfere with access.
Spacing also affects maintenance. Narrow gaps can make cleaning more difficult and increase the chance of congestion in busy periods.
The main spacing zones to review
When checking locker spacing, focus on five areas:
- clear space in front of lockers
- walkways and aisles
- door opening clearance
- space around benches
- access near corners, walls and entrances
A room can look acceptable on plan but still perform badly if one of these clearance zones is too tight.
Clear space in front of lockers
The space directly in front of lockers is one of the most important clearance areas. Users need room to stop, open the door, reach inside and step away again. If this space is too limited, the lockers become awkward to use.
There should be enough room for a person to stand comfortably in front of an open locker without completely blocking nearby access. In busier rooms, more clearance is usually needed so access is not interrupted every time a locker is opened.
Walkways and aisles
Walkways should provide usable access through the room without forcing people to stop whenever a locker door opens. Main aisles usually need more width than short secondary access routes because they carry more regular movement.
Where lockers face each other, the aisle needs to account for activity on both sides. If the space is too tight, access quickly becomes restricted.
For overall room arrangement and layout logic, see our locker room design guide.
Door opening clearance
Locker spacing should always take door movement into account. A locker may fit into a layout on paper, but the clearance still needs to work once the door is open.
Check whether doors open into benches, opposing lockers or active walkways. Single rows against a wall are often simpler to manage because the door opens into one defined clearance zone. Facing rows usually need more attention because open doors affect both sides of the aisle.
For more on lock and handle choices, see best lock types for changing rooms.
Spacing around benches
Benches need their own clearance zone. The issue is not just the bench footprint. There also needs to be enough space around it for lockers to remain usable and for nearby access routes to stay practical.
Where benches run parallel to lockers, make sure the space between the bench edge and locker fronts still allows lockers to be opened and used properly. Where benches are placed centrally, the surrounding clearance needs to work on all accessible sides.
Spacing works best when reviewed alongside locker room sizes and space planning explained and locker layout planning guide.
If benches are part of the project, our guide to choosing changing room benches covers the bench decision in more detail.
Corners, run ends and entrances
Spacing problems often appear at edges and transitions rather than along the main locker run. A corner can become too tight, a run end can sit too close to a wall, or an entrance can open directly into an active access zone.
Pay particular attention to:
- the first lockers nearest the entrance
- the ends of locker runs
- tight turns near adjacent areas
- places where benches reduce usable clearance
These areas often reveal spacing problems first.
Common locker spacing mistakes
- allowing for locker dimensions but not front clearance
- forgetting door swing when placing opposing runs
- placing benches too close to active locker fronts
- making main aisles too tight for practical access
- ignoring corners, run ends and entrance pressure points
Most spacing problems come from underestimating the clearance needed around lockers once the room is in use.
If benches are part of the room, see our guide to choosing changing room benches. You can also browse our lockers or return to the locker room design guide.
How to review locker spacing
Before finalising a scheme, check the spacing from a practical access point of view. Ask:
- Can a locker door open fully without obstructing the next access route?
- Is there enough standing space in front of each locker?
- Do benches reduce access more than expected?
- Are corners, run ends and entrances clear enough?
- Do facing locker runs still allow practical use on both sides?
If the answer to any of these is no, the spacing needs adjustment before installation.
Locker spacing should focus on clearance and access
Good locker spacing is about practical clearance. Users need enough room to open doors, stand in front of lockers and move through the area without unnecessary obstruction. When those clearances work, the locker area is easier to use and easier to maintain.
For the wider planning process, read our locker room design guide. If you need help with quantities, see how many lockers do you need. For overall room dimensions, read locker room sizes and space planning explained. You can also browse our range of lockers.
Next steps
- Locker Room Design UK: Layout, Lockers, Benches and Planning Guide
- Locker Room Sizes and Space Planning Explained
- How Many Lockers Do You Need?
- View lockers
Discover more from Blog Total Locker Service
Subscribe to get the latest posts sent to your email.