Locker Room Layouts: Small, Medium and Large
April 16, 2026
Choosing the right locker room layout depends largely on the size of the space available. A layout that works well in a small changing room may not suit a larger one, and larger spaces require a different approach to keep the room organised and easy to use.
og/locker-room-design-uk-layout-lockers-planning-guide/”>locker room design guide.This guide focuses on which layout types suit small, medium and large locker rooms. It does not cover spacing, locker quantities or full planning. For overall room size, see locker room sizes and space planning explained. For clearance and access, read locker spacing guidelines. For the full planning process, see our locker room design guide.
Small locker rooms: best layout options
In smaller locker rooms, layouts need to make efficient use of limited wall space while keeping the room practical to use. The aim is to keep the layout simple and avoid overcrowding the space.
Single-wall locker layout
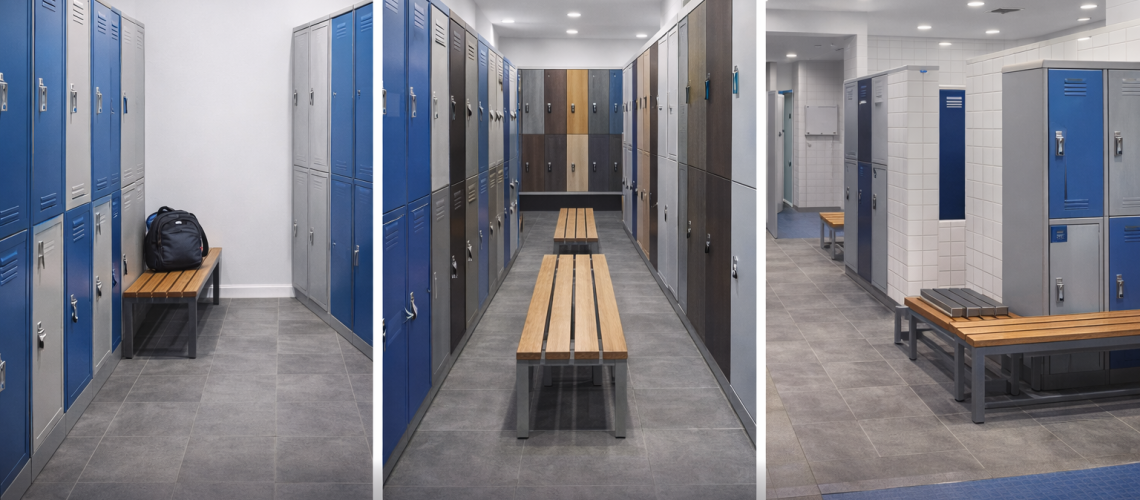
Lockers are arranged along one wall, leaving the rest of the room open. This is one of the simplest and most reliable layouts for compact spaces.
- keeps the layout straightforward
- works well where space is limited
- leaves a clear open area for access
Back-to-wall locker layout
Lockers are placed along two walls where space allows. This increases storage while still keeping the room relatively simple.
Small locker rooms are best suited to layouts that minimise complexity and avoid adding too many features into a limited footprint.
For overall room size considerations, see locker room sizes and space planning explained.
Medium locker rooms: best layout options
Medium-sized locker rooms allow more flexibility. At this scale, layouts can support more storage while still maintaining a clear and organised structure.
Facing locker runs
Lockers are placed on opposite walls or in parallel rows. This increases capacity while keeping the layout easy to understand.
- efficient use of available space
- balanced layout
- suitable for regular use environments
Perimeter locker layout
Lockers are arranged around the outer walls of the room, leaving a central area open. This works well where a more open feel is needed.
Layout choice works best when paired with locker room sizes and space planning explained and locker spacing guidelines.
Medium rooms benefit from layouts that balance storage with usable open space, without overcomplicating the arrangement.
For clearance between lockers and access routes, read locker spacing guidelines.
Large locker rooms: best layout options
Large locker rooms offer more flexibility but still need a clear structure. Without a defined layout approach, large spaces can become disorganised.
If you want the process behind arranging the room, read our locker layout planning guide. You can also browse our lockers or return to the locker room design guide.
Island locker layout
Lockers are arranged in central blocks or islands, with access around them. This layout works well in larger rooms where there is enough space to support it.
- maximises storage capacity
- works well in larger rooms
- creates defined sections within the space
Zoned locker layout
The room is divided into different areas for lockers, changing and other functions. This is often used in larger or more complex environments.
Large rooms benefit from layouts that create structure within the space rather than leaving it open and undefined.
For the full planning process, see locker room design guide.
How to choose the right layout
The right layout depends on the size of the room and how it will be used. Smaller rooms need simple, efficient layouts, while larger rooms can support more complex arrangements. The key is to match the layout type to the available space rather than trying to force a layout that does not fit.
Start by identifying the room size, then select the layout approach that suits that scale. Detailed spacing and locker selection can be refined afterwards.
Next steps
- Locker Room Design UK: Layout, Lockers, Benches and Planning Guide
- Locker Room Sizes and Space Planning Explained
- Locker Spacing Guidelines: How Much Space Do You Need?
- View lockers
Discover more from Blog Total Locker Service
Subscribe to get the latest posts sent to your email.