Traffic Flow in Changing Rooms: Avoiding Congestion
April 13, 2026
Traffic flow is one of the most important parts of changing room design, yet it is often treated as an afterthought. Lockers, benches and doors may all be in the right place individually, but the room can still feel awkward, crowded and frustrating if people cannot move through it comfortably. In busy schools, leisure centres, gyms, workplaces and sports facilities, poor flow quickly leads to congestion, delays, mess and avoidable wear.
A changing room should do more than hold lockers and seating. It should guide people naturally from entry to storage, from storage to changing, and from changing to exit. When that movement pattern works well, the space feels calmer, safer and easier to manage. When it does not, users bunch together, aisles become blocked, and the whole room becomes harder to use.
This guide explains how traffic flow works in changing rooms, what causes congestion, and how to create layouts that help people move around the space with less delay and less frustration.
Why traffic flow matters in a changing room
Changing rooms are not static spaces. People are constantly entering, opening lockers, carrying bags, getting changed, sitting down, queuing, drying off and leaving again. Good traffic flow allows all of those movements to happen with less conflict between users.
That matters for several reasons. First, it improves the user experience. A room that feels open and organised is easier to navigate and more pleasant to use. Second, it supports safety. Narrow pinch points, blocked exits and crowded walkways can increase the risk of slips, trips and accidental collisions. Third, it helps with maintenance. Spaces that allow smoother movement are easier to clean and tend to suffer less damage over time.
Flow also affects how efficient the room feels at busy times. A changing room may have enough lockers and enough benches on paper, but if too many people are forced into the same small section of the room at once, it will still feel undersized.
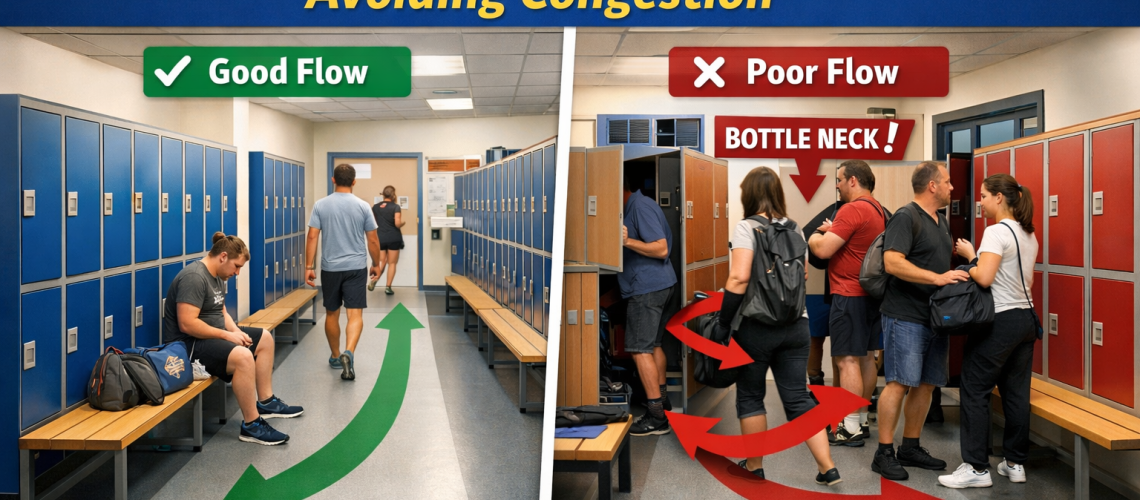
What causes congestion in changing rooms?
Congestion usually happens when several actions compete for the same space. That can happen in front of locker banks, near entrances, around bench ends or in routes between wet and dry areas.
One common problem is placing lockers in a way that creates a working zone directly inside a main circulation route. When locker doors are open and bags are on the floor, the aisle is no longer being used only for walking. It becomes a shared space for movement, access and changing. That overlap often creates bottlenecks.
Another issue is poor bench positioning. Benches support changing, but they also draw people into one place for longer than a quick stop at a locker. If benches are placed too close to locker doors or too near entry routes, the room can become blocked even when the furniture itself fits comfortably.
Door locations can also create problems. An entrance that opens straight into a narrow run of lockers or bench seating can force everyone into a single crowded lane. Likewise, if people entering and leaving use the same constricted point, traffic can back up quickly during peak periods.
In some layouts, the issue is not one large mistake but several small ones. A slightly narrow aisle, a bench that projects a little too far, a locker door swing into a walkway and a cleaning trolley left nearby can combine to make the room feel much more cramped than expected.
Understand the difference between circulation space and use space
One of the best ways to plan traffic flow properly is to separate circulation space from use space. Circulation space is the area people move through. Use space is the area they occupy while opening lockers, sitting on benches, changing shoes or handling bags.
Problems begin when both types of space are forced into the same footprint. A walkway may look wide enough on a drawing, but once locker doors are open and people are standing in front of them, the usable walking route can shrink dramatically.
That is why planning only around furniture dimensions is not enough. You also need to think about how each item behaves in use. Lockers need clearance in front. Benches need access on one or both sides. Doorways need room for people to pause, turn and continue moving. Bags and kit also need to be accounted for, especially in sports and leisure settings.
A strong layout gives these actions room to happen without blocking the main route through the space.
Start with the busiest movement routes
Every changing room has primary routes and secondary routes. The primary routes are the busiest paths that most users will take. These usually run from the entrance to the lockers, from lockers to benches, and from the changing area to showers, toilets or exits. Secondary routes connect smaller sections or allow access to individual locker rows.
Primary routes should be the easiest and clearest paths in the room. They should not rely on users weaving around bench corners or stepping past open locker doors. Where possible, these routes should feel obvious the moment someone enters the room.
Secondary routes can be narrower or more localised, but they still need to work safely and comfortably. A layout often fails when there is no proper distinction between the two, leaving the whole room to operate as one crowded shared space.
It helps to imagine how the room will work at the busiest point of the day, not just when it is half empty. A layout that seems acceptable in quiet use may break down completely when several people arrive at once.
Position lockers without blocking movement
Lockers are often the biggest driver of traffic patterns because nearly every user interacts with them. The area in front of a locker is rarely just a passing space. It becomes a stopping space, a bag-drop space and sometimes a changing space too.
For that reason, locker fronts should not be treated as neutral walkways. If the main route through the room runs directly in front of the most heavily used lockers, congestion is likely. A better approach is to create circulation paths that run past locker zones without depending entirely on them.
Double-bank locker arrangements can work well where space allows, but the aisle between them needs careful planning. The route must cope with open doors, people standing in front of lockers and others walking through at the same time. In tighter rooms, single-bank layouts against the wall may offer better overall flow even if they look less dense on paper.
It is also worth thinking about which lockers are likely to receive the heaviest use. Units nearest the entrance are often chosen first, even in unassigned systems. That can create a crowded hotspot at the front of the room while lockers further in remain underused.
Use benches to support the layout, not interrupt it
Benches are essential in many changing rooms, but they need to be placed with movement in mind. A bench should support changing activity without cutting across the room’s most important routes.
Central bench islands can work well in larger spaces because they provide access from multiple sides and help break the room into zones. In smaller rooms, however, they can create unnecessary obstacles if the aisles around them are too narrow or if users end up clustering at each end.
Wall-mounted or perimeter benches may suit compact rooms better because they keep the centre more open. Even then, enough room is still needed in front of the seating for people to sit, stand and move past without constant interruption.
A common mistake is placing benches too close to locker banks. This forces the locker access zone and the seating zone to overlap. Someone sitting down to change footwear should not block another person trying to open a locker directly opposite.
Bench ends also matter. If the end of a bench lands directly in a key route, it can act like a physical pinch point and slow everyone down.
Avoid pinch points near entrances and exits
Entrance areas are especially vulnerable to congestion because people pause there to orient themselves, wait for others, adjust clothing or decide where to go next. If lockers, hooks, benches or doors all compete for the same space, a bottleneck can form almost immediately.
A strong entrance zone should feel open enough for people to enter without stopping the flow behind them. That does not mean wasting space. It means making sure the first few steps into the room are not immediately obstructed by furniture or conflicting routes.
Exit routes deserve the same level of attention. In some settings, people leave carrying bags, sports kit or wet items, which naturally slows movement. Where possible, leaving the room should feel straightforward and separate enough from incoming traffic to prevent bunching.
Where a changing room connects to showers, toilets or poolside areas, transitions between zones should also be kept clear. Wet users moving one way and dry users moving another can easily create friction if the route is too narrow or poorly defined.
Think about peak-time behaviour, not ideal behaviour
Layouts often fail because they are designed around how people should use the room rather than how they actually use it. In reality, users stop suddenly, leave bags in awkward places, gather near friends, choose the nearest available locker and often move in groups.
School changing rooms may experience large groups arriving at once between lessons. Leisure settings may see bursts of traffic before and after classes. Workplace changing areas may fill rapidly around shift changes. These patterns all affect flow.
Designing for real behaviour means allowing extra tolerance in the layout. It means expecting open locker doors, temporary pauses and moments when several users want the same area at once. A room that only works when everyone moves perfectly and keeps every item tidy is not a robust design.
Create zones for different activities
One effective way to reduce congestion is to zone the room clearly. Instead of letting all activities happen everywhere, the layout can gently assign different functions to different areas.
For example, the entrance zone can focus on arrival and orientation. Locker zones can handle storage access. Bench zones can support seated changing. Wet transition zones can lead towards showers or pool access. When these areas are organised logically, users spread out more naturally and conflicts reduce.
Zoning does not need barriers or complex signage. Often, the furniture layout itself can create it. The direction of locker banks, the position of benches and the openness of main routes all help signal how the room is meant to work.
Good zoning also improves supervision and cleaning. Staff can identify busy sections more easily, and cleaning routines can be planned around areas that receive the most footfall.
Allow enough room for bags, kit and personal items
Traffic flow is affected not only by people but also by what they carry. A user with a gym bag, sports kit, coat or work gear takes up more room than a simple standing footprint. Once bags are placed on the floor or bench, the available route can narrow quickly.
This is particularly important in team sports, school PE environments and staff changing rooms where larger bags are common. The more equipment people bring into the room, the more valuable clear circulation routes become.
Storage design can help here. Lockers sized properly for the user group reduce the chance of overspill. Bench placement can also limit whether bags spill into main routes. In some cases, hooks, shelves or dedicated kit areas may support better movement by keeping bulky items off the floor.
Simple ways to improve an existing layout
Not every site can rebuild its changing room from scratch, but many traffic flow issues can still be improved. Small adjustments often make a noticeable difference.
- move benches away from locker fronts where possible
- remove unnecessary furniture or clutter from main walkways
- reassign the most convenient lockers to spread use more evenly
- review whether door swings or access points are creating avoidable bottlenecks
- use signage or numbering to guide people more clearly through the room
- adjust cleaning and storage routines so equipment is not left in circulation areas
Even a modest change in furniture position can open up a route that previously felt blocked. The key is to look at how the room behaves in use, not just how it appears when empty.
Signs that a changing room has a traffic flow problem
Some problems are obvious. Others build up gradually and are accepted as normal. A layout may need reviewing if users regularly queue to access lockers, if aisles become blocked when a few doors are open, or if bench areas feel crowded even when the room is not at full capacity.
Frequent scuffing, dirt build-up in pinch points, damaged locker doors and repeated complaints about cramped conditions can all indicate a flow issue. Staff may also notice that certain sections of the room are always busy while others are avoided.
These patterns are useful because they show where movement is clashing with layout. Once identified, they can often be addressed through better planning rather than simply adding more furniture.
Traffic flow should be part of changing room planning from the start
It is much easier to prevent congestion at the planning stage than to correct it later. A successful changing room layout considers how people move, where they stop, what they carry and how the space will behave at its busiest.
Lockers, benches and access routes should work together as part of one system. When that system is planned well, the changing room feels more spacious, more efficient and easier to manage. Users move through the room with less frustration, staff find it easier to maintain, and the facility performs better over time.
If you are reviewing a changing room layout, traffic flow should be one of the first things to assess. A room does not need to be large to work well, but it does need a layout that gives people enough room to move without constant conflict.
Explore our locker range, view our bench seating options, or browse the Total Locker Service blog for more guides on changing room planning, locker layout and storage design.
Discover more from Blog Total Locker Service
Subscribe to get the latest posts sent to your email.