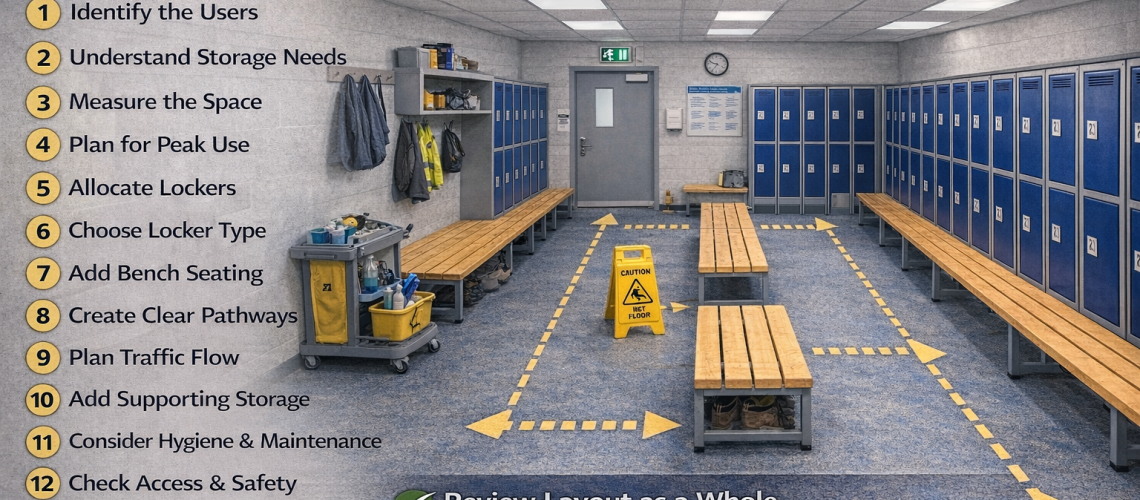
How to Design a Locker Room (Step-by-Step Guide)
April 13, 2026
Designing a locker room is not only about fitting in as many lockers as possible. A good layout needs to work for the people using it, the belongings they need to store and the way they move through the space every day. When the design is right, the room feels organised, practical and easy to maintain. When it is rushed, even a room with good products can become cramped, cluttered and awkward to use. If you want the wider overview first, start with our main guide to locker room design, then use this article as the practical planning framework.
That is why locker room design works best as a step-by-step process. Before choosing lockers, benches or accessories, it helps to understand the users, the environment and the demands the room will face at busy times. From there, you can make better decisions on layout, storage and long-term usability.
This guide explains how to design a locker room step by step, helping you create a space that is practical, efficient and suited to the site.
Step 1: Identify who will use the locker room
The first question is always who the room is for. A school changing room, workplace welfare area, public leisure facility and wet poolside changing room all have different needs. The user group affects almost every design decision that follows.
Think about whether the room will be used by staff, pupils, visitors, gym members or mixed user groups. Consider whether they are regular users who know the space well or first-time users who need a more intuitive layout. It also helps to understand how much privacy, supervision, accessibility and durability the environment is likely to require.
Once the user type is clear, the room becomes much easier to plan properly.
Step 2: Understand what needs to be stored
Locker rooms are shaped as much by storage needs as by floor area. Different users bring different items, and the design needs to reflect that. In one environment, the room may only need to store coats, bags and shoes. In another, it may need to handle uniforms, PPE, wet clothing, towels, toiletries or sports kit.
Do not assume a standard locker size will suit every project. Start by thinking about what users actually carry, what needs to hang and what may need to stay separate from other items. Storage planning becomes much stronger when it is based on real use rather than default assumptions.
Step 3: Measure the space properly
Before working on layout options, you need a clear understanding of the room itself. Measure the full footprint carefully and note anything that affects how the space can be used. This includes door positions, windows, columns, ceiling height, service points, radiators, drainage areas, wet zones and any awkward corners or obstructions.
It is also important to think beyond the room outline alone. The usable space may be more limited than the total footprint suggests once access routes, locker door clearance and bench circulation are taken into account.
If you need more detail on footprint and room dimensions, see our locker layout planning guide.
Step 4: Plan for peak use, not just average use
A common mistake in locker room design is planning for average occupancy instead of the busiest times. In reality, many locker rooms experience short periods of heavy demand. Shift changes, lesson changes, sports sessions and class start times can all create sudden pressure on the layout.
That means the room should be judged by how it performs when several people are using it at once. Consider how many users are likely to arrive together and whether they are carrying bulky items such as bags, boots or towels.
If you are still deciding how many users the room needs to support, our guide to locker capacity planning breaks that down in more detail.
Step 5: Decide how lockers will be allocated
Not all locker rooms use storage in the same way. Some have assigned lockers used by the same person every day. Others rely on shared or temporary-use lockers, especially in public and leisure settings. This choice affects layout, numbering and how users move through the room.
Assigned lockers often suit workplaces and staff areas because users know exactly where they are going. Shared lockers can work well in public environments, but they need a more intuitive arrangement because users will choose from what they see first.
Getting this right early helps prevent avoidable layout problems later.
Step 6: Choose the right locker type and size
With the storage needs and user pattern in mind, you can choose a locker format that suits the room. Full-height lockers, multi-door lockers, Z-lockers, specialist wet area lockers and workplace lockers all serve different purposes. The right answer depends on what needs to be stored and how the room is used.
Material choice matters as well. Steel lockers may suit many dry environments. Plastic lockers can be a strong option in wet or humid areas. The best product is not always the densest one. It is the one that supports the storage need without making the room harder to use.
Explore our locker range to compare practical options.
Step 7: Build the layout around use, not just products
Once you know who is using the room, what they need to store and how many users are likely to be present at busy times, you can start shaping the layout properly. Lockers, benches and access routes should work together rather than compete for the same floor area.
The aim is not to fit in the maximum number of items. It is to create a layout that still works when people are opening lockers, carrying bags and changing at the same time.
If you need more detailed guidance on room arrangement, see our locker layout planning guide.
Step 8: Review the room as a complete system
At this stage, step back and look at the room as a whole rather than as individual products. Check whether lockers, benches, routes and supporting features work together. Ask where clutter is likely to build up, where congestion may happen and which areas may wear fastest.
It can help to imagine a real user moving through the room from entry to exit. Where do they stop? What do they carry? What happens when several people do the same thing at once? This practical walk-through often reveals weaknesses that are easy to miss on a simple plan.
Step 9: Check the practical finish before installation
Once the products are installed, layout changes become harder and more expensive. That is why the final review matters so much. Adjusting locker runs, bench positions or access routes on paper is far easier than correcting them later in a fully fitted room.
Before signing off the design, make sure the room supports safe movement, sensible cleaning access and practical day-to-day use. If those checks raise concerns, refine the layout before installation rather than after it.
If you need a deeper look at upkeep or practical standards, see our guides to changing room cleaning and maintenance and locker room compliance in the UK.
A good locker room starts with good planning
Designing a locker room step by step helps avoid rushed decisions and creates a stronger result. The best rooms are shaped by the users, the storage need and the practical demands of layout and long-term use. They do not rely on fitting in the maximum number of lockers and hoping the rest works itself out.
When the design process starts with real use and moves through layout and product choice in a logical order, the finished room is more likely to stay practical and easy to manage. That benefits both the people using it and the site team responsible for keeping it in good condition.
If you are planning a new changing area or reviewing an existing one, a step-by-step approach is the best way to get the layout right before installation begins.
Explore our locker range, view our bench seating options, or browse the Total Locker Service blog for more guidance on locker room planning and changing room design.
Discover more from Blog Total Locker Service
Subscribe to get the latest posts sent to your email.