Workplace Changing Rooms: Staff Welfare and PPE Layouts
April 13, 2026
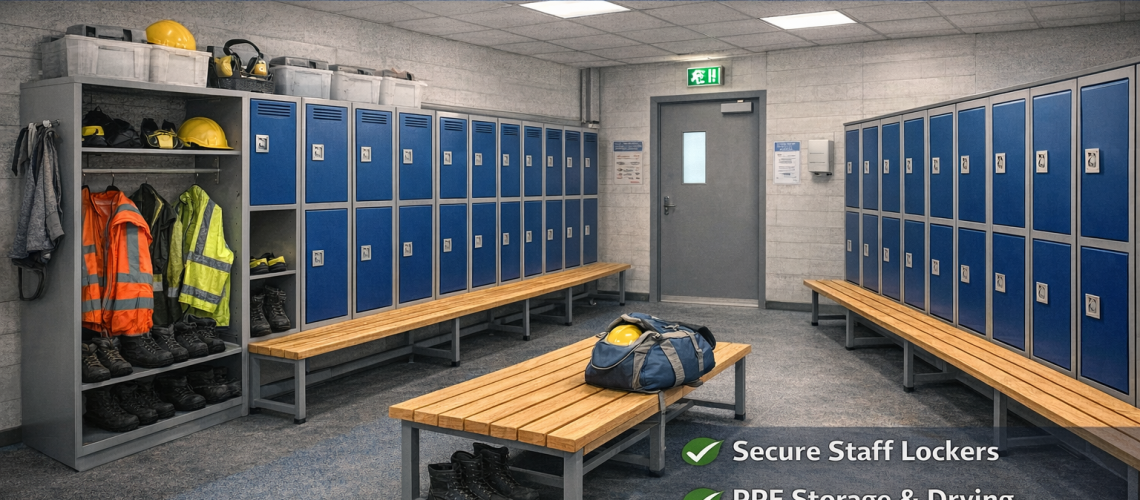
Workplace changing rooms support staff welfare, personal storage, uniforms, footwear and PPE while providing a practical transition between arriving at work and entering the working environment. The best changing rooms are planned around the real staff routine rather than simply filling the available walls with lockers.
A good layout gives employees enough space to store personal belongings, change clothing and footwear, access PPE and move through the room without unnecessary congestion. Where workwear becomes dirty, damp or otherwise needs to be kept apart from personal clothing, the locker arrangement and room layout should support that separation from the beginning.
This guide covers workplace changing rooms for factories, warehouses, engineering sites, transport depots, maintenance operations, healthcare staff areas, food-related workplaces and other commercial or industrial environments. For the wider workplace locker subject, see our Workplace Lockers UK guide.
Quick Answer: How Should a Workplace Changing Room Be Planned?
Start with the staff routine. Identify what employees arrive wearing, what they change into, what PPE they use, what they need to store and how many people use the room during the busiest shift change.
Then choose locker compartments large enough for those belongings, decide whether personal clothing and workwear need separating, include footwear and PPE storage, and arrange the lockers and benches around the actual movement through the room.
Finally, test the room with several lockers open, benches occupied and incoming and outgoing staff present together.
Plan the changing routine first. The locker configuration, benches, PPE storage and room layout should then support that routine.
What Does a Workplace Changing Room Need to Do?
A workplace changing room can perform several jobs at the same time:
- provide secure personal storage;
- give staff somewhere to change clothing;
- support changing into uniforms or workwear;
- provide somewhere to sit while changing footwear;
- store boots and other work footwear;
- organise personal PPE;
- support shared PPE storage where appropriate;
- help separate personal clothing from workwear;
- support clean and dirty routines where required;
- connect changing facilities with washrooms, showers or work areas;
- and remain practical to clean and maintain.
The exact combination depends on the workplace. A small office shower room may only need lockers, a bench and coat storage. A factory changing room may need uniforms, boots, helmets, workwear, personal belongings and a more structured changing sequence.
Step 1: Map the Staff Changing Routine
Before choosing products, follow the journey a member of staff makes through the changing area.
- Employee enters the staff or welfare area.
- They reach their locker.
- Coat, bag and personal belongings are stored.
- Personal clothing may be removed.
- Workwear or uniform is collected.
- Footwear may be changed.
- PPE is collected or put on.
- The employee continues towards the working area.
At the end of the shift, that sequence usually runs in reverse. Where used workwear, wet clothing or dirty PPE needs separate handling, the return route may require an additional collection, storage or changing stage.
This staff journey should influence where lockers, benches, boot storage and PPE facilities are positioned.
Step 2: Identify Everything Staff Need to Store
Locker selection should begin with the contents rather than a preferred door configuration.
| Item | Planning consideration |
|---|---|
| Coats and personal clothing | Check whether hanging space is required |
| Bags and backpacks | Measure realistic bag sizes and allow usable depth |
| Uniforms | Decide whether they are folded, hung or issued separately |
| Overalls and workwear | Consider hanging length and whether garments remain on site |
| Safety boots | Allow practical lower storage and consider dirt or moisture |
| Helmets and hard hats | Check useful width and depth |
| High-visibility clothing | May require hanging or folded storage |
| Gloves and smaller PPE | May suit shelving or smaller internal sections |
| Personal belongings | Do not forget phones, wallets, keys, lunch items and everyday belongings |
Do Not Let PPE Storage Replace Personal Storage
One of the easiest mistakes to make is to design the locker entirely around workwear and protective equipment.
Employees still arrive with ordinary belongings such as:
- coats;
- bags;
- phones;
- wallets;
- keys;
- lunch items;
- personal footwear;
- and clothing worn to and from work.
If the locker works perfectly for a uniform but leaves nowhere sensible for the employee’s bag or coat, the storage system is incomplete. Personal storage and work storage should be considered together.
Step 3: Choose a Locker Format for Uniforms, PPE and Personal Clothing
There is no single best locker format for every workplace changing room. Several configurations can work well depending on the stored items and the required separation.
Full-height lockers
Full-height single-user lockers provide generous internal space and can work well where employees need to store coats, hanging garments, uniforms, larger bags and workwear.
They are often a practical choice where each employee has a permanently assigned locker and where compartment capacity is more important than achieving the maximum number of users along a wall.
Two-tier lockers
Two-tier lockers provide two separate user compartments within a similar vertical footprint. They can increase capacity while retaining useful storage for bags, folded clothing and personal belongings.
Check the actual workwear first. A two-tier compartment may be completely adequate for one site and too small for another.
Split-compartment lockers
A divided locker can help keep different categories of belongings apart within one user space. For example, personal clothing may occupy one section while workwear or equipment is stored in another.
This can provide useful organisation where the workplace needs separation but does not require completely separate locker banks.
Z lockers
Z lockers can provide hanging space for more users within a given width than conventional full-height single-door lockers. They can be useful where garments need to hang but the room has limited wall space.
Dual-use or two-person arrangements
Some locker formats divide a physical cabinet so that more than one user receives structured storage within the same footprint.
These arrangements can improve room capacity, but they should only be selected where the resulting compartments still suit the clothing, footwear and PPE that each person needs to store.
Specialist PPE storage
Bulky helmets, respiratory equipment, heavy protective clothing or other specialist PPE may be better stored in purpose-designed cabinets or a dedicated equipment area rather than being forced into a standard personal locker.
For detailed workplace locker dimensions and placement, use the Workplace Locker Sizes and Layouts for Staff Areas guide.
Step 4: Plan Boot and Footwear Storage Properly
Protective footwear can consume a surprisingly large proportion of a locker compartment. Safety boots may also carry dirt, mud, moisture or debris from the working environment.
- Measure the actual footwear used.
- Check whether boots remain at work between shifts.
- Consider whether they should be kept away from personal clothing.
- Provide lower storage where appropriate.
- Include benches if staff change footwear regularly.
- Avoid leaving boots in aisles or beneath unsuitable furniture.
- Allow surrounding floors to be cleaned.
Dedicated boot compartments or separate footwear storage can sometimes provide a better arrangement than using a large part of the main personal compartment.
Step 5: Decide Whether Clean and Dirty Separation Is Required
Not every workplace changing room needs a formal clean and dirty system. Where separation is required by the site’s working process, hygiene arrangements or risk assessment, however, it should be built into the storage and room layout rather than added later.
Possible arrangements include:
- internally divided lockers;
- separate personal and workwear compartments;
- separate locker banks;
- dedicated boot storage;
- clean-uniform storage;
- used-workwear collection points;
- separate PPE storage;
- and defined clean and dirty areas within the changing room.
The important point is that staff can understand and follow the arrangement easily. An unnecessarily complicated system is more likely to be worked around in everyday use.
For detailed clean/dirty, wet/dry and PPE zoning, use the Locker Room Zoning Guide UK.
Step 6: Make PPE Easy to Store and Retrieve
PPE storage should support the point in the working routine where equipment is needed.
Consider:
- whether PPE is personal or shared;
- whether it remains on site;
- where staff put it on;
- where they remove it;
- whether it becomes wet or dirty;
- whether it needs drying;
- whether some items need hanging;
- and whether the equipment is too large for a standard locker.
If the changing room does not provide sensible PPE storage, helmets, jackets, boots and other equipment often migrate onto benches, locker tops and walkways.
PPE should therefore be included in the original room plan rather than treated as an accessory once the lockers are installed.
Step 7: Decide Whether Changing-Room Lockers Are Assigned or Shared
Assigned storage is common where employees attend regularly and keep approved uniforms, workwear, footwear or personal equipment on site.
A permanently assigned locker can make the routine simple because the same user returns to the same compartment each shift.
Shared lockers may still suit some workplaces, but they work best where compartments are genuinely emptied and released between users.
| Locker arrangement | Can suit | Main consideration |
|---|---|---|
| Assigned | Regular employees with uniforms, PPE or belongings kept on site | Each allocated user normally requires a suitable compartment |
| Shared / temporary use | Temporary users or lighter day storage | Lockers must be cleared and released reliably |
| Mixed | Permanent staff plus contractors, visitors or temporary workers | Different groups may need separate arrangements |
For workplace capacity calculations, use How Many Workplace Lockers Do You Need?
Step 8: Choose a Lock System That Works at Shift Change
Locker security matters, but staff also need quick and predictable access at the beginning and end of a shift.
| Lock type | Can suit | Management consideration |
|---|---|---|
| Key lock | Assigned lockers | Replacement keys and master-key procedures |
| Padlock fitting | User-managed locking | Lost or abandoned padlocks |
| Mechanical combination lock | Assigned or selected shared arrangements | Forgotten codes and reset procedures |
| Electronic or RFID lock | Larger managed installations | Credentials, administration, batteries or power and override access |
For detailed lock selection, use Best Lock Options for Workplace Lockers or browse our locker lock range.
Step 9: Include Bench Seating Before Fixing Locker Positions
Bench seating is particularly important where employees change workwear or footwear.
The bench footprint alone does not represent the space it occupies in use. Staff also need room for legs, feet, belongings and standing up.
- Keep benches clear of locker door swing.
- Avoid placing seating directly across main entrances.
- Allow users to stand after changing.
- Keep bench ends away from narrow routes.
- Allow several users to change at busy times.
- Provide cleaning access around or beneath benches.
For detailed bench clearances, use the Bench Spacing and Clearance Guide UK.
Step 10: Design Around Peak Shift Changes
The busiest period is often more important than average room occupancy.
During a shift change, staff may simultaneously:
- open lockers;
- remove bags and personal clothing;
- sit on benches;
- change boots;
- put on or remove uniforms;
- handle PPE;
- and move towards or away from the workplace.
Incoming and outgoing shifts may also overlap for a short period. A room that works comfortably for 20 users at most times can become difficult if 40 people briefly need access together.
Test the layout during that busiest realistic period. For detailed congestion planning, use the Locker Room Traffic Flow and Congestion Planning Guide.
Step 11: Position the Lockers Around Staff Movement
The locker bank should fit the room physically and operationally.
- Keep entrances reasonably clear.
- Avoid putting the busiest lockers immediately beside narrow doorways.
- Include locker depth.
- Check open locker doors.
- Allow users to stand at the lockers.
- Include bench seating in the original plan.
- Keep routes to showers, washrooms and exits usable.
- Position PPE storage where staff naturally need it.
- Keep building services accessible.
- Check opposing locker banks during simultaneous use.
For workplace-specific dimensions and placement, use the Workplace Locker Sizes and Layouts for Staff Areas guide.
For detailed aisle planning, use the Locker Aisle Width and Spacing Guide UK.
Step 12: Plan for Dirt, Moisture, Cleaning and Maintenance
Changing rooms serving uniforms, boots and PPE can be harder-working environments than ordinary personal locker areas.
Dust, mud, moisture and wet clothing can all influence the choice of furniture and layout.
- Can floors around the locker banks be cleaned?
- Can areas beneath benches be reached?
- Are narrow dirt traps being created between units?
- Can locks be replaced?
- Can hinges and doors be adjusted?
- Can ventilation grilles remain clear?
- Can wet clothing or footwear dry appropriately?
- Can damaged components be reached for repair?
Locker ventilation can help in some applications, but ventilated doors are not a replacement for suitable room ventilation or a proper drying arrangement where wet equipment is routinely stored.
PPE and Changing-Room Priorities by Workplace Type
| Workplace | Typical storage | Main priority |
|---|---|---|
| Factory | Uniforms, overalls, boots, PPE and personal clothing | Durability, shift use and appropriate clothing separation |
| Warehouse / logistics | High-visibility clothing, footwear, coats, bags and PPE | Shift flow and sufficient compartment size |
| Engineering / maintenance | Workwear, dirty outerwear, boots and PPE | Robust storage, cleaning and practical separation |
| Facilities and cleaning teams | Uniforms, footwear, PPE and personal belongings | Simple workwear organisation and easy cleaning |
| Food-related workplace | Personal clothing, footwear and work garments | Storage arranged around the site’s hygiene procedures |
| Healthcare staff area | Uniforms and personal belongings | Practical staff changing routine and controlled storage |
| Transport depot | Uniforms, outerwear, bags, boots and PPE | Shift patterns, durability and sufficient storage volume |
Smaller Details That Improve Staff Changing Rooms
Not every site needs every accessory, but small details can improve daily use substantially.
- Clear locker numbering
- Coat hooks
- Mirrors
- Boot racks or lower storage
- Shelves
- Waste bins
- Dirty-workwear collection points
- Drying areas where required
- Clear identification for separate staff groups
- A practical temporary location for bags while changing
These features should support the room’s normal routine rather than simply fill unused wall or floor space.
Common PPE and Workplace Changing Room Mistakes
- Choosing standard personal lockers without considering uniforms or PPE.
- Forgetting ordinary personal belongings while planning workwear storage.
- Choosing compartments that are too small for boots or helmets.
- Ignoring hanging requirements.
- Using more tiers simply to increase the locker count.
- Failing to separate clothing where the workplace process requires it.
- Making the clean/dirty arrangement too complicated for practical daily use.
- Assuming all PPE should be stored inside personal lockers.
- Failing to provide sensible boot storage.
- Using shared lockers where equipment is intended to remain permanently assigned.
- Ignoring shift-change overlap.
- Adding benches after the locker layout has been fixed.
- Putting PPE, bags or footwear into circulation routes.
- Fitting too many locker banks into the available changing space.
- Ignoring cleaning, maintenance and drying requirements.
Step-by-Step Workplace Changing Room Planning Process
- Identify every staff group using the changing room.
- Map what staff do when they arrive and leave.
- List personal belongings.
- List uniforms and workwear.
- List footwear and PPE.
- Identify any items that need hanging space.
- Decide whether personal and work clothing need separation.
- Decide whether lockers are assigned or shared.
- Calculate the required locker capacity.
- Choose suitable locker compartment formats.
- Plan boots and specialist PPE storage.
- Measure the complete room.
- Establish any clean/dirty or wet/dry zones required.
- Position the main locker banks.
- Add bench seating.
- Check locker-door operation.
- Check aisle and circulation space.
- Test the room during shift change.
- Choose the lock system.
- Check cleaning, ventilation and maintenance access.
- Review the complete staff journey before ordering.
Workplace Changing Room Sign-Off Checklist
- Have all staff groups been identified?
- Do you know what personal belongings staff bring?
- Do you know what uniforms or workwear they store?
- Has PPE been measured?
- Has protective footwear been included?
- Is hanging space required?
- Are locker compartments large enough?
- Does personal clothing need separating from workwear?
- Are dedicated clean and dirty areas required?
- Are lockers assigned or shared?
- Has the required user capacity been calculated?
- Has shift overlap been considered?
- Is PPE stored close to where staff need it?
- Are benches included?
- Can locker doors open while benches are occupied?
- Can staff move through the room at peak use?
- Are boots kept out of circulation routes?
- Can floors and furniture be cleaned?
- Can wet clothing or equipment dry where necessary?
- Can locks and locker doors be maintained?
- Does the complete changing sequence make sense?
Related Workplace Locker and Changing Room Guides
- Workplace Lockers UK: Staff Storage, Security, Compliance and Layout Guide
- Workplace Locker Sizes and Layouts for Staff Areas
- How Many Workplace Lockers Do You Need?
- Locker Room Zoning Guide UK
- Bench Spacing and Clearance Guide UK
- Locker Aisle Width and Spacing Guide UK
- Locker Room Traffic Flow and Congestion Planning
- Best Lock Options for Workplace Lockers
- Locker Installation Planning UK
Workplace Changing Room and PPE Locker FAQs
What should a workplace changing room include?
The requirements depend on the workplace, but a staff changing room may include lockers, bench seating, footwear storage, PPE storage, hooks, mirrors and access to washing or shower facilities. The room should be planned around the actual staff routine.
What are PPE lockers used for?
PPE lockers provide organised storage for protective clothing, footwear and equipment. Depending on the workplace, they may also help keep PPE separate from personal belongings, ordinary clothing or other stored items.
Are standard staff lockers suitable for uniforms and PPE?
Sometimes, but not always. A standard personal locker may be too small where staff need space for safety boots, helmets, hanging garments, bulky PPE or separate storage zones. The compartment should be chosen from the actual items being stored.
What is a split-compartment locker?
A split-compartment locker divides the user’s storage space into separate internal areas. This can help organise personal clothing, workwear, footwear or equipment where keeping different items apart is useful.
Do uniform lockers need clean and dirty separation?
Not every workplace requires the same arrangement. Where the site’s working process, hygiene controls or risk assessment requires clean and dirty items to remain separate, that separation should be incorporated into the locker and changing-room design.
Should staff lockers include space for personal belongings as well as PPE?
Yes, where employees bring personal belongings into the workplace. Coats, bags, phones, wallets, personal clothing and lunch items still need sensible storage even where uniforms and PPE are the main focus of the changing room.
Should PPE and uniform lockers be assigned or shared?
Assigned lockers often suit regular staff who keep uniforms, workwear or authorised equipment on site. Shared lockers can work where compartments are completely emptied and released between users. The arrangement should follow the actual workplace routine.
How should safety boots be stored in a changing room?
Safety boots need sufficient space and should be considered during locker selection. Depending on the site, they may be stored in the main compartment, a lower section, dedicated footwear storage or a separate boot area.
Do workplace changing rooms need benches?
Benches are particularly useful where staff change footwear or clothing. They should be incorporated into the original layout so that seated users do not block locker doors or important circulation routes.
What is the biggest mistake when planning PPE lockers?
A common mistake is selecting a standard locker before defining the real storage requirement. PPE, boots, uniforms, personal clothing, bags and the changing routine should be understood first, then the locker format can be chosen around them.
Plan PPE, Uniforms and Personal Storage as One Changing-Room System
A workplace changing room works best when personal storage, uniforms, footwear and PPE are planned together. Employees should have enough room for what they bring to work, what they change into and what they need during the working day.
Start with the staff routine, identify every stored item, choose locker formats that provide suitable capacity and separation, then integrate footwear storage, benches, PPE, circulation, cleaning and shift-change use.
For product options, compare our commercial lockers for workplaces, factories, warehouses and staff changing rooms.
For help planning a workplace changing room, call Total Locker Service on 01284 749211 or email sales@totallocker.co.uk.
Discover more from Blog Total Locker Service
Subscribe to get the latest posts sent to your email.