Locker and Bench Positioning: How to Plan Efficient Layouts
April 13, 2026
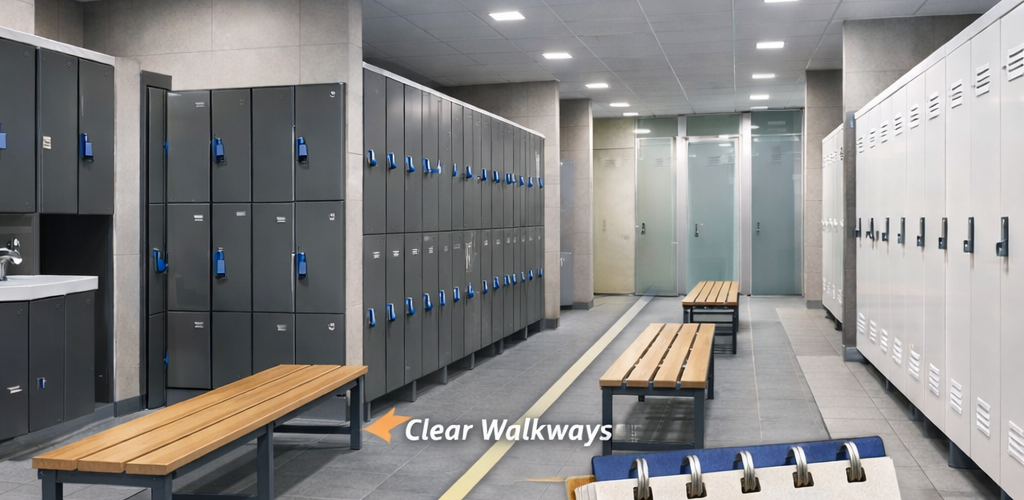
Locker and bench positioning plays a major role in how a changing room works. Even with the right number of lockers and good quality seating, poor placement can lead to congestion, awkward movement and inefficient use of space.
Good positioning creates a layout that feels natural to use. Users can move easily, access lockers without obstruction and sit comfortably while changing. Cleaning becomes easier, and the entire space works more efficiently.
This guide explains how to position lockers and benches properly, helping you design layouts that balance storage, seating and movement.
For a full overview of layout planning, see our locker room design UK guide.
Why positioning matters
The placement of lockers and benches directly affects how people interact with the space. Poor positioning can create bottlenecks, reduce access and make the room feel cramped, even if the overall size is sufficient.
- improves user flow and movement
- reduces congestion at busy times
- ensures lockers are easy to access
- provides comfortable changing space
- supports cleaning and maintenance routines
Positioning is not just about fitting items into a room. It is about making the space work in practice.
Start with movement and flow
Before placing lockers or benches, consider how users will move through the space. Movement routes should feel natural and unobstructed, even during peak periods.
Think about:
- entry and exit points
- main walkways through the room
- areas where users are likely to gather
- access routes to lockers and seating
Once movement paths are clear, lockers and benches can be positioned around them.
For more on space planning, see our locker room size and layout guide.
Positioning lockers effectively
Lockers are usually the dominant feature in a changing room, so their placement sets the structure for the rest of the layout.
Common approaches include:
- placing lockers along walls to maximise central space
- using back-to-back locker banks in larger rooms
- creating rows with clear access on both sides
When positioning lockers, ensure there is enough space for doors to open and for users to stand comfortably while accessing them.
To determine how many lockers you need, see our locker capacity planning guide.
Positioning benches for usability
Benches should support the natural use of lockers without blocking access or movement. Poorly placed benches often become obstacles rather than useful features.
Effective bench positioning should:
- align with locker rows where possible
- allow users to sit without blocking walkways
- provide space for changing footwear and clothing
- support easy access to nearby lockers
Explore our changing room bench guide for more detail on seating options.
Clearances between lockers and benches
The space between lockers and benches is critical. Too little space creates congestion, while too much can waste valuable floor area.
When planning spacing, consider:
- room for locker doors to open fully
- space for users standing at lockers
- clearance for seated users on benches
- walking space for others passing through
This balance ensures that all elements can be used at the same time without conflict.
Parallel vs central bench layouts
Bench positioning often follows two main patterns.
Parallel layouts place benches alongside locker rows. This keeps seating close to storage and works well in many standard layouts.
Central layouts place benches in the middle of the room, with lockers around the perimeter. This can improve flow in larger spaces and reduce crowding along walls.
The best option depends on room size, shape and usage patterns.
Avoiding common positioning problems
Several issues appear when lockers and benches are positioned without considering how the space will be used.
- benches blocking locker access
- narrow walkways between locker rows
- crowded areas near entrances
- poor alignment between seating and storage
- unused or awkward dead space
These problems can make the room feel smaller and less efficient than it actually is.
Adapting positioning to different environments
Locker and bench positioning should reflect the environment.
Schools and colleges
Layouts should handle large groups at once, with clear movement paths and easy supervision.
Workplaces
Positioning should support staff routines, including changing into workwear and storing personal items.
Gyms and leisure facilities
Layouts should allow quick access and smooth turnover, with minimal congestion during busy periods.
Industrial environments
More space may be needed for PPE, larger lockers and heavier-duty seating.
Positioning and cleaning access
Layout decisions also affect how easy the space is to clean. Tight gaps and awkward positioning can make maintenance difficult.
Good positioning should:
- allow access around and beneath benches
- avoid trapping dirt in hard-to-reach areas
- support regular cleaning routines
See our locker room cleaning guide for more detail.
A simple positioning checklist
Before finalising your layout, check:
- Are walkways clear and wide enough?
- Can locker doors open without obstruction?
- Is there enough space to sit comfortably on benches?
- Do lockers and benches work together logically?
- Can the space be cleaned easily?
- Does the layout handle peak usage?
This helps ensure the layout works in practice.
Final thoughts on locker and bench positioning
Effective positioning is about more than fitting lockers and benches into a space. It is about creating a layout that supports movement, usability and long-term performance.
When lockers and benches are positioned correctly, the entire changing room becomes easier to use, easier to maintain and better suited to everyday demands.
“`
Discover more from Blog Total Locker Service
Subscribe to get the latest posts sent to your email.