How to Plan the Best Locker Layout for Schools, Workplaces and Changing Rooms
April 10, 2026
Choosing the right lockers is only part of the job. Layout matters just as much. A locker bank can look correct on paper and still work badly in practice if spacing, positioning and flow have not been planned properly. Good locker layout helps people move easily through the area, find their storage quickly and use the space without congestion.
Poor layout creates bottlenecks, reduces comfort and makes the storage system feel less effective. That is why planning should go beyond product selection. Room size, entry points, user numbers and storage type all influence how lockers should be arranged.
This guide explains how to plan locker layouts in practical terms. For a broader overview of lockers, including types, materials and lock options, see our main pillar page.
Why locker layout matters
Locker layout affects how the entire space functions. Limited access space, blocked walkways or poor positioning can make even high-quality lockers difficult to use.
- improves movement through the space
- reduces congestion at peak times
- supports safer access
- makes cleaning easier
- improves overall user experience
Peak usage is often the most important test. Schools, offices and gyms all experience short bursts of heavy use, so layout must work under pressure.
Start with how the space is used
Effective layout planning begins with movement patterns rather than furniture placement. Understanding how people enter, move and exit the space helps prevent design issues later.
- Where do users enter and exit?
- Which routes are busiest?
- Will users gather in one area?
- Do doors block walkways?
- Is there space to pause without congestion?
Main factors that shape locker layout
User numbers
Higher user numbers increase pressure on space, especially during peak times. Layout should allow for realistic usage rather than average occupancy.
Door opening space
Users need enough room to open doors and access contents comfortably. Tight spacing can quickly create frustration.
Walkways and circulation
Clear routes are essential. Lockers placed too close to main walkways can block movement and create bottlenecks.
Benches and changing areas
In changing rooms, lockers must work alongside seating and space for changing. Ignoring this often leads to poor usability.
Cleaning and maintenance
Layouts should allow easy access for cleaning and maintenance. Avoid tight gaps and inaccessible areas.
Visibility and supervision
Clear sightlines are important in schools and public spaces. Avoid hidden corners where supervision is limited.
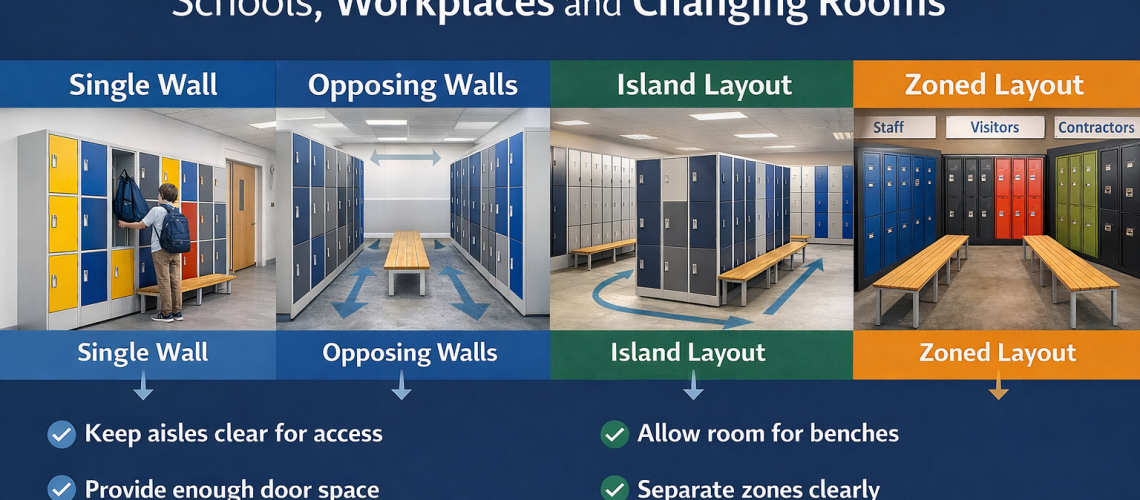
Common locker layout types
Single wall layout
Lockers positioned along one wall provide a simple and effective solution. This works well in corridors and smaller rooms.
Opposing wall layout
Lockers on both sides increase capacity but require sufficient aisle width to avoid congestion.
Island layout
Back-to-back lockers in the centre maximise capacity in larger spaces. Proper spacing is essential to prevent crowding.
Zoned layout
Separating lockers into zones for different user groups improves organisation and usability.
Locker layout for schools
School layouts must prioritise corridor flow and quick access between lessons. Wall-mounted locker runs are often the most effective solution.
See Best Lockers for High Schools for more detail.
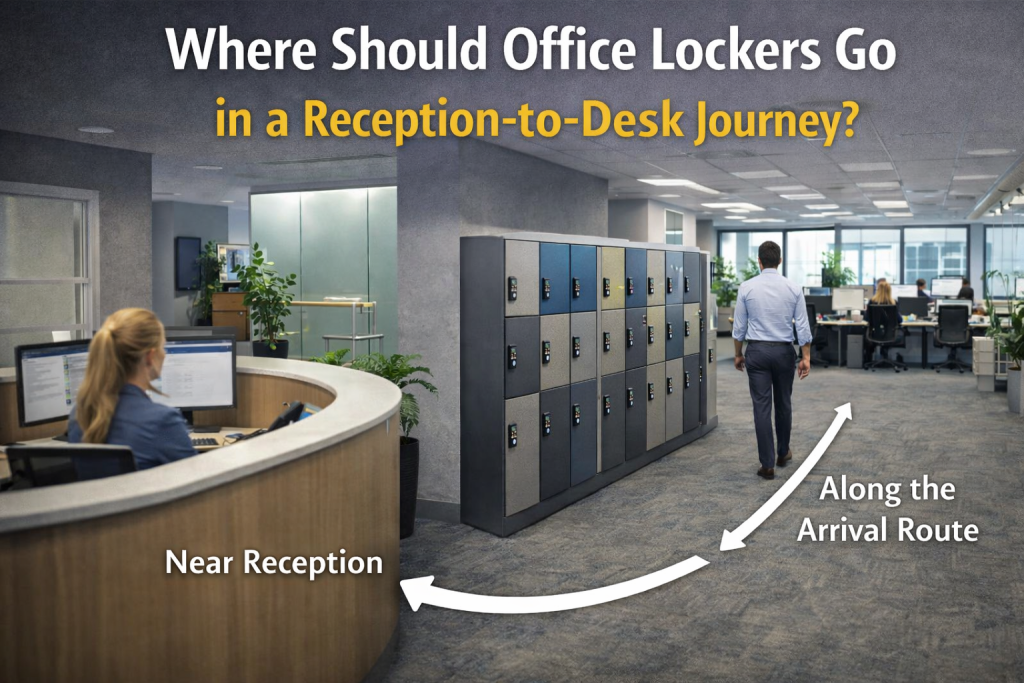
Locker layout for workplaces
Workplace layouts should support daily routines, especially in hybrid environments where lockers are used at key times of day.
Read Workplace Locker Guide and Hybrid Locker Zones for further guidance.
Locker layout for changing rooms
Changing rooms require more space for movement, seating and storage. Layout should allow comfortable use during busy periods.
Consider Z lockers where hanging space is needed.
Locker layout for industrial settings
Industrial layouts often need to support welfare routines and equipment storage. Space for larger items and separation of use is important.
Explore wire mesh lockers and garment lockers for suitable options.
Spacing and aisle planning
Allow enough space for users to stand, open doors and move around comfortably. Underestimating this is one of the most common layout mistakes.
Common mistakes to avoid
- focusing only on maximum locker numbers
- ignoring peak-time usage
- blocking main walkways
- forgetting seating or support features
- treating all users the same
Questions to ask before finalising layout
- How many users will access lockers at once?
- Where are the busiest areas?
- Is there enough door clearance?
- Are different user groups separated?
- Can the layout adapt in the future?
Final thoughts
The best locker layout supports movement, reduces congestion and improves usability. Planning around real behaviour rather than just fitting units into space leads to better long-term results.
Explore the full locker range to start planning your layout effectively.
“`
Discover more from Blog Total Locker Service
Subscribe to get the latest posts sent to your email.